Hello ROS developers! In this post lets’ see how to create and test a publisher in ROS2 using Python (rclpy).
I break it down into “5 easy steps”, let’s see one by one:
- Create a Python-based package in ROS2.
- Create the python code for your publisher.
- Edit
package.xml. - Replace
CMakeLists.txtwithsetup.py. - Run and test your python code in ROS2.
Let’s go!
1. Create a Python-based package in ROS2
At this point, I’m taking for granted that you already have the following in place:
- Your ROS2 is installed and running. (Don’t have this? No issues, you can spin a free ROS2 development environment at ROSDS. No installation required, just a few clicks and you will have a fully-functional ROS2 installation within your browser.)
- You have created a ROS2 workspace. Need help on this? See this tutorial.
Once you have crossed the two bridges above, you just need to run this command from the src folder of your ROS2 workspace:
~/ros2_ws/src$ ros2 pkg create ro2_pub_py
Here the name of the package is ros2_pub_py, and our workspace directory is ros2_ws. Feel free to name yours differently.
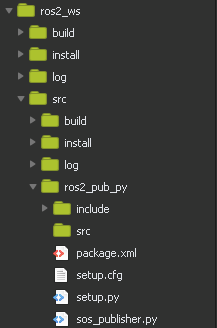
The final structure of your project should look something like this (when you have completed all steps):
Easy Step 1 done!
2. Create the python code for your publisher
Yes, you guessed right, we must write the publisher in Python, since this post says “using Python”. ROS2 official repo provides 3 different ways with examples on how to write the Python code.
In this post, we will use the “local function” method because…I like it and get to decide here :)…kidding…I think it’s still somewhat ROS1-like while showcasing the differences in ROS2. Take home bonus: try ‘translating’ the code into the “old school” and “member function” variants.
Enough small talk, let’s do the work! Create Python file located at `~/ros2_ws/src/ro2_pub_py/sos_publisher.py`. Here’s the code:
# Copyright 2016 Open Source Robotics Foundation, Inc.
#
# Licensed under the Apache License, Version 2.0 (the "License");
# you may not use this file except in compliance with the License.
# You may obtain a copy of the License at
#
#     http://www.apache.org/licenses/LICENSE-2.0
#
# Unless required by applicable law or agreed to in writing, software
# distributed under the License is distributed on an "AS IS" BASIS,
# WITHOUT WARRANTIES OR CONDITIONS OF ANY KIND, either express or implied.
# See the License for the specific language governing permissions and
# limitations under the License.

import rclpy

from std_msgs.msg import String


def main(args=None):
    rclpy.init(args=args)

    node = rclpy.create_node('sos_publisher')
    publisher = node.create_publisher(String, 'sos')

    msg = String()

    def timer_callback():
        msg.data = 'ObiWan Kenobi, please help me. You\'re my only hope'
        node.get_logger().info('Publishing sos message: "%s"' % msg.data)
        publisher.publish(msg)

    timer_period = 0.5  # seconds
    timer = node.create_timer(timer_period, timer_callback)

    rclpy.spin(node)

    # Destroy the timer attached to the node explicitly
    # (optional - otherwise it will be done automatically
    # when the garbage collector destroys the node object)
    node.destroy_timer(timer)
    node.destroy_node()
    rclpy.shutdown()


if __name__ == '__main__':
    main()
A few notes about the code above:
- The statement
import rclpyimports the ROS2 Python module. This is equivalent toimport rospyin ROS1. - The statement
from std_msgs import Stringimports the type of message the publisher uses. Basically no change from ROS1. - The statements from
rclpy.init(args=args)topublisher = node.create_publisher(String, 'sos')initialize the ROS2 Python module and create a nodesos_publisherpublishing to the topicsos. Did you notice the subtle differences in how this is achieved in ROS1? - The variable
timerprovides similar functionality asrospy.Rate()in ROS1, providing the frequency at which a particular code block is repeated.
Next!
3. Edit package.xml
Actually, this step is technically part of creating the Python package, because the changes we are doing here is just indicating that it’s a Python package. But I wanted to call this out separately because I think it’s an important step.
Now, the original package.xml should look something like this after creating the package:
<?xml version="1.0"?>
<?xml-model href="http://download.ros.org/schema/package_format2.xsd" schematypens="http://www.w3.org/2001/XMLSchema"?>
<package format="2">
  <name>ros2_pub_py</name>
  <version>0.0.0</version>
  <description>TODO: Package description</description>
  <maintainer email="user@todo.todo">user</maintainer>
  <license>TODO: License declaration</license>

  <buildtool_depend>ament_cmake</buildtool_depend>

  <test_depend>ament_lint_auto</test_depend>
  <test_depend>ament_lint_common</test_depend>

  <export>
    <build_type>ament_cmake</build_type>
  </export>
</package>
Change to the following, following the example given in the official repo:
<?xml version="1.0"?>
<?xml-model href="http://download.ros.org/schema/package_format2.xsd" schematypens="http://www.w3.org/2001/XMLSchema"?>
<package format="2">
  <name>ros2_pub_py</name>
  <version>0.0.0</version>
  <description>TODO: Package description</description>
  <maintainer email="user@todo.todo">user</maintainer>
  <license>Apache License 2.0</license>

  <exec_depend>rclpy</exec_depend>
  <exec_depend>std_msgs</exec_depend>

  <!-- These test dependencies are optional
  Their purpose is to make sure that the code passes the linters -->
  <test_depend>ament_copyright</test_depend>
  <test_depend>ament_flake8</test_depend>
  <test_depend>ament_pep257</test_depend>
  <test_depend>python3-pytest</test_depend>

  <export>
    <build_type>ament_python</build_type>
  </export>
</package>
You can spot the differences, right? Great, next step!
4. Replace CMakeLists.txt with setup.py
Similar to step 3 above, this is also something that’s related to package creation that I decided to call out separately. These steps are necessary because as of now ROS2 package creator does not yet support Python-based packages out of the box (the package.xml and CMakeList.txt are created for a C-based package by default). Hopefully, a future release would make these steps unnecessary.
Not in some many words:
- Delete
CMakeList.txt; we don’t need it here. - Add a
setup.pyproperly configured for the package and python program.
Here you go, following the official example:
from setuptools import setup

package_name = 'ros2_pub_py'

setup(
    name=package_name,
    version='0.0.0',
    packages=[],
    py_modules=[
        'sos_publisher',
    ],
    install_requires=['setuptools'],
    zip_safe=True,
    author='user',
    author_email="user@todo.todo",
    maintainer='user',
    maintainer_email="user@todo.todo",
    keywords=['ROS', 'ROS2'],
    classifiers=[
        'Intended Audience :: Developers',
        'License :: OSI Approved :: Apache Software License',
        'Programming Language :: Python',
        'Topic :: Software Development',
    ],
    description='TODO: Package description.',
    license='Apache License, Version 2.0',
    tests_require=['pytest'],
    entry_points={
        'console_scripts': [
            'sos_publisher = sos_publisher:main',
        ],
    },
)
Also, add a setup.cfg file to the same location as setup.py:
[develop]
script-dir=$base/lib/ros2_pub_py
[install]
install-scripts=$base/lib/ros2_pub_py
Done here. Last step!
5. Run and test your python code in ROS2
Now time to ros2 run your code, but not so fast! Before we become ros2-run-happy, we need to take care of some basic things so that we don’t have bad surprises.
In your ROS2 workspace directory, run:
~/ros2_ws$ colcon build
Yes, we need to rebuild the package, after all those changes.
Also, we need to run:
~/ros2_ws$ source install/setup.bash && source install/local_setup.bash
And then you’re ready for ros2-run:
ros2 run ros2_pub_py sos_publisher
You should see output similar to:
~/ros2_ws$ ros2 run ros2_pub_py sos_publisher
[INFO] [sos_publisher]: Publishing sos message: "ObiWan Kenobi, please help me. You're my only hope"
[INFO] [sos_publisher]: Publishing sos message: "ObiWan Kenobi, please help me. You're my only hope"
[INFO] [sos_publisher]: Publishing sos message: "ObiWan Kenobi, please help me. You're my only hope"
[INFO] [sos_publisher]: Publishing sos message: "ObiWan Kenobi, please help me. You're my only hope"
...
From another terminal, run the following commands and check the output:
~$ ros2 node list
/sos_publisher
~$ ros2 topic list
/parameter_events
/sos
~$ ros2 topic echo /sos
data: ObiWan Kenobi, please help me. You're my only hope

data: ObiWan Kenobi, please help me. You're my only hope

data: ObiWan Kenobi, please help me. You're my only hope
And we’re all done!
Final take away
I hope you found this post useful. I would suggest that you try following the post and creating your package from scratch, but in case you want to have a sneak-peek at the code used for this post, you can find it here: https://rds.theconstructsim.com/r/bayodesegun/ros2_demo_4698/.
Keep pushing your ROS2 learning!


Just tried it and there are three problems with this code:
1.) Your setup.py has a none python line (line 2)
2.) You forgot to add that the source code is either not in /src or line 8 is wrong. The correct way seems to be:
py_modules=[
‘src/sos_publisher’,
],
(I couldn’t believe that either but I tried it any other way and apparently you need to state the src folder)
3.) You do not even mention that ROS2 is trying to object orient everything. I know that some people are not down for this but at least mention it somewhere.
Do you python code for publishing and subscribing to pointcloud
Do you ros2 python code for publishing and subscribing to pointcloud