Did you like this video? Do you have questions about what is explained? Whatever the case, please leave a comment on the comments section below, so we can interact and learn from each other.
If you want to learn about other ROS topics, please let us know on the comments area and we will do a video about it 🙂
In the post, you will learn how to create a C++ subscriber to a custom msg array published with Python publisher. This answers the following question on the ROS Answers forum: https://answers.ros.org/question/324325/how-to-use-c-subscribe-to-a-custom-msg-array-published-by-python/.
Use the ROS Development Studio (ROSDS), an online platform for developing for ROS within a PC browser. Easy-peasy. I’m using this option for this post.
Once you log in, click on the New ROSject button to create a project that will host your code. Then Click on Open ROSject to launch the development/simulation environment.
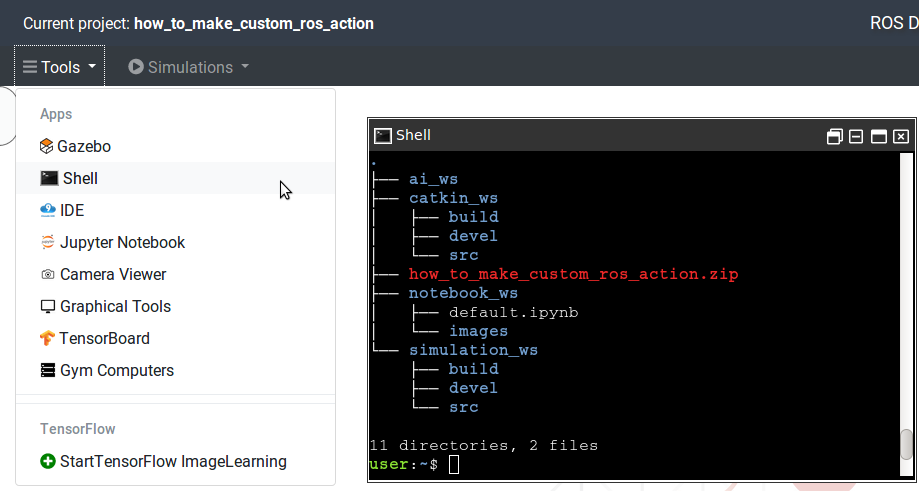
To open a “terminal” on ROSDS, pick the Shellapp from the Tools menu.
You can find the IDE app on the Tools menu.
You have ROS installed on a local PC. Okay, skip to Step 2.
Next step!
Step 1: Create the custom messages
Err, not so fast! We need to create a package first. So, open a terminate, browse to your catkin workspace source directory and create the package and some of the files we will need for the custom messages. Note that when creating the package, we added both rospy and roscpp because we will be working with C++ and Python source codes.
cd ~/catkin_ws/src
catkin_create_pkg cpp_python roscpp rospy
cd cpp_python
mkdir -p msg
touch InfoData.msg
touch InfoDataArray.msg
Now open the IDE and locate the open both message files in the msg subdirectory of the package. In InfoData.msg, paste in the following:
int32 num
string color
string name
Put this in InfoDataArray.msg:
InfoData[] infos
Add the following lines to your CMakeLists.txt and package.xml in order to recognize the custom messages:
CMakeLists.txt:
1. Find the existing add_message_files directive, uncomment it, and change it to the following:
# make sure you run this from the root of your catkin workspace (e.g catkin_ws)
catkin_make
Source the workspace:
# make sure you run this from the root of your catkin workspace (e.g catkin_ws)
source devel/setup.bash
Step 2: Create the Python publisher node
Create a python file in the src folder and make it executable
roscd cpp_python
cd src
touch infodata_publisher.py
chmod +x infodata_publisher.py
Using the IDE, paste in the following code
#! /usr/bin/env python

import rospy # import the ros Python api
from cpp_python.msg import InfoData, InfoDataArray # import the custom messages

rospy.init_node('infodata_publisher_node') # create a node to run the publisher
pub = rospy.Publisher('/infodata', InfoDataArray, queue_size=1) # create the publisher
rate = rospy.Rate(1) # create a rate (per second) for publishing
infodata = InfoData() # create the infodata message
infodata_array = InfoDataArray() # create the infodata array
# set the variables of the info data message
infodata.num = 5
infodata.color = 'red'
infodata.name = 'data1'

# push several infodata messages into the info data array
for x in range(10):
    infodata_array.infos.append(infodata)

# continously publish the infodata array at the rate specified
# until someone stops the node
while not rospy.is_shutdown():
  pub.publish(infodata_array.infos)
  rate.sleep()
Step 3: Create the C++ subscriber node
Create a C++ file in the src folder
roscd cpp_python
cd src
touch infodata_subscriber.cpp
Locate the file in the IDE and paste in the following code:
// Import the infodata messaages
#include <cpp_python/InfoData.h>
#include <cpp_python/InfoDataArray.h>
#include <ros/ros.h> // import the ros C++ api

// the function that takes the message from the subscriber and does
// something with it
void infodataCallback(const cpp_python::InfoDataArray::ConstPtr &msg) {
  ROS_INFO("%d", msg->infos[0].num);
  ROS_INFO("%s", msg->infos[0].color.c_str());
  ROS_INFO("%s", msg->infos[0].name.c_str());
}

int main(int argc, char **argv) {
  // create a node for running the subscriber
  ros::init(argc, argv, "infodata_subscriber_node");
  ros::NodeHandle nh;

  // create the subscriber
  ros::Subscriber sub = nh.subscribe("/infodata", 1000, infodataCallback);

  // Run the subscriber until someone stops the program with Ctrl + C
  ros::spin();

  return 0;
}
Add the following lines to CMakeLists.txt, under the Build section, so the C++ can be compiled:
# make sure you run this from the root of your catkin workspace (e.g catkin_ws)
catkin_make
Step 4: Run the Python publisher node
# make sure you run this from the root of your catkin workspace (e.g catkin_ws)
source devel/setup.bash
nohup roscore &
rosrun cpp_python infodata_publisher.py
Nothing is happening? Nah, wait until we launch the subscriber! So, then, let’s do it!
So that was it! That’s how to create a C++ subscriber for a Python publisher node.
Extra: Video of this post
We made a video showing how we solved this challenge. If you prefer “sights and sounds” to “black and white”, here you go:
Feedback
Did you like this post? Do you have any questions about the explanations? Whatever the case, please leave a comment on the comments section below, so we can interact and learn from each other.
If you want to learn about other ROS or ROS2 topics, please let us know in the comments area and we will do a video or post about it.
Edited by Bayode Aderinola
Want to play with the complete code right away? You can get a copy of the ROSject at the link below (requires an account on ROSDS).
Open the Motor.action file in IDE and write the following content to it.
# This is an action definition file, which has three parts: the goal
# the result, and the feedback.
# Part 1: the goal.
#
# The angle in degree the robot to turn, sent by client main
float64 angle
---
# Part 2: the result, sent by action server unpon completion
#
# How much time used
duration time_elapsed
# How many updates thrown in total
uint32 updates_n
---
# Part 3: the feedback,to be sent periodically by server
#
# The amount of time elapsed from the start
duration time_elapsed
The contents of Motor.action defines variables of three categories. The categories are separated by — lines. The first category of variables are related to GOAL, second is related to RESULT and third are related to the FEEDBACK. Here we have the following variable in different categories: angle for GOAL, time_elapsed, updates_n for RESULT and time_elapsed for FEEDBACK.
Now we have to add the directive to compile action file in CMakeLists.txt file. This file is inside our package directory i.e. ~/catkin_ws/src/turtlebot3_console_controller. Open the CMakeLists.txt file in IDE
Add the following code block
add_action_files(
FILES
Motor.action
)
Also, add this code block
generate_messages(
DEPENDENCIES
actionlib_msgs
)
Let’s compile the project. Run following commands in the SHELL
$ cd ~/catkin_ws
$ catkin_make
To test if the action file works we will create a script name node.py inside a new directory within the package. Use the following commands in SHELL
$ cd ~/catkin_ws/src/turtlebot3_console_controller
$ mkdir src
$ touch node.py
To create the directory and file we can use IDE tool as well. Let’s add the following code to the node.py file
from turtlebot3_console_controller.msg import MotorGoal, MotorResult, MotorFeedback

print("OK, it worked!!!")
Let’s run the above script. Enter the following commands in the SHELL
$ cd ~/catkin_ws/src/turtlebot3_console_controller/src
$ ./node.py
After running the above command you should see the reply OK, it worked!!! in the next line.
And that’s it. We have created a basic action message and verified it works.
Use the ROS Development Studio (ROSDS), an online platform for developing for ROS within a PC browser. Easy-peasy. I’m using this option for this post.
Once you log in, click on the New ROSject button to create a project that will host your code. Then Click on Open ROSject to launch the development/simulation environment.
To open a “terminal” on ROSDS, pick the Shellapp from the Tools menu.
You can find the IDE app on the Tools menu.
You have ROS installed on a local PC. Okay, skip to Step 2.
Next step!
Step 2: Launch a simulation
We are going to use a topic from a simulation of a robot. You may use any robot that has Odometry (/odom topic). For this post, we are using Turtlebot 2.
On ROSDS, start a Turtlebot 2 simulation from the simulations menu:
Simulations -> Use a provided simulation -> (Empty world) + Select a robot -> Turtlebot 2 > Start simulation.
Step 3: Find out the kind and structure of the message the Odometry topic uses
Open a terminal and run the following:
user:~$ rostopic info /odom
Type: nav_msgs/Odometry

Publishers:
 * /gazebo (http://rosdscomputer:37377/)

Subscribers: None


user:~$ rosmsg show nav_msgs/Odometry
std_msgs/Header header
  uint32 seq
  time stamp
  string frame_id
string child_frame_id
geometry_msgs/PoseWithCovariance pose
  geometry_msgs/Pose pose
    geometry_msgs/Point position
      float64 x
      float64 y
      float64 z
    geometry_msgs/Quaternion orientation
      float64 x
      float64 y
      float64 z
      float64 w
  float64[36] covariance
geometry_msgs/TwistWithCovariance twist
  geometry_msgs/Twist twist
    geometry_msgs/Vector3 linear
      float64 x
      float64 y
      float64 z
    geometry_msgs/Vector3 angular
      float64 x
      float64 y
      float64 z
  float64[36] covariance
First command (rostopic info): we found out the kind of message – nav_msgs/Odometry.
Second command (rosmsg show): we found out the structure of the message.
Next, let’s examine the structure of the ROS message nav_msgs/Odometry:
It’s a fairly complex message as it contains a lot of nested variables.
The variables are arranged in hierarchical or tree form, with parent variable appearing without indentation. “Parent variables” here include
header
child_frame_id
pose
twist.
Some of the parent variables have children, grandchildren, and so on, which are also variables. These are indicated by the visual indents. For example,
header has three children.
pose has two children.
pose, which also has children position and orientation, which both have children too.
covariance, which has no children.
Every variable has a type, indicated just before the variable name. Type for …
header is std_msgs/Header.
pose -> pose -> position -> x is float64.
child_frame_id is string.
Next, let create a Python package and see how to access these variables in code.
Step 4: Create a package and extract these multiple variables from the message std_msgs/Odometry
Create a package and create a Python file. Please note that we are making the Python file executable with chmod +x, otherwise it won’t run!
user:~$ cd catkin_ws/src/
user:~/catkin_ws/src$ catkin_create_pkg extract_msg rospy
Created file extract_msg/CMakeLists.txt
Created file extract_msg/package.xml
Created folder extract_msg/src
Successfully created files in /home/user/catkin_ws/src/extract_msg. Please adjust the values in package.xml.
user:~/catkin_ws/src$ cd extract_msg/src/
user:~/catkin_ws/src/extract_msg/src$ touch extract_msg_node.py
user:~/catkin_ws/src/extract_msg/src$ chmod +x extract_msg_node.py
user:~/catkin_ws/src/extract_msg/src$
Open the extract_msg_node.py using the IDE and paste in the following code that extracts some of the multiple variables from the ROS message.
#! /usr/bin/env python

import rospy # the ROS api for python. We need it to create a node,
             # a subscriber and access other ROS-specific program control
from nav_msgs.msg import Odometry # Python message class for Odometry


rospy.init_node("extra_message_node")
msg = rospy.wait_for_message("/odom", Odometry)
print "Full message: \n"
print msg # that's the whole Odometry message. It should be something like
            # what was printed out by `rosmsg show nav_msgs/Odometry`

# print out each of the parent variables
print "\n Parent variables: \n"
print msg.header
print msg.child_frame_id
print msg.pose
print msg.twist

# print some children
print "\nSome children: \n"
print msg.header.frame_id
print msg.pose.pose
print msg.twist.twist

# print out some grandchildren
print "\nSome grandchildren: \n"
print msg.pose.pose.position
print msg.twist.twist.linear

# print out some great grandchildren :)
print "\nSome great grandchildren: \n"
print msg.pose.pose.orientation.w
print msg.twist.twist.angular.z

# print other (great grand) children below this line
print "\nOther ones you have specified: \n"
Run the program:
user:~$ rosrun extract_msg extract_msg_node.py
The program should run once and print out the extracted variables. Try adding your own variables.
And so that was it! I hope you were able to learn a thing or two from this post.
Extra: Video of the post
Here below you have a “sights and sounds” version of this post, just in case you prefer it that way. Enjoy!
Feedback
Did you like this post? Do you have any questions about the explanations? Whatever the case, please leave a comment on the comments section below, so we can interact and learn from each other.
If you want to learn about other ROS or ROS2 topics, please let us know in the comments area and we will do a video or post about it.
Learn the proper use of ROS spin for a ROS subscriber so that the data received in the callback function can be accessed. This is an answer to a question on the ROS Answers forum. Let’s go!
Use the ROS Development Studio (ROSDS), an online platform for developing for ROS within a PC browser. Easy-peasy. I’m using this option for this post.
Once you log in, click on the New ROSject button to create a project that will host your code. Then Click on Open ROSject to launch the development/simulation environment.
To open a “terminal” on ROSDS, pick the Shellapp from the Tools menu.
You can find the IDE app on the Tools menu.
You have ROS installed on a local PC. Okay, skip to Step 2.
Next step!
Step 2: Create a ROS project containing the C++ code
Create a ROS project in your workspace
user:~$ cd ~/catkin_ws/src
user:~/catkin_ws/src$ catkin_create_pkg callback_fix roscpp
Created file callback_fix/package.xml
Created file callback_fix/CMakeLists.txt
Created folder callback_fix/include/callback_fix
Created folder callback_fix/src
Successfully created files in /home/user/catkin_ws/src/callback_fix. Please adjust the values in package.xml.
Create a C++ file in the project’s src folder and paste in the code specified below.
user:~/catkin_ws/src$ cd callback_fix/src
user:~/catkin_ws/src/callback_fix/src$ touch callback_fix_node.cpp
user:~/catkin_ws/src/callback_fix/src$
We are using a slightly modified version of the code here, using simpler message types since the driving_msg is not available.
#include "ros/ros.h"
#include "std_msgs/Int32.h"
#include <iostream>
using namespace std;

class server {
public:
  int totalobjects;
  void chatterCallback(const std_msgs::Int32 &msg);
};

void server::chatterCallback(const std_msgs::Int32 &msg) {
  totalobjects = msg.data;
}

int main(int argc, char **argv) {
  server objserver;
  ros::init(argc, argv, "listener");
  ros::NodeHandle n;
  ros::Subscriber sub =
      n.subscribe("/ground_truth", 1000, &server::chatterCallback, &objserver);
  ros::spin();
  cout << objserver.totalobjects;
  cout << "\n";
  return 0;
}
On ROSDS, pick the IDE from the Tools menu, locate the callback_code.cpp file and paste in the code.
Step 3: Prepare your C++ code for compilation and compile it
To ensure that our C++ code is runnable, we need to make some modifications to the CMakeLists.txt file. Please edit the following Build section of the file as follows.
We have simply uncommented the add_executable, add_dependencies and target_link_libraries directives.
PS: If your C++ file is named differently, you need to adjust the values accordingly. I have used the default name for the C++ file and its, which is ${PROJECT_NAME}_node.cpp (callback_fix_node.cpp). It’s executable will be generated without the .cpp suffix.
###########
## Build ##
###########

## Specify additional locations of header files
## Your package locations should be listed before other locations
include_directories(
# include
  ${catkin_INCLUDE_DIRS}
)

## Declare a C++ library
# add_library(${PROJECT_NAME}
#   src/${PROJECT_NAME}/callback_fix.cpp
# )

## Add cmake target dependencies of the library
## as an example, code may need to be generated before libraries
## either from message generation or dynamic reconfigure
# add_dependencies(${PROJECT_NAME} ${${PROJECT_NAME}_EXPORTED_TARGETS} ${catkin_EXPORTED_TARGETS})

## Declare a C++ executable
## With catkin_make all packages are built within a single CMake context
## The recommended prefix ensures that target names across packages don't collide
add_executable(${PROJECT_NAME}_node src/callback_fix_node.cpp)

## Rename C++ executable without prefix
## The above recommended prefix causes long target names, the following renames the
## target back to the shorter version for ease of user use
## e.g. "rosrun someones_pkg node" instead of "rosrun someones_pkg someones_pkg_node"
# set_target_properties(${PROJECT_NAME}_node PROPERTIES OUTPUT_NAME node PREFIX "")

## Add cmake target dependencies of the executable
## same as for the library above
add_dependencies(${PROJECT_NAME}_node ${${PROJECT_NAME}_EXPORTED_TARGETS} ${catkin_EXPORTED_TARGETS})

## Specify libraries to link a library or executable target against
target_link_libraries(${PROJECT_NAME}_node
   ${catkin_LIBRARIES}
)
Compile the package. Go back to the Terminal and…
user:~/catkin_ws/src/callback_fix/src$ cd ~/catkin_ws/
user:~/catkin_ws$ catkin_make
Step 4: Run your package and experience the elusive output!
PS: If you get a message indicating a connection cannot be made to the master, please stop the program, run nohup roscore & to start the master node in the background and then start your program again.
Open another terminal and publish to the ground_truth topic. You should see the published data in the terminal where you started in the callback_fix_node.
user:~$ rostopic pub /ground_truth std_msgs/Int32 "data: 55"
publishing and latching message. Press ctrl-C to terminate
Huh, did you see that? The moment we stopped the node, the data we published appeared. That’s baloney, isn’t it? Let’s find out the fix in the next section.
Step 5: Fix the baloney (by implementing a proper use of ROS spin) and run the program again
In the callback_fix_node.cpp file, we can see that the print statements appear right after then ros::spin() statement! The problem is, anything after ros::spin() will not run until the program exits, because ros::spin() creates a loop that won’t exit until the program is interrupted!
In the v2 of the code below, use ros::spinOnce(), instead of ros::spin() to solve the problem:
1. Replace the int main() function with this snippet:
int main(int argc, char **argv) {
  server objserver;
  ros::init(argc, argv, "listener");
  ros::NodeHandle n;
  ros::Rate loop_rate(1);
  ros::Subscriber sub =
      n.subscribe("/ground_truth", 1000, &server::chatterCallback, &objserver);
  while (ros::ok()) {
    ros::spinOnce();
    loop_rate.sleep();
    cout << objserver.totalobjects;
    cout << "\n";
  }
  return 0;
}
4. In the other terminal, publish to the ground_truth topic again and watch the output of the first terminal:
user:~$ rostopic pub /ground_truth std_msgs/Int32 "data: 67"
publishing and latching message. Press ctrl-C to terminate
Now you should see the published data printed in the first terminal, in real-time. Try publishing other integers:
# ...
67
67
999
999
999
#...
And that was it! I hope you have learned something about the proper use of ROS spin. See you in another post!
Extra: Video of this post
We made a video showing how we solved this challenge. If you prefer “sights and sounds” to “black and white”, here you go:
Feedback
Did you like this post? Do you have any questions about the explanations? Whatever the case, please leave a comment on the comments section below, so we can interact and learn from each other.
If you want to learn about other ROS or ROS2 topics, please let us know in the comments area and we will do a video or post about it.
About:
In the video of today, we are going to see how you can easily store a value from a subscribed topic into a variable in order to use it later for further purposes. In this case, we will use a global variable to do so.
? Subscribe for more free ROS learning: https://www.youtube.com/channel/UCt6Lag-vv25fTX3e11mVY1Q?sub_confirmation=1
RELATED ROS RESOURCES&LINKS:
ROS Development Studio (ROSDS) —▸ http://rosds.online
Robot Ignite Academy –▸ https://www.robotigniteacademy.com
—
Feedback
—
Did you like this video? Do you have questions about what is explained? Whatever the case, please leave a comment on the comments section below, so we can interact and learn from each other.
If you want to learn about other ROS topics, please let us know on the comments area and we will do a video about it 🙂
![[ROS Q&A] 191 – How to load a pre-built map into ROS for the Navigation Stack](https://www.theconstruct.ai/wp-content/uploads/2019/06/ROS-QA-191-How-to-load-a-pre-built-map-into-ROS-for-the-Navigation-Stack.jpg)
![[ROS Q&A] 190 – How to subscribe with a C++ subscriber to a custom msg array published with a Python publisher](https://www.theconstruct.ai/wp-content/uploads/2019/05/How-to-subscribe-with-C-to-a-custom-msg-array-published-with-Python.jpg)
![[ROS Q&A] 189 – How to create a custom action message](https://www.theconstruct.ai/wp-content/uploads/2019/05/custom-action-message-for-ROS-Actions.jpg)
![[ROS Q&A] 188 – How do you extract multiple variables from a ROS message](https://www.theconstruct.ai/wp-content/uploads/2019/05/ROS-QA-188-How-do-you-extract-multiple-variables-from-a-ROS-message.jpg)
![[ROS Q&A] 187 – Unable to use data received in callback function](https://www.theconstruct.ai/wp-content/uploads/2019/05/Unable-to-use-data-received-in-callback-function.jpg)
![[ROS Q&A] 186 – How to store value from a subscribed topic in ROS in Python](https://www.theconstruct.ai/wp-content/uploads/2019/04/how-to-store-value-from-suscribed-topic-ROS-python.jpg)