
A Brief History of ROS (Robot Operating System)
The following is a visual timeline of Robot Operating System (ROS)
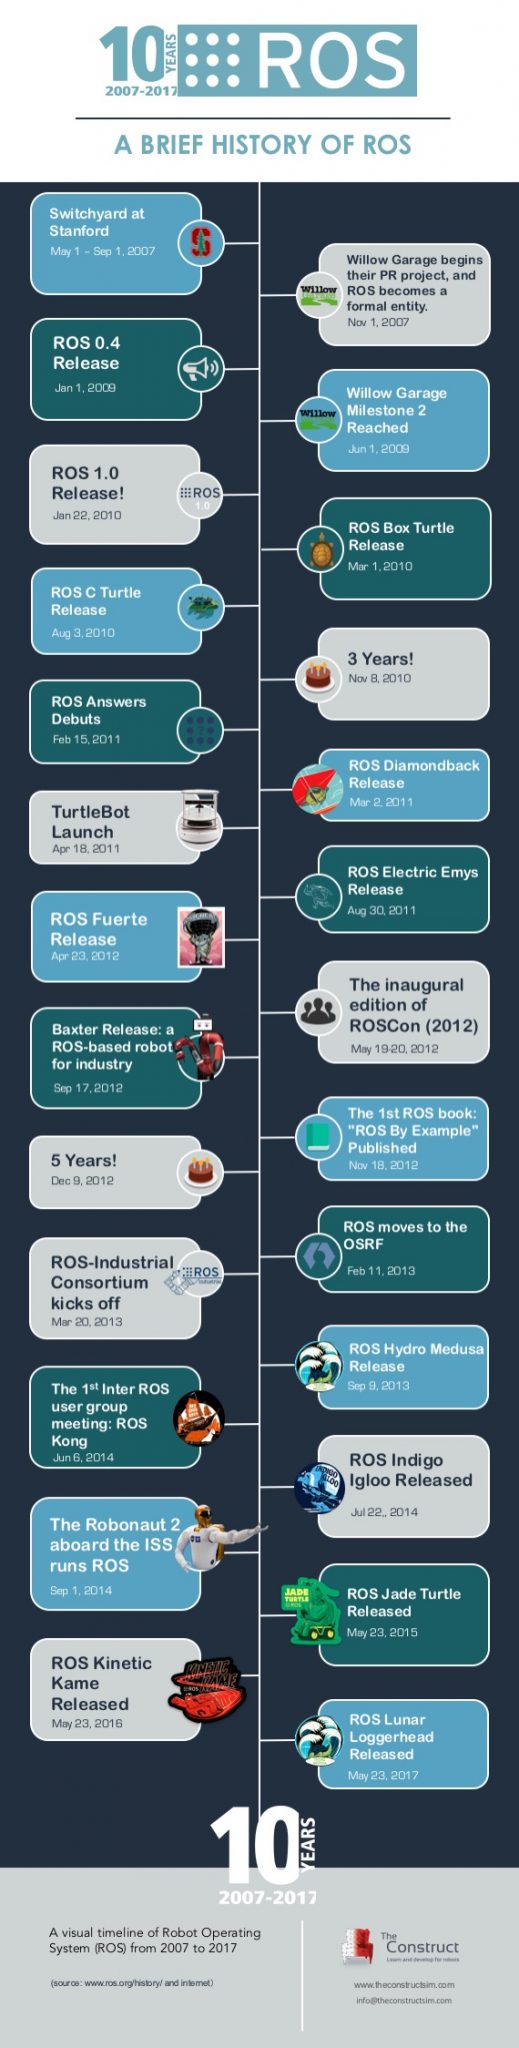
The following is a visual timeline of Robot Operating System (ROS)
![[ROS Q&A] 089 – Have a Turtlebot 3 simulation running in 5 minutes with RDS v2.0](https://www.theconstruct.ai/wp-content/uploads/2018/01/Have-a-Turtlebot-3-simulation-running-in-5-minutes-with-RDS-v2.0-screen.png)
In this video I will show you how to have a Turtlebot 3 simulation in Gazebo with ROS running in a few minutes, by using any type of computer and requiring no ROS nor Gazebo installation.
Develop for Turtlebot 3 with any type of computer.
* Turtlebot 3 manual: http://emanual.robotis.com/docs/en/platform/turtlebot3/simulation/#gazebo-3d
* ROS Development Studio: rds.theconstructsim.com
![[ROS Q&A] 088 – How to add trajectory path in RViz](https://www.theconstruct.ai/wp-content/uploads/2018/01/How-to-add-trajectory-path-in-rviz-screen.png)
In this tutorial, you will learn how to add a trajectory path in RVIZ when you using a mapping system.
You can check the answer in this following tutorial:
![[ROS Q&A] 087 – ROS CPP Unit Testing](https://www.theconstruct.ai/wp-content/uploads/2018/01/ROS-CPP-Unit-Testing-screen.png)
Repository: https://bitbucket.org/marcoarruda/ros_gtest
Blog post: https://www.theconstruct.ai/ros-package-testing-part-1/
References: https://answers.ros.org/questions/scope:all/sort:activity-desc/page:1/query:ros%20tests%20cpp/
![[ROS Q&A] 086 – How can I publish OpenCv Mat image and see it on RViz](https://www.theconstruct.ai/wp-content/uploads/2018/01/How-can-I-publish-OpenCv-Mat-image-and-see-it-on-RViz-screen.png)
In this video we show how to publish a OpenCV Image on a ROS Topic and see the image on RViz by solving a real question: https://answers.ros.org/question/103911/how-can-i-publish-a-opecv-mat-as-a-topic-and-subscribe-by-rviz/
We have the best online ROS course available in RIA. It helps you learn ROS in the easiest way without setting up ROS environment locally. The only thing you need is a browser! Create an account here and start to browse the trial course for free now! We’ll use the ROS Basic in 5 days course unit 3 as an example today.
Let’s create a package for the code with the following command
cd ~/catkin_ws/src
catkin_create_pkg publisher roscpp sensor_msgs image_transport cv_bridge
Let’s put the code from the question under the publisher/src folder with the name publisher_node.cpp
#include <cv_bridge/cv_bridge.h>
#include <opencv2/opencv.hpp>
#include <iostream>
#include <ros/ros.h>
#include <image_transport/image_transport.h>
#include <sensor_msgs/image_encodings.h>

namespace enc = sensor_msgs::image_encodings;

int main(int argc, char **argv)
{
    int trajectory[3] = {512,612,712};
    cv::Mat image(1024,1024,CV_8UC3);

    for(int i = 0;i<3;i++)
    {
        cv::circle(image, cv::Point(trajectory[i],trajectory[i]), 100, CV_RGB(255,0,0));
    }

#if 0
    cv::namedWindow("image", CV_WINDOW_NORMAL);
    cv::resizeWindow("image", 1024,1024);
    cv::imshow("image", image);
    cv::waitKey(0);
    cv::destroyWindow("image");
#endif

#if 1
    ros::init(argc, argv, "draw_circle");
    ros::NodeHandle n;
    image_transport::ImageTransport it_(n);
    image_transport::Publisher image_pub_ = it_.advertise("/traj_output", 1);

    cv_bridge::CvImagePtr cv_ptr(new cv_bridge::CvImage);

#if 1
    ros::Time time = ros::Time::now();
cv_ptr->encoding = "bgr8";
    cv_ptr->header.stamp = time;
    cv_ptr->header.frame_id = "/traj_output";
#endif

    cv_ptr->image = image;
    image_pub_.publish(cv_ptr->toImageMsg());

    ROS_INFO("ImageMsg Send.");
#endif
    ros::spin();
    return 0;

}
To compile it, we have to modify the CMakeLists.txt file in the build part. Please uncomment the add_executable and target_link_librarys part in the file. Then we can compile it with the following command
cd ~/catkin_ws
catkin_make
Then we can run the node with
rosrun publisher publisher_node
Let’s open rviz with the following command
rosrun rviz rviz
By clicking add->Image and select the topic /traj_output, we still can’t see the image.
It turns out the image only publish once with the original code, to visualize it in rviz we have to keep publishing, so let’s change the code
#include <cv_bridge/cv_bridge.h>
#include <opencv2/opencv.hpp>
#include <iostream>
#include <ros/ros.h>
#include <image_transport/image_transport.h>
#include <sensor_msgs/image_encodings.h>

namespace enc = sensor_msgs::image_encodings;

int main(int argc, char **argv)
{
    int trajectory[3] = {512,612,712};
    cv::Mat image(1024,1024,CV_8UC3);

    for(int i = 0;i<3;i++)
    {
        cv::circle(image, cv::Point(trajectory[i],trajectory[i]), 100, CV_RGB(255,0,0));
    }

#if 0
    cv::namedWindow("image", CV_WINDOW_NORMAL);
    cv::resizeWindow("image", 1024,1024);
    cv::imshow("image", image);
    cv::waitKey(0);
    cv::destroyWindow("image");
#endif

        #if 1
        ros::init(argc, argv, "draw_circle");
        ros::NodeHandle n;
        image_transport::ImageTransport it_(n);
        image_transport::Publisher image_pub_ = it_.advertise("/traj_output", 1);

        cv_bridge::CvImagePtr cv_ptr(new cv_bridge::CvImage);

    ros::Rate loop_rate(10);
    while(ros::ok()) {


        #if 1
        ros::Time time = ros::Time::now();
        cv_ptr->encoding = "bgr8";
        cv_ptr->header.stamp = time;
        cv_ptr->header.frame_id = "/traj_output";
        #endif

        cv_ptr->image = image;
        image_pub_.publish(cv_ptr->toImageMsg());

        ROS_INFO("ImageMsg Send.");
        #endif
        ros::spinOnce();
        loop_rate.sleep();
    }
    ros::spin();
    return 0;

}
Then we have to compile and run the node again, you should see the image now.
If you are interested in this topic, please check our ROS perception in 5 days course.
Edit by: Tony Huang
Q: The user says that the code compiles and runs without any problem but the message can’t be shown on RViz.
A: The problem is because the user was publishing the message only once. When RViz is loaded, the message is not being published anymore. To solve this, the solution is keep publishing until we make sure RViz is subscribed. The code can be found on the answer (https://answers.ros.org/question/103911/how-can-i-publish-a-opecv-mat-as-a-topic-and-subscribe-by-rviz/?answer=278560#post-id-278560)
![[ROS Q&A] 085 – Basic usage of octomap_mapping package](https://www.theconstruct.ai/wp-content/uploads/2018/01/Basic-usage-of-octomap_mapping-package-screen.png)
In the following video, I show how to execute some basic functionalities of the octomap_mapping package: Creating an Octomap, saving the Octomap and providing the Octomap.