In this video we show how to Navigate using the move_base node combined with RTAB-Map. See question: https://answers.ros.org/question/275410/navigation/
Q: I have obtained a map using RTAB-Map. Now I want to use the point cloud obtained to navigate.
A: You need to do several things:
1. Built a 2D map based on LaserScan.
2. Tune a little bit the rtabmap_ros node.
3. Localize the robot in the map.
4. Navigate!
In this video we show how to get the model state of a model in Gazebo using ROS Topics with Python. See question: https://answers.ros.org/question/261782/how-to-use-getmodelstate-service-from-gazebo-in-python/
Q: I try to get the state of a model in Gazebo but the returned value is always zero.
A: You have to call the /gazebo/get_model_state service passing the name of the model and the name of a link.
Q: writing a publisher and subscriber and unsure how to finish it
A: I have create a package (my_pkg) with two nodes, trying to reproduce your situation.. It is like that:
———Want to learn ROS really FAST and master the latest Robotics topics?———–
::Visit Robot Ignite Academy, the online Academy that teaches you ROS really FAST, from beginner to master, using only a web browser: https://goo.gl/LBT7EN
Robot Ignite Academy is an integrated ROS learning platform which contains a series of online ROS tutorials tied to online simulations, giving you the tools and knowledge to understand and create any ROS based robotics development.
——————Are you a ROS expert and want to develop FAST your next ROS project?———–
:: Then, use the ROS Development Studio (RDS) for your next project: https://goo.gl/EtFqmE
With the ROS Development Studio, you will be able to:
– Develop ROS programs for robots in a faster way, with an already setup IDE environment that includes autocomplete.
– Test the programs in real time on the provided simulated robots. Use the provided simulations or upload your own. Quickly see the results of your programming.
– Debug using graphical ROS tools.
– Test what you have developed on RDS in the real robot (if you have it 😉
all of these are using ONLY a web browser without any installation and not limited by any operating system. DEVELOP FOR ROS USING WINDOWS, LINUX OR OSX.
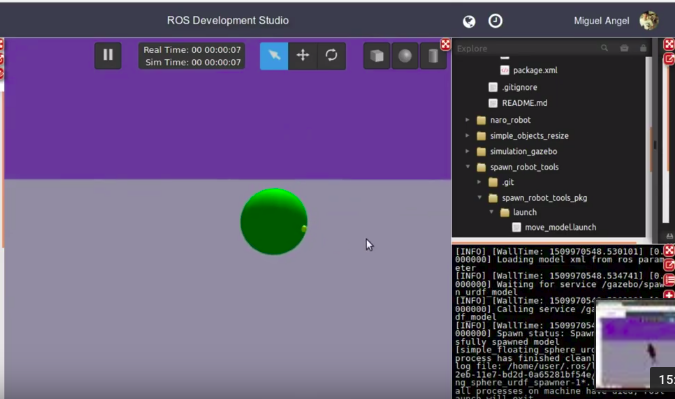
This post is an answer to a question related to buoyancy in Gazebo Answers.
To exemplify, we created a ros package called buoyancy_tests_pkg and a launch file called main.launch. We can launch that file with roslaunch buoyancy_tests_pkg main.launch.
In our package, we have the buoyancy_tests_pkg/urdf/simple_floating_sphere.urdf with the definition of a floating sphere.
If everything went ok, you should have a sphere spawned like in the image below:
buoyancy sphere floating in ROSDS
Bear in mind that the weight of the sphere applies forces in the Z direction from top to down (from the sky to the earth) and the buoyancy plugin applied the force in opposite direction. We will apply the same force in the opposite direction, which will be the mass of the sphere, basically.
Calculating the weight of the sphere
In order to calculate the mass of the sphere to then use the same value for buoyance, we created a file called volume_calculator.py on buoyancy_tests_pkg/scripts/volume_calculator.py with the following content:
#!/usr/bin/env python
import math


class BuoyancyCalculator(object):

    def __init__(self):
        print "Buoyancy Force Calculator Initialised..."

    def start_ask_loop(self):

        selection = "START"

        while selection != "Q":
            print "#############################"
            print "Select Geometry to Calculate Buoyancy Force:"
            print "[1]Sphere radius(r)"
            print "[2]Cylinder radius(r)"
            print "[3]Box dimensions(x_size*y_size*z_size)"
            print "[Q]END program"
            selection = raw_input(">>")
            self.select_action(selection)

        print "InertialCaluclator Quit...Thank you"

    def select_action(self, selection):
        if selection == "1":
            mass = float(raw_input("mass>>"))
            radius = float(raw_input("radius>>"))
            fluid_density = float(raw_input("fluid_density [kg/m^3]>>"))
            self.calculate_sphere_buoyancy_force(mass, radius, fluid_density)

        elif selection == "2":
            mass = float(raw_input("mass>>"))
            radius = float(raw_input("radius>>"))
            height = float(raw_input("height>>"))
            fluid_density = float(raw_input("fluid_density [kg/m^3]>>"))
            self.calculate_cylinder_buoyancy_force(mass, radius, height, fluid_density)

        elif selection == "3":
            mass = float(raw_input("mass>>"))
            x_size = float(raw_input("x_size>>"))
            y_size = float(raw_input("y_size>>"))
            z_size = float(raw_input("z_size>>"))

            fluid_density = float(raw_input("fluid_density [kg/m^3]>>"))
            self.calculate_box_buoyancy_force(mass, x_size, y_size, z_size, fluid_density, gravity=9.81)

        elif selection == "Q":
            print "Selected Quit"
        else:
            print "Usage: Select one of the give options"

    def calculate_sphere_volume(self, m, r):
        volume = (4.0/3.0)*math.pi*math.pow(r,3)
        return volume

    def calculate_cylinder_volume(self, m, r, h):
        # volume = pi*r^2*h
        volume = math.pi*math.pow(r,2)*h
        return volume

    def calculate_cylinder_area(self, r, h):
        # area = 2*pi*r^2 + 2*pi*r*h
        area = 2*math.pi*math.pow(r,2) + 2*math.pi*r*h
        return area

    def calculate_box_volume(self,x, y, z):
        # Volume of box is x*y*z
        volume = x*y*z
        return volume

    def calculate_sphere_buoyancy_force(self, mass, radius, fluid_density, gravity=9.81):
        volume = self.calculate_sphere_volume(m=mass, r=radius)
        fluid_eq_mass = fluid_density * volume
        buoyancy_force = fluid_eq_mass * gravity
        sphere_weight = mass * gravity
        print "Volume Sphere ="+str(volume)
        print "Mass of Fluid for Sphere Volume Sphere, This should be the mass of sphere for neutral buoyancy ="+str(fluid_eq_mass)
        print "Buoyancy Force ="+str(buoyancy_force)
        print "Weight Force of Sphere ="+str(sphere_weight)

        final_weight_force = buoyancy_force - sphere_weight

        print "RESULT OF WEIGHT AND BUOYANCY FORCE =="+str(final_weight_force)
        if final_weight_force < 0:
            print "The Sphere is going to SINK"
        elif final_weight_force == 0:
            print "The Sphere is going to have NEUTRAL Buoyancy"
        else:
            print "The Sphere is going to FLOAT"


    def calculate_cylinder_buoyancy_force(self, mass, radius, height, fluid_density, gravity=9.81):

        volume = self.calculate_cylinder_volume(m=mass, r=radius, h=height)
        area = self.calculate_cylinder_area(r=radius, h=height)

        fluid_eq_mass = fluid_density * volume
        buoyancy_force = fluid_eq_mass * gravity
        cylinder_weight = mass * gravity
        print "Volume Cylinder ="+str(volume)
        print "Area Cylinder ="+str(area)
        print "Mass of Fluid for Cylinder Volume Cylinder, This should be the mass of sphere for neutral buoyancy ="+str(fluid_eq_mass)
        print "Buoyancy Force ="+str(buoyancy_force)
        print "Weight Force of Cylinder ="+str(cylinder_weight)

        final_weight_force = buoyancy_force - cylinder_weight

        print "RESULT OF WEIGHT AND BUOYANCY FORCE =="+str(final_weight_force)
        if final_weight_force < 0:
            print "The Cylinder is going to SINK"
        elif final_weight_force == 0:
            print "The Cylinder is going to have NEUTRAL Buoyancy"
        else:
            print "The Cylinder is going to FLOAT"


    def calculate_box_buoyancy_force(self, mass, x_size, y_size, z_size, fluid_density, gravity=9.81):

        volume = self.calculate_box_volume(x=x_size, y=y_size, z=z_size)

        fluid_eq_mass = fluid_density * volume
        buoyancy_force = fluid_eq_mass * gravity
        box_weight = mass * gravity
        print "Volume Box ="+str(volume)
        print "Mass of Fluid for Box Volume, This should be the mass of Box for neutral buoyancy ="+str(fluid_eq_mass)
        print "Buoyancy Force ="+str(buoyancy_force)
        print "Weight Force of Box ="+str(box_weight)

        final_weight_force = buoyancy_force - box_weight

        print "RESULT OF WEIGHT AND BUOYANCY FORCE =="+str(final_weight_force)
        if final_weight_force < 0:
            print "The Box is going to SINK"
        elif final_weight_force == 0:
            print "The Box is going to have NEUTRAL Buoyancy"
        else:
            print "The Box is going to FLOAT"


if __name__ == "__main__":
    inertial_object = BuoyancyCalculator()
    inertial_object.start_ask_loop()
<?xml version="1.0" encoding="UTF-8"?>

    <launch>

        <arg name="x" default="0.0" />
        <arg name="y" default="0.0" />
        <arg name="z" default="0.0" />
        <arg name="roll" default="0"/>
        <arg name="pitch" default="0"/>
        <arg name="yaw" default="0.0" />

        <arg name="urdf_robot_file" default="" />
        <arg name="robot_name" default="" />

        <!-- This Version was created due to some errors seen in the V1 that crashed GAzebo or went too slow in spawn -->
        <!-- Load the URDF into the ROS Parameter Server -->
        <param name="robot_description" command="cat $(arg urdf_robot_file)" />

        <!-- Run a python script to the send a service call to gazebo_ros to spawn a URDF robot -->
        <node name="$(arg robot_name)_urdf_spawner" pkg="gazebo_ros" type="spawn_model" respawn="false" output="screen"
        args="-urdf -x $(arg x) -y $(arg y) -z $(arg z) -R $(arg roll) -P $(arg pitch) -Y $(arg yaw) -model $(arg robot_name) -param robot_description"/>
    </launch>
#!/usr/bin/env python
import math


class InertialCalculator(object):

    def __init__(self):
        print "InertialCaluclator Initialised..."

    def start_ask_loop(self):

        selection = "START"

        while selection != "Q":
            print "#############################"
            print "Select Geometry to Calculate:"
            print "[1]Box width(w)*depth(d)*height(h)"
            print "[2]Sphere radius(r)"
            print "[3]Cylinder radius(r)*height(h)"
            print "[Q]END program"
            selection = raw_input(">>")
            self.select_action(selection)

        print "InertialCaluclator Quit...Thank you"

    def select_action(self, selection):
        if selection == "1":
            mass = float(raw_input("mass>>"))
            width = float(raw_input("width>>"))
            depth = float(raw_input("depth>>"))
            height = float(raw_input("height>>"))
            self.calculate_box_inertia(m=mass, w=width, d=depth, h=height)
        elif selection == "2":
            mass = float(raw_input("mass>>"))
            radius = float(raw_input("radius>>"))
            self.calculate_sphere_inertia(m=mass, r=radius)
        elif selection == "3":
            mass = float(raw_input("mass>>"))
            radius = float(raw_input("radius>>"))
            height = float(raw_input("height>>"))
            self.calculate_cylinder_inertia(m=mass, r=radius, h=height)
        elif selection == "Q":
            print "Selected Quit"
        else:
            print "Usage: Select one of the give options"


    def calculate_box_inertia(self, m, w, d, h):
        Iw = (m/12.0)*(pow(d,2)+pow(h,2))
        Id = (m / 12.0) * (pow(w, 2) + pow(h, 2))
        Ih = (m / 12.0) * (pow(w, 2) + pow(d, 2))
        print "BOX w*d*h, Iw = "+str(Iw)+",Id = "+str(Id)+",Ih = "+str(Ih)

    def calculate_sphere_inertia(self, m, r):
        I = (2*m*pow(r,2))/5.0
        print "SPHERE Ix,y,z = "+str(I)

    def calculate_cylinder_inertia(self, m, r, h):
        Ix = (m/12.0)*(3*pow(r,2)+pow(h,2))
        Iy = Ix
        Iz = (m*pow(r,2))/2.0
        print "Cylinder Ix,y = "+str(Ix)+",Iz = "+str(Iz)

if __name__ == "__main__":
    inertial_object = InertialCalculator()
    inertial_object.start_ask_loop()
So this is the post for today. We hope it made you better understand how the buoyancy plugin works in the gazebo simulator.
Remember that we have a live version of this post on YouTube. If you liked the post and the video, please consider subscribing to our channel and Keep Pushing your ROS Learning.
what you are talking about is called Robot navigation, that is, the ability of the robot to go from one place to another.
Then, in order to achieve that, you need to decide at least the following three things:
In which frame are you measuring the coordinates (0,0) and (5,5)?
Do you need to have obstacle avoidance (that is, avoid any obstacle that may appear between (0,0) and (5,5) when your robot is moving towards the end location)?
Is it the location where the robot moves known or unknown?
Let’s assume the simplest answer to the questions above:
We are measuring the coordinates in the odometry frame (I’m assuming you know what odometry is). The problem with this frame is that has a sift (an error) which increases over time. But for your example is good enough.
Let’s say, there are no obstacles in the path. Hence, we do not have to implement an obstacle avoidance algorithm like potential fields or else.
Let’s say it is an unknown environment, of which we are not going to build a map.
Even if this is a very simple setup, that setup can be used, for example, to move the robot to the position of a detected target. Imagine that the robot has a camera and a program that detects people. Then, once the program detects a person within 5 meters in front of the robot, it means that the robot can go to the person location using that simple framework we defined in the questions above.
Now, you need to build a controller that converts the distances from the current position and orientation of the robot into velocity commands that are sent to the /cmd_vel of the robot to make it move towards the location. That controller can be built in many ways.
A simple controller to do that would be the following:
If the robot (odometry) orientation is not towards the target, then rotate only the robot until its orientation is towards the target.
More complex controllers can be implemented that optimize the time to reach the goal, or other factors like moving faster when far away from goal and moving slower when getting closer.
In case you want to make the robot include obstacle avoidance, navigation in bigger environments of which a map can be built, then you need to use the Navigation Stack of ROS which includes all that (and more).
Step 0. Create a project in ROS Development Studio(ROSDS)
ROSDS helps you follow our tutorial in a fast pace without dealing without setting up an environment locally. If you haven’t had an account yet, you can create a free account here. After logging in, click on My ROSjects. You’ll find the public simulations provided by the Construct. We’ll use the Husky simulation today.
Step 1. Move the robot
At first, let’s create a package for the code.
cd catkin_ws/src
catkin_create_pkg simple_controller rospy
To move the robot from A to B, we can apply a controller. Then we create a controller.py file under the src folder in the package with the following content.
import rospy
from nav_msgs.msg import Odometry
from tf.transformations import euler_from_quaternion
from geometry_msgs.msg import Point, Twist
from math import atan2

x = 0.0
y = 0.0
theta = 0.0

def newOdom(msg):
    global x
    global y
    global theta

    x = msg.pose.pose.position.x
    y = msg.pose.pose.position.y

    rot_q = msg.pose.pose.orientation
    (roll, pitch, theta) = euler_from_quaternion([rot_q.x, rot_q.y, rot_q.z, rot_q.w])

rospy.init_node("speed_controller")

sub = rospy.Subscriber("/odometry/filtered", Odometry, newOdom)
pub = rospy.Publisher("/cmd_vel", Twist, queue_size = 1)

speed = Twist()

r = rospy.Rate(4)

goal = Point()
goal.x = 5
goal.y = 5

while not rospy.is_shutdown():
    inc_x = goal.x -x
    inc_y = goal.y -y

    angle_to_goal = atan2(inc_y, inc_x)

    if abs(angle_to_goal - theta) > 0.1:
        speed.linear.x = 0.0
        speed.angular.z = 0.3
    else:
        speed.linear.x = 0.5
        speed.angular.z = 0.0

    pub.publish(speed)
    r.sleep()
You can also launch the rviz tool for visualization with
rosrun rviz rviz
Then you can launch the program with
rosrun simple_controller controller.py
You should see the robot turns and move to the point we set by comparing the difference between the set goal and the odometry.
What to learn more?
If you are interested in learning ROS, please visit
Original questions here: https://answers.ros.org/question/273384/how-to-move-to-a-certain-point-in-space-using-twist-cmd_vel/
Q: How to move to a certain point in space using Twist /cmd_vel?
A: what you are talking about is called Robot navigation, that is, the ability of the robot to go from one place to another.
Then, in order to achieve that, you need to decide at least the following three things:
In which frame are you measuring the coordinates (0,0) and (5,5)?
Do you need to have obstacle avoidance (that is, avoid any obstacle that may appear between (0,0) and (5,5) when your robot is moving towards the end location)?
Is it the location where the robot moves known or unknown?
Let’s assume the simplest answer to the questions above:
We are measuring the coordinates in the odometry frame (I’m assuming you know what odometry is). The problem with this frame is that has a sift (an error) which increases over time. But for your example is good enough.
Let’s say, there are no obstacles in the path. Hence, we do not have to implement an obstacle avoidance algorithm like potential fields or else.
Let’s say it is and unknown environment, of which we are not going to build a map.
Even if this is a very simple setup, that setup can be used, for example, to move the robot to the position of a detected target. Imagine that the robot has a camera and a program that detects people. Then, once the program detects a person in 5 meters in front of the robot, it means that the robot can go to the person location using that simple framework we defined in the questions above.
Now, you need to built a controller that converts the distances from the current position AND orientation of the robot into velocity commands that are sent to the /cmd_vel of the robot to make it move towards the location. That controller can be built in many ways.
A simple controller to do that would be the following:
If the robot (odometry) orientation is not towards the target, then rotate only the robot until its orientation is towards the target.
I have created this video that shows how that controller works with a Husky robot in a Gazebo simulated environment.
More complex controllers can be implemented that optimize the time to reach the goal, or other factors like moving faster when far away from goal and moving slower when getting closer.
In case you want to make the robot include obstacle avoidance, navigation in bigger environments of which a map can be built, then you need to use the Navigation Stack of ROS which includes all that (and more).
![[ROS Q&A] 053 – How to Move a Robot to a Certain Point Using Twist](https://www.theconstruct.ai/wp-content/uploads/2018/09/ROS-QA-053-How-to-Move-a-Robot-to-a-Certain-Point-Using-Twist.png)