Robotic Motion Planning
Hello ROS Developers! In this post we continue with the series Exploring ROS with a 2 wheeled Robot. In the previous post, we created an obstacle avoidance algorithm. Today we’ll start working with motion planning! We’re going create an algorithm to go from a point to another using the odometry data to localize the robot.
If you don’t have the ROSject generated from the previous one, just copy it from here http://www.rosject.io/l/9945166/
Let’s model our problem!
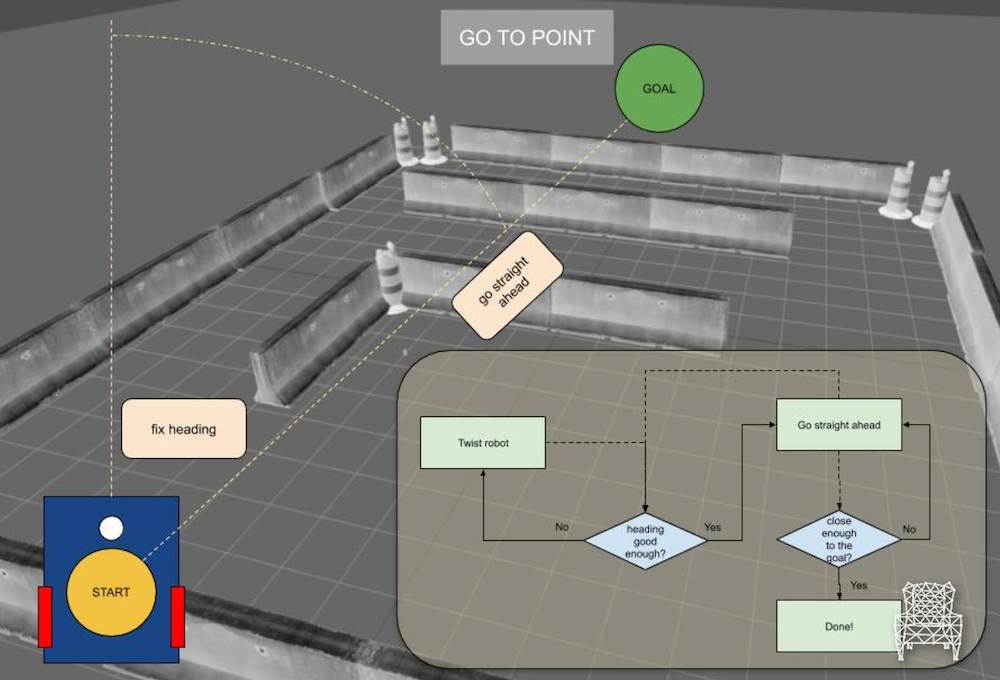
The behavior we want to program is basically going in a straight line from a point to another. We have 2 steps:
- Twist robot until we achieve the best heading to the endpoint
- Go in a straight line, until we are close enough to the final point
It’s a state machine, described by the diagram below:

The first status is Twist robot, until we reach a good enough heading value. The next status is Go straight ahead, this one can go back to Twist robot or Done.
Let’s start coding!
STEP 1
A new script is created: ~/catkin_ws/src/motion_plan/scripts/go_to_point.py. First thing is to add the necessary libraries:
#! /usr/bin/env python

# import ros stuff
import rospy
from sensor_msgs.msg import LaserScan
from geometry_msgs.msg import Twist, Point
from nav_msgs.msg import Odometry
from tf import transformations

import math
And also define some variables: publisher, robot state, machine state, goal position and some tune parameters:
# robot state variables
position_ = Point()
yaw_ = 0
# machine state
state_ = 0
# goal
desired_position_ = Point()
desired_position_.x = -3
desired_position_.y = 7
desired_position_.z = 0
# parameters
yaw_precision_ = math.pi / 90 # +/- 2 degree allowed
dist_precision_ = 0.3

# publishers
pub = None
I’ll define the main function now, so we can have an overview of the algorithm. Bare in mind callbacks and helper functions will be written further:
def main():
    global pub

    rospy.init_node('go_to_point')

    pub = rospy.Publisher('/cmd_vel', Twist, queue_size=1)

    sub_odom = rospy.Subscriber('/odom', Odometry, clbk_odom)

    rate = rospy.Rate(20)
    while not rospy.is_shutdown():
        if state_ == 0:
            fix_yaw(desired_position_)
        elif state_ == 1:
            go_straight_ahead(desired_position_)
        elif state_ == 2:
            done()
            pass
        else:
            rospy.logerr('Unknown state!')
            pass
        rate.sleep()

if __name__ == '__main__':
    main()
We are basically in a 20hz loop, checking the status in order to send a command to the robot. The status is defined by an integer:
0 – Twist robot (fix_yaw) – Fix robot orientation
1 – Go straight ahead (go_straight_ahead) – Just go ahead
2 – Done (done) – Stop
Let’s program the behaviors!
STEP 2
In order to get the desired Yaw, let’s program the first method fix_yaw
def fix_yaw(des_pos):
    global yaw_, pub, yaw_precision_, state_
    desired_yaw = math.atan2(des_pos.y - position_.y, des_pos.x - position_.x)
    err_yaw = desired_yaw - yaw_

    twist_msg = Twist()
    if math.fabs(err_yaw) > yaw_precision_:
        twist_msg.angular.z = -0.3 if err_yaw > 0 else 0.3

    pub.publish(twist_msg)

    # state change conditions
    if math.fabs(err_yaw) <= yaw_precision_:
        print 'Yaw error: [%s]' % err_yaw
        change_state(1)
We are using some global variables. Why? Because these values come from a callback, which will be written further (there is nothing new to us in a subscriber, it’s just something that we need, but not related to the motion planning algorithm, just ROS stuff)
There is a calculation of the yaw error, based on this value, we normalize this value in order to turn the robot always to the closest way (left or right).
Finally, publish the twist message and check if the yaw value is good enough (defined in yaw_precision_how much is good enough. You can see it as a tuning parameter)
STEP 3
What about going straight ahead? Seems to be easier, let’s check how we did it!
def go_straight_ahead(des_pos):
    global yaw_, pub, yaw_precision_, state_
    desired_yaw = math.atan2(des_pos.y - position_.y, des_pos.x - position_.x)
    err_yaw = desired_yaw - yaw_
    err_pos = math.sqrt(pow(des_pos.y - position_.y, 2) + pow(des_pos.x - position_.x, 2))

    if err_pos > dist_precision_:
        twist_msg = Twist()
        twist_msg.linear.x = 0.3
        pub.publish(twist_msg)
    else:
        print 'Position error: [%s]' % err_pos
        change_state(2)

    # state change conditions
    if math.fabs(err_yaw) > yaw_precision_:
        print 'Yaw error: [%s]' % err_yaw
        change_state(0)
There are 2 verifications here:
- Is yaw good enough?
- No – Back to state 0
- Yes – Keep going
- Is the robot close enough to the goal?
- No – Keep going
- Yes – Go to state 2 (stop)
Again, we are using the global vars in order to get yaw, state, yaw_precision_ and pub
STEP 4
Finally, the done function and other helper functions:
def done():
    twist_msg = Twist()
    twist_msg.linear.x = 0
    twist_msg.angular.z = 0
    pub.publish(twist_msg)
The change_state function, that provides us a log message and changes the global state var:
def change_state(state):
    global state_
    state_ = state
    print 'State changed to [%s]' % state_
And something we don’t program without! The callback for the odometry reading:
def clbk_odom(msg):
    global position_
    global yaw_

    # position
    position_ = msg.pose.pose.position

    # yaw
    quaternion = (
        msg.pose.pose.orientation.x,
        msg.pose.pose.orientation.y,
        msg.pose.pose.orientation.z,
        msg.pose.pose.orientation.w)
    euler = transformations.euler_from_quaternion(quaternion)
    yaw_ = euler[2]
Which is basically reading the messages and filling our vars. Notice how we are converting the quaternion to simple yaw value. That’s why we need to import tf library.
We are good to go!
STEP 5
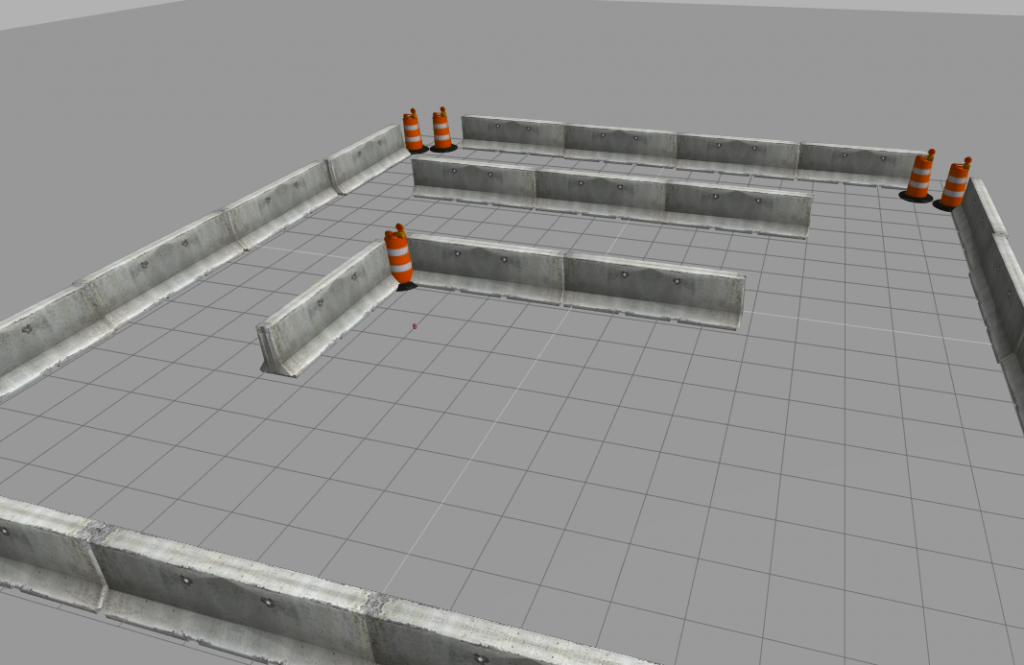
Launch the same world we launched before!
Spawn the robot in a suitable position for this test:
roslaunch m2wr_description spawn.launch y:=8
Launch the script:
rosrun motion_plan go_to_point.py
You may notice the robot switches between go_straight_ahead and fix_yaw many times:
Yaw error: [-0.0682238880539]
State changed to [1]
Yaw error: [0.0698676056395]
State changed to [0]
Yaw error: [0.0683643359256]
State changed to [1]
Yaw error: [0.0708310727095]
State changed to [0]
Yaw error: [0.0579104782174]
State changed to [1]
Yaw error: [0.0718681960156]
State changed to [0]
Yaw error: [0.0595617709548]
State changed to [1]
Yaw error: [0.0717480008102]
State changed to [0]
Yaw error: [0.0627887992796]
State changed to [1]
Yaw error: [0.0718602150916]
State changed to [0]
Yaw error: [0.0662619015533]
State changed to [1]
Position error: [0.296183858313]
State changed to [2]
This’s because our robot model is not symmetric, so it lost the heading when it tries to go in a straight line. It can happen with real robots, not only because of the model, but also because of the environment. Something that must be expected!
That’s all for this post!
Remember to leave a comment, if you have doubts or suggestions!
If something went wrong up to here, you can always clone the ROSject produced with this post!
In this next tutorial, we’re going work with wall following robot algorithm. Cheers!
[irp posts=”13195″ name=”Exploring ROS using a 2 Wheeled Robot: Obstacle Avoidance”]


0 Comments