In this post you are going to learn:
- How to build a simple differential drive simulation in Gazebo simulator.
- How to add a plugin to the model to allow ROS commands to the robot
- How to move the robot through ROS topics
For this purpose you need to download this file which contain the basic structure to start.
We are going to show you how to do it inside The Construct, but almost everything directly applies to Gazebo running standalone in your own computer. If there are differences in the steps to apply, you will get additional instructions in blue for standalone-Gazebo (sG).
Setting up with the zip file
Upload the zip file (as is, without decompression) to your account in The Construct. If you don’t have one, you can create a free account here.
If you are using sG, uncompress the zip file inside a directory that is in your ROS_PACKAGE_PATH inside an active ROS workspace.
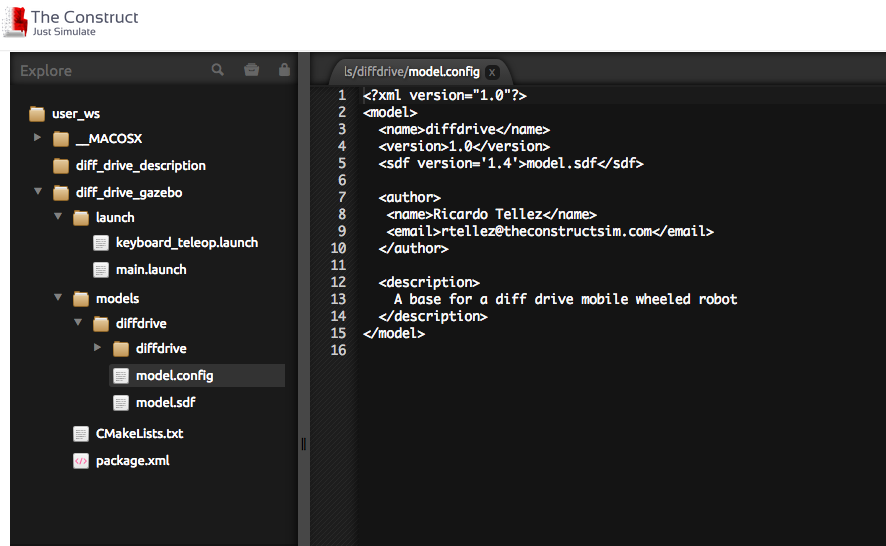
Launch a simulator in The Construct. We launch Gazebo 4.0 with ROS Indigo, but the example we have provided in the zip file should work with any other version of the simulator or of ROS. Once the simulator has started, you will see just an empty world. You must open the integrated IDE of The Construct (press IDE button) to be able to edit the files. You must see something like this:
For sG, just type roslaunch diff_drive_gazebo main.launch on a terminal to open the empty world in Gazebo. Then open your preferred editor to create the model files as described below.
Files Structure
As you can see, the zip file contains several files and directories. The structure of those files and directories is specified by Gazebo in this link and must be followed for optimal performance. For The Construct, that structure is mandatory.
Our robot, will be defined as a model. The model must be placed inside the diff_drive_gazebo/models directory. Then we will put that model inside an empty world by using a proper launch file.
To create a model, you need to have the following directory structure:
your_model : A directory for your_model
▪ model.config : Meta-data about your_model
▪ model.sdf : SDF description of the model
▪ meshes : A directory for all COLLADA and STL files
▪ materials : A directory which should only contain the textures and scripts subdirectories
▪ textures : A directory for image files (jpg, png, etc).
▪ scripts : A directory for OGRE material scripts
▪ plugins: A directory for plugin source and header files
If you open the diff_drive_gazebo/models you will see that we have created for you a directory with a model named diffdrive. That model is empty and needs to be filled with the files described above in order to create a model for the differential drive robot. For the example of today, we are going to explain how to build the model.config and model.sdf files, which are the only mandatory files to describe a model. The rest is material for another webinar.
Building the model of the robot
Go to the diff_drive_gazebo/models. Now create a new file named model.config. This file contains data about the model, like what is about this model, who made it, etc, in XML format. It just has informative purposes.
Open the file and write the following code:
<?xml version="1.0"?>
<model>
<name>diffdrive</name>
<version>1.0</version>
<sdf version='1.4'>model.sdf</sdf>
<author>
<name>Your name</name>
<email>your@email.address</email>
</author>
<description>
A simple differential robot with ROS control plugin
</description>
</model>
Save the file and create a new file named model.sdf.
The model.sdf file contains a description of the robot in SDF format. If you want to know more about this format, visit this website.
Write down the basic structure of the file as follows
<?xml version='1.0'?>
<sdf version='1.4'>
<model name="diffdrive">
<static>false</static>
</model>
</sdf>
The description of the robot model must be done between the <model> tags.
A robot is composed of a set of links. Using the <link> tag we are going to include each of the parts of the robot, as well as describe the relations between them.
Adding the chassis
Let’s first create the base of the robot as a small box.We will call it the chassis. Add the following code after the </static> tag.
<link name='chassis'>
 <pose>0 0 0.1 0 0 0</pose>
<inertial>
 <mass>10.0</mass>
 <pose>0.0 0 0.1 0 0 0</pose>
 <inertia>
 <ixx>0.5</ixx>
 <iyy>1.0</iyy>
 <izz>0.1</izz>
 </inertia>
 </inertial>
 <collision name='collision'>
 <geometry>
 <box>
 <size>.4 .2 .1</size>
 </box>
 </geometry>
 </collision>
<visual name='visual'>
 <pose>0 0 0.0 0 0 0</pose>
 <geometry>
 <box>
 <size>.4 .2 .1</size>
 </box>
 </geometry>
 </visual>
 </link>
This is the first link. You can see that it contains three differentiated parts:
- the <inertial> tag specifies the inertial parameters of the chassis, those are, how the mass is distributed along the surface of the chassis. Computing those values is a little tricky and will not be described here. You can read about how to calculate them here.
- the <collision> tag describes the physical shape of the chassis. This description is used to calculate collisions with other objects in the world.
- and the <visual> tag describes the visual aspect of the chassis. This is, how the chasis is going to be seen in the simulator. For this simple robot, <collision> and <visual> are exactly the same (a box), but this is not mandatory. Actually, it is very common that the visual aspect is more detailed than the collision model, because it is less expensive to compute the visual than the collisions.
Adding a caster wheel
We need to add a caster wheel in order to provide stability to the robot. Otherwise, it will fall forward towards the floor.
We can simulate the caster wheel as a sphere attached to the chassis that has very low friction values. That sphere will not rotate in the simulation as it would do it in real life, but the behavior is close enough to a real caster.
Because we want it as part of the chassis structure, we must include the <collision> and <visual> tags of the caster inside the chassis link definition. Copy the following SDF code just after the </visual> tag of the chassis (just before the </link> tag).
<collision name='caster_collision'>
 <pose>-0.15 0 -0.05 0 0 0</pose>
 <geometry>
 <sphere>
 <radius>.05</radius>
 </sphere>
 </geometry>
<surface>
 <friction>
 <ode>
 <mu>0</mu>
 <mu2>0</mu2>
 <slip1>1.0</slip1>
 <slip2>1.0</slip2>
 </ode>
 </friction>
 </surface>
 </collision>
<visual name='caster_visual'>
 <pose>-0.15 0 -0.05 0 0 0</pose>
 <geometry>
 <sphere>
 <radius>.05</radius>
 </sphere>
 </geometry>
 </visual>
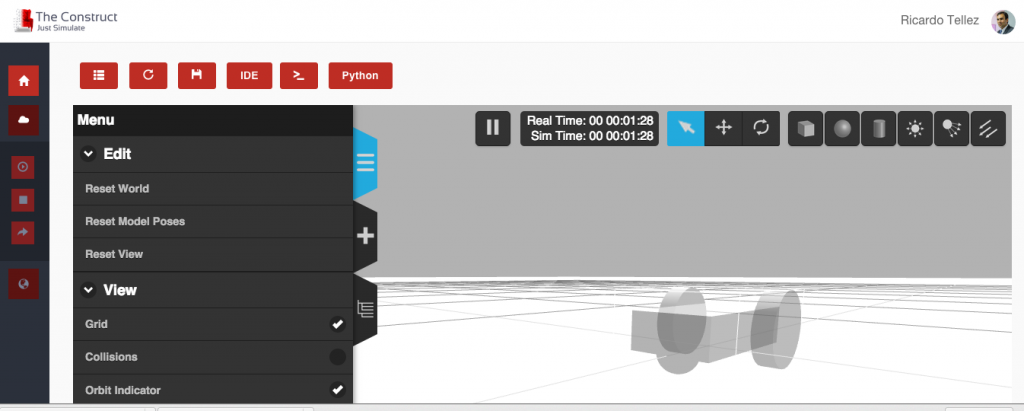
At this moment, you can have a look at how your model is going. Press the Relaunch button to see your result. In sG you need to close the current empty simulation and do the roslaunch again.
Adding the differential wheels
We are going to add two wheels, to left and right sides of the chassis. We model the wheels as cylinders of radius 0.1 m. Copy the following code after the </link> of the chassis. Again, you can see the <collision> and <visual> tags to describe the wheels. An additional tag of <pose> indicates the position of the wheels related to the center of the robot (side to side of the chassis).
<link name="left_wheel">
 <pose>0.1 0.13 0.1 0 1.5707 1.5707</pose>
 <collision name="collision">
 <geometry>
 <cylinder>
 <radius>.1</radius>
 <length>.05</length>
 </cylinder>
 </geometry>
 </collision>
 <visual name="visual">
 <geometry>
 <cylinder>
 <radius>.1</radius>
 <length>.05</length>
 </cylinder>
 </geometry>
 </visual>
 </link>
<link name="right_wheel">
 <pose>0.1 -0.13 0.1 0 1.5707 1.5707</pose>
 <collision name="collision">
 <geometry>
 <cylinder>
 <radius>.1</radius>
 <length>.05</length>
 </cylinder>
 </geometry>
 </collision>
 <visual name="visual">
 <geometry>
 <cylinder>
 <radius>.1</radius>
 <length>.05</length>
 </cylinder>
 </geometry>
 </visual>
 </link>
Additionally to the <visual> and <collision> tags, in order to indicate that those parts must rotate, we have to specify that the union between the wheel and the chasis is made by a joint, and that this joint can rotate. For this purpose, add now the following code that describes the two required joints and the union between chassis and wheels.
<joint type="revolute" name="left_wheel_hinge">
 <pose>0 0 -0.03 0 0 0</pose>
 <child>left_wheel</child>
 <parent>chassis</parent>
 <axis>
 <xyz>0 1 0</xyz>
 </axis>
 </joint>
<joint type="revolute" name="right_wheel_hinge">
 <pose>0 0 0.03 0 0 0</pose>
 <child>right_wheel</child>
 <parent>chassis</parent>
 <axis>
 <xyz>0 1 0</xyz>
 </axis>
 </joint>
Have now a look at how your model is going. Press the Relaunch button to see your result. In sG you need to close the current empty simulation and do the roslaunch again.
Adding the differential drive plugin
As you have checked, your robot is now complete but needs to integrate some code that allows the robot movement and control from ROS programs. This is only possible by using plugins. You can learn how to build plugins for your robots in this link.
Fortunately, for our purpose today, we can use an already made plugin to drive the robot (libgazebo_ros_diff_drive.so). This is a plugin included in the installation of ROS packages for Gazebo. To include the plugin in the robot, include the following code after the last </joint> tag.
<plugin name="differential_drive_controller" filename="libgazebo_ros_diff_drive.so">
 <alwaysOn>true</alwaysOn>
 <updateRate>20</updateRate>
 <leftJoint>left_wheel_hinge</leftJoint>
 <rightJoint>right_wheel_hinge</rightJoint>
 <wheelSeparation>0.4</wheelSeparation>
 <wheelDiameter>0.1</wheelDiameter>
 <torque>20</torque>
 <commandTopic>cmd_vel</commandTopic>
 <odometryTopic>odom</odometryTopic>
 <odometryFrame>odom</odometryFrame>
 <robotBaseFrame>base_footprint</robotBaseFrame>
 </plugin>
This plugin has some parameters that you can configure. They are very straight forward so we are not going to describe them. Just take them into account if you need to use this plugin with a different robot.
Relaunch again the simulation in order to take into account the plugin code. Press the Relaunch button in The Construct to see your result. In sG you need to close the current empty simulation and do the roslaunch again.
Moving the robot with ROS
Now your robot is ready to be moved using ROS.
In The Construct, open the Web Shell. In sG open a terminal. Then type:
> rostopic list
You must see a list of all the ROS topics available. One of them is the /cmd_vel topic. That is the topic used to send commands to the wheels. That topic requires you to send geometry_msgs/Twist messages. Type the following to make the robot move:
> rostopic pub /cmd_vel geometry_msgs/Twist "linear:
x: 0.1
y: 0.0
z: 0.0
angular:
x: 0.0
y: 0.0
z: 0.0”
Your robot must start moving forward until you press Ctrl-C. Press Ctrl-C and stop the robot.
Now we are going to move the robot using the keyboard. For this purpose, we have included and special launch file in the package you downloaded above, that allows you to use the keyboard to control the robot. In order to call that launch file type the following on the Web Shell:
> roslaunch diff_drive_gazebo keyboard_teleop.launch
Now you can press the keys as indicated in the screen and watch your robot move.
Conclusion
We provided you with a very simple example of the simulation of a differential drive that moves around using a ROS interface. You can use this example and its files as a template for more complex robots and environments.
Credits:
Differential Drive Picture thanks to Guilherme Martins blog





hi. your topic is very nice and useful, thank you. I have a question.
if you have used 4 or more wheels instead of 2 wheels here, how should we organize the differential drive plugin?
I have the exact question. Did they answered you?