In this post, you will learn how to use the Gazebo differential drive plugin in ros 2. This post answers the following question posted on ROS Answers.
Step 1: Copy a sample project with a ROS 2 Gazebo simulation using the differential drive plugin
“Hey, do I have to install ros2 first?” Absolutely not! We will be using The Construct to get access to virtual machines pre-installed with ROS.
Click here to copy the ROS2 TurtleBot3 sandbox project. Once copied, click the red RUN button to launch the project in a virtual machine. Please be patient while the environment loads.
PS: You will need to log in or create an account to copy the packages.
You might also want to try this on a local PC if you have ros2 and some executables installed. However, please note that we cannot support local PCs and you will have to fix any errors you run into on your own. The post assumes that you are working on The Construct; please adapt them to your local PC and ros2 installation.
Step 2: Find and explore the Gazebo model file containing the differential drive plugin
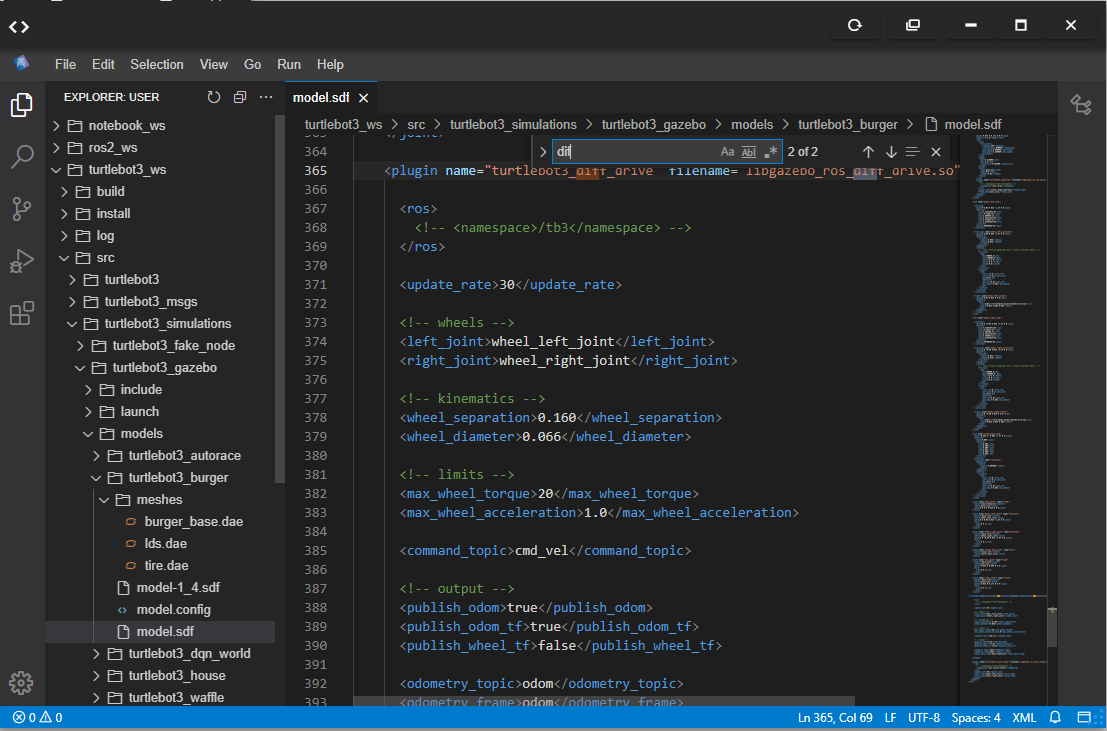
Now, we will find a Gazebo model file with the differential drive plugin. For this post, we’ll use the turtlebot3_ws/src/turtlebot3_simulations/turtlebot3_gazebo/models/turtlebot3_burger/model.sdf file. Sometimes it’s also defined as a .xacro file.
Head over to the Code Editor to explore this file as well as other files.


Let’s examine the differential drive section of this plugin file and compare it with the one on the ROS Answers post.
turtlebot3_ws/src/turtlebot3_simulations/turtlebot3_gazebo/models/turtlebot3_burger/model.sdf
<plugin name="turtlebot3_diff_drive" filename="libgazebo_ros_diff_drive.so">

      <ros>
        <!-- <namespace>/tb3</namespace> -->
      </ros>

      <update_rate>30</update_rate>

      <!-- wheels -->
      <left_joint>wheel_left_joint</left_joint>
      <right_joint>wheel_right_joint</right_joint>

      <!-- kinematics -->
      <wheel_separation>0.160</wheel_separation>
      <wheel_diameter>0.066</wheel_diameter>

      <!-- limits -->
      <max_wheel_torque>20</max_wheel_torque>
      <max_wheel_acceleration>1.0</max_wheel_acceleration>

      <command_topic>cmd_vel</command_topic>

      <!-- output -->
      <publish_odom>true</publish_odom>
      <publish_odom_tf>true</publish_odom_tf>
      <publish_wheel_tf>false</publish_wheel_tf>

      <odometry_topic>odom</odometry_topic>
      <odometry_frame>odom</odometry_frame>
      <robot_base_frame>base_footprint</robot_base_frame>

    </plugin>
On lines 385 and 392, we see entries for the /cmd_vel (<command_topic>cmd_vel</command_topic>) and /odom (<odometry_topic>odom</odometry_topic>) topics respectively. However, these entries are missing in the file on ROS Answers.
Gazebo plugin file: mising command and odometry entries
<?xml version="1.0"?>
<robot xmlns:xacro="http://www.ros.org/wiki/xacro"  name="robot">

   <gazebo>
        <plugin name="diff_drive" filename="libgazebo_ros_diff_drive.so">
            <!-- Wheel info-->
            <left_joint>left_wheel_joint</left_joint>
            <right_joint>right_wheel_joint</right_joint>
            <wheel_separation>0.35</wheel_separation>
            <wheel_diameter>0.1</wheel_diameter>

            <!-- Limits-->
            <max_wheel_torque>200</max_wheel_torque>
            <max_wheel_acceleration>10.0</max_wheel_acceleration>

            <!-- Output-->
            <odometry_frame>odom</odometry_frame>
            <robot_base_frame>base_link</robot_base_frame>

            <publish_odom>true</publish_odom>
            <publish_odom_tf>true</publish_odom_tf>
            <publish_wheel_tf>true</publish_wheel_tf>

        </plugin>
     </gazebo>

</robot>
Are these lines really necessary for moving the robot and getting its odometry? Let’s find out!
Step 3: Investigate the impacts of the of the command and odometry topic tags
Let’s comment out those tags in the file, and see if we can find the /cmd_vel and /odom topics, and if they work.
turtlebot3_ws/src/turtlebot3_simulations/turtlebot3_gazebo/models/turtlebot3_burger/model.sdf
<plugin name="turtlebot3_diff_drive" filename="libgazebo_ros_diff_drive.so">

      <ros>
        <!-- <namespace>/tb3</namespace> -->
      </ros>

      <update_rate>30</update_rate>

      <!-- wheels -->
      <left_joint>wheel_left_joint</left_joint>
      <right_joint>wheel_right_joint</right_joint>

      <!-- kinematics -->
      <wheel_separation>0.160</wheel_separation>
      <wheel_diameter>0.066</wheel_diameter>

      <!-- limits -->
      <max_wheel_torque>20</max_wheel_torque>
      <max_wheel_acceleration>1.0</max_wheel_acceleration>

      <!-- <command_topic>cmd_vel</command_topic> -->

      <!-- output -->
      <publish_odom>true</publish_odom>
      <publish_odom_tf>true</publish_odom_tf>
      <publish_wheel_tf>false</publish_wheel_tf>

      <!-- <odometry_topic>odom</odometry_topic> -->
      <odometry_frame>odom</odometry_frame>
      <robot_base_frame>base_footprint</robot_base_frame>

    </plugin>
Now let’s run the package…in Terminal 1…
cd
source turtlebot3_ws/install/setup.bash
export TURTLEBOT3_MODEL=burger
ros2 launch turtlebot3_gazebo turtlebot3_world.launch.py
…check the topics in Terminal 2…
ros2 topic list

# output:
/clock
/cmd_vel
/imu
/joint_states
/odom
/parameter_events
/performance_metrics
/robot_description
/rosout
/scan
/tf
/tf_static
Well, the topics are there, but are they working? Let’s publish to the /cmd_vel topic and see if the robot moves. We also echo the /odom in another terminal. Run the following in Terminal 2:
# Try to move the robot with teleop
ros2 run teleop_twist_keyboard teleop_twist_keyboard
Then in Terminal 3:
ros2 topic echo /odom
The robot didn’t move and nothing was echoing from /odom!
Now we need to confirm that it’s not working because of those tags. Let’s modify the launch command in Terminal 1. Press Ctrl + C to stop the simulation and run the following commands instead:
# note that we changed the Turtlebot3 model
export TURTLEBOT3_MODEL=waffle
ros2 launch turtlebot3_gazebo turtlebot3_world.launch.py
Now try to move the robot again and check the /odom eching…Poof, both working! Why? We modified the model file for “burger”; the one for “waffle” was intact!
Final confirmation: uncomment the lines in turtlebot3_ws/src/turtlebot3_simulations/turtlebot3_gazebo/models/turtlebot3_burger/model.sdfTerminal 1 and run the following commands.
# note that we changed the Turtlebot3 model back to burger
export TURTLEBOT3_MODEL=burger
ros2 launch turtlebot3_gazebo turtlebot3_world.launch.py
Done! Now everything should be working!
So we have confirmed that the command and odometry tags are necessary.
Step 4: Check your learning
Do you understand how to use the Gazebo differential drive plugin in ROS 2? If you don’t know it yet, please go over the post again, more carefully this time.
(Extra) Step 5: Watch the video to understand how to use the Gazebo differential drive plugin in ROS 2
Here you go:
Feedback
Did you like this post? Do you have any questions about how to use the Gazebo differential drive plugin in ROS 2? Please leave a comment in the comments section below, so we can interact and learn from each other.
If you want to learn about other ROS2 topics, please let us know in the comments area and we will do a video or post about it.


0 Comments