In this post, you will learn how to write a ROS publisher and subscriber with a custom message, by following the Writing a Publisher and Subscriber with a Custom Message (Python) tutorial. This post is a response to this question posted on Gazebo Answers.
Step 1: Fire up a system with ROS installation
“Hey, do you mean I have to install ROS first?” Absolutely not! Just log in to The Construct to get access to virtual machines pre-installed with ROS.
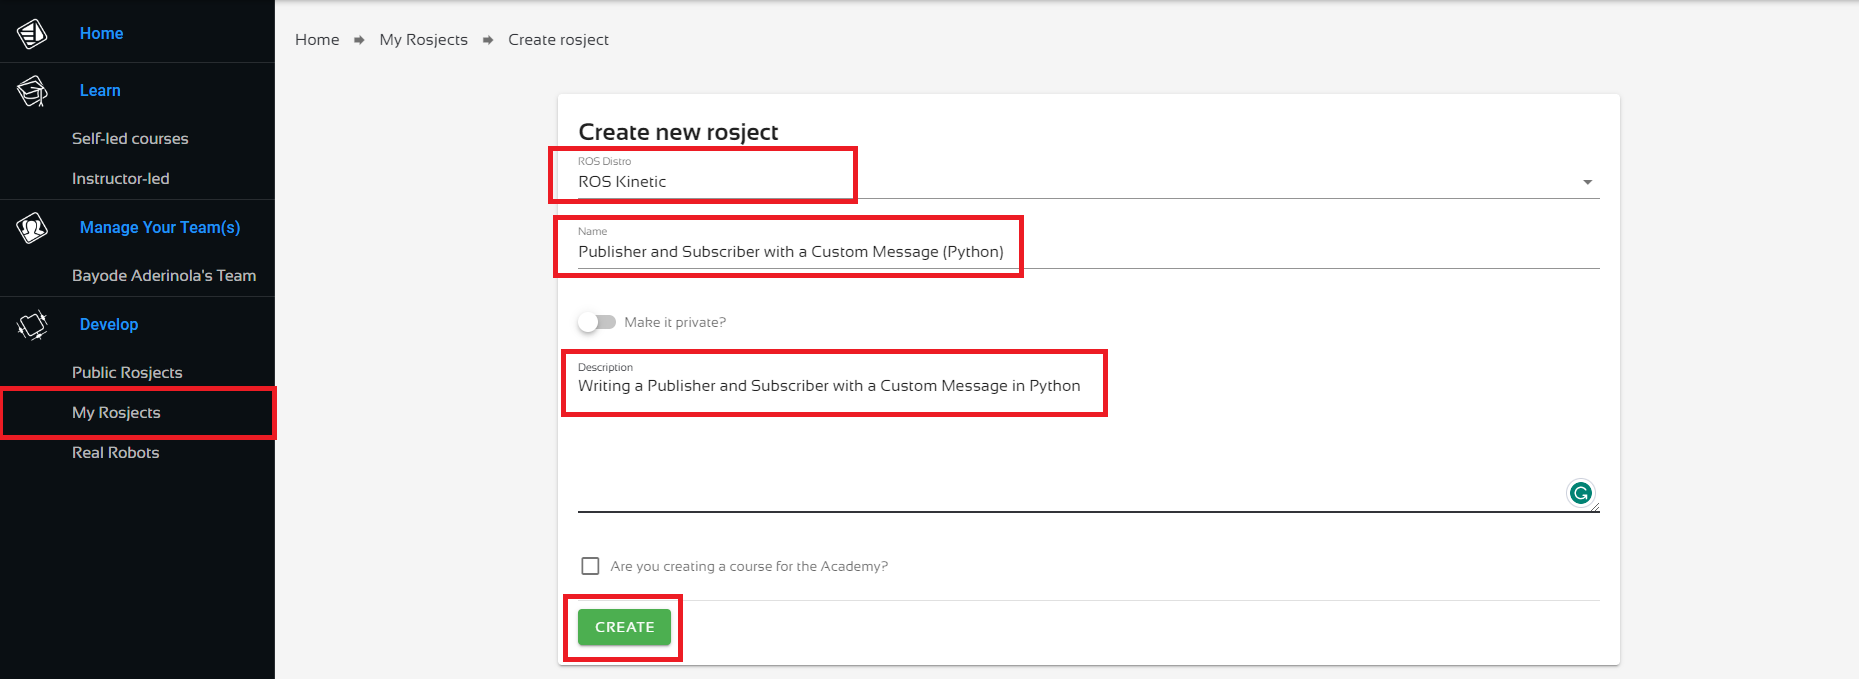
Once logged in, click on My Rosjects, then Create a New Rosject, supply the information as shown in the image below, and click Create. Then RUN the rosject.

You might also want to try this on a local PC if you have ROS installed. However, please note that we don’t support local PCs and you will have to fix any errors you run into on your own. The rest of the instruction assumes that you are working on The Construct; please adapt them to your local PC and ROS installation.
PS:
- We are using ROS Kinetic here because that’s what the user on ROS Answers used.
- We could put the publisher and the subscriber in a single package, but we’ll create two packages as the user did.
- We could put the custom message in any of the two packages, but we’ll put it in the subscriber, just like the user.
Step 2: Create the first package that contains the subscriber and the custom message
Create the package and custom message
Open a web shell and run the following commands to create the package. When creating a custom message, you need extra dependencies message_generation and message_runtime, in addition to the main ROS API, rospy (for Python) in this case, and the types needed for the message, in this case std_msgs.
cd catkin_ws/src
source /opt/ros/kinetic/setup.bash
catkin_create_pkg quadrotor_receive rospy std_msgs message_generation message_runtime
Next, we create the message file, Person.msg. Run the following command in the same terminal you just used.
cd quadrotor_receive
mkdir msg
cd msg
touch Person.msg
Nice done! Now head over to the Code Editor to make changes to the Person.msg file. Check the image below for how to open the Code Editor.

Locate the file in the code editor: catkin_ws > src > quadrotor_receive > msg > Person.msg and paste in the following code.
string name
int32 age
Edit package files
Replace CMakeLists.txt with the one below (where the following changes have been made).
- Removed
message_runtimefrom thefind_packagefunction. - Uncommented the
add_message_filesfunction, and addedPerson.msgbelowFILES. - Uncommented the
generate_messagesfunction, and left it intact. - Uncommented the line
CATKIN_DEPENDSin thecatkin_packagefunction. - Removed all commented lines to keep the file short and sweet.
cmake_minimum_required(VERSION 3.0.2)
project(quadrotor_receive)

## Find catkin macros and libraries
## if COMPONENTS list like find_package(catkin REQUIRED COMPONENTS xyz)
## is used, also find other catkin packages
find_package(catkin REQUIRED COMPONENTS
  message_runtime
  rospy
  std_msgs
)

## Generate messages in the 'msg' folder
add_message_files(
  FILES
  Person.msg
  # Message2.msg
)

## Generate added messages and services with any dependencies listed here
generate_messages(
  DEPENDENCIES
  std_msgs
)

###################################
## catkin specific configuration ##
###################################
## The catkin_package macro generates cmake config files for your package
## Declare things to be passed to dependent projects
## INCLUDE_DIRS: uncomment this if your package contains header files
## LIBRARIES: libraries you create in this project that dependent projects also need
## CATKIN_DEPENDS: catkin_packages dependent projects also need
## DEPENDS: system dependencies of this project that dependent projects also need
catkin_package(
#  INCLUDE_DIRS include
#  LIBRARIES quadrotor_receive
CATKIN_DEPENDS message_generation message_runtime rospy std_msgs
#  DEPENDS system_lib
)

###########
## Build ##
###########

## Specify additional locations of header files
## Your package locations should be listed before other locations
include_directories(
# include
  ${catkin_INCLUDE_DIRS}
)
Next, add a single line to package.xml so that it looks like the one below. Can you identify the line that was added?
<?xml version="1.0"?>
<package format="2">
  <name>quadrotor_receive</name>
  <version>0.0.0</version>
  <description>The quadrotor_receive package</description>

  <!-- One maintainer tag required, multiple allowed, one person per tag -->
  <!-- Example:  -->
  <!-- <maintainer email="jane.doe@example.com">Jane Doe</maintainer> -->
  <maintainer email="user@todo.todo">user</maintainer>


  <!-- One license tag required, multiple allowed, one license per tag -->
  <!-- Commonly used license strings: -->
  <!--   BSD, MIT, Boost Software License, GPLv2, GPLv3, LGPLv2.1, LGPLv3 -->
  <license>TODO</license>

  <!--   <doc_depend>doxygen</doc_depend> -->
  <buildtool_depend>catkin</buildtool_depend>
  <build_depend>message_generation</build_depend>
  <build_depend>rospy</build_depend>
  <build_depend>std_msgs</build_depend>
  <build_export_depend>rospy</build_export_depend>
  <build_export_depend>std_msgs</build_export_depend>
  <build_export_depend>message_generation</build_export_depend>
  <exec_depend>message_runtime</exec_depend>
  <exec_depend>rospy</exec_depend>
  <exec_depend>std_msgs</exec_depend>


  <!-- The export tag contains other, unspecified, tags -->
  <export>
    <!-- Other tools can request additional information be placed here -->

  </export>
</package>
Finally, let’s create the receiver Python node, just as the ROS Answers user created it. Run the following in the same terminal as before. Notice that we’re making the Python script executable.
cd ~/catkin_ws/src/quadrotor_receive/src
touch custom_listener.py
chmod +x custom_listener.py
Open custom_listener.py in the IDE and paste in the following code.
#!/usr/bin/env python

import rospy
from quadrotor_receive.msg import Person

def callback(data):
    rospy.loginfo("%s is age: %d" % (data.name, data.age))

def listener():

    rospy.init_node('custom_listener', anonymous=True)
    rospy.Subscriber("custom_chatter", Person , callback)

    # spin() simply keeps python from exiting until this node is stopped
    rospy.spin()

if __name__=='__main__':
    listener()
So much for all the hard work – let’s see if it works. Time to compile the code. In the same web shell, run the following commands:
Compile and test
cd ~/catkin_ws
catkin_make
source devel/setup.bash
Success! We have successfully created a package with a custom message. Let’s see if we can find the message. You should get an output similar to the one below.
user:~/catkin_ws$ rosmsg show quadrotor_receive/Person
string name
int32 age
Let’s also test receiver node at this point. Though there’s nothing to receive yet, it should not throw any error. First, we need to start roscore.
roscore
Then try to run your subscriber in another terminal. Leave it running!
rosrun quadrotor_receive custom_listener.py
PS: if your code did not compile correctly, please go over the instructions and ensure you have created the files in the exact locations specified.
Step 3: Create the second package that contains the publisher
Create a new folder package. This should be easy-peasy, as most of the work has been done in the previous step. Do the following in a new terminal.
cd ~/catkin_ws/src/
catkin_create_pkg transmit_thrust rospy
Next, create the custom_talker.py node.
cd transmit_thrust/src
touch custom_talker.py
chmod +x custom_talker.py
Open up custom_talker.py in the IDE and paste in the following.
#!/usr/bin/env python
import rospy
from quadrotor_receive.msg import Person

def talker():
    pub = rospy.Publisher('custom_chatter', Person)
    rospy.init_node('custom_talker', anonymous=True)
    r = rospy.Rate(10) #10hz
    msg = Person()
    msg.name = "ROS User"
    msg.age = 4

    while not rospy.is_shutdown():
        rospy.loginfo(msg)
        pub.publish(msg)
        r.sleep()

if __name__ == '__main__':
    try:
        talker()
    except rospy.ROSInterruptException: pass
Please note that:
- We are importing the custom message from the
quadrotor_receivepackage. - We are creating a publisher for the same topic we created a subscriber for in the
quadrotor_receivepackage.
Nothing more is needed. Let’s compile our new package.
cd ~/catkin_ws
catkin_make
source devel/setup.bash
That done, let’s start the custom talker node.
rosrun transmit_thrust custom_talker.py
You should see some output similar to these on the terminal.
[INFO] [1680728823.955004]: name: "ROS User"
age: 4
[INFO] [1680728824.055152]: name: "ROS User"
And…on the terminal where you have the listener tunning, you should see something similar to:
[INFO] [1680728823.956347]: ROS User is age: 4
[INFO] [1680728824.056833]: ROS User is age: 4
And we are done here!
Step 4: Check your learning
Do you understand how to write a ROS publisher and subscriber with a custom message? If you don’t know it yet, please go over the post again, more carefully this time.
(Extra) Step 5: Watch the video to understand how to write a ROS publisher and subscriber with a custom message
Here you go:
Feedback
Did you like this post? Do you have any questions about how to write a ROS publisher and subscriber with a custom message? Please leave a comment in the comments section below, so we can interact and learn from each other.
If you want to learn about other ROS topics, please let us know in the comments area and we will do a video or post about it.


0 Comments