.
What will you learn in this post
- Learn how to create a differential drive with python for RaspBerryPi, using the ROS system.
This is the first part of a three-part video for creating a line following robot with a camera.
List of resources used in this post
- The ROSject with the simulation and all the code one click away: http://www.rosject.io/l/8292943/
- Theory: https://en.wikipedia.org/wiki/Differential_wheeled_robot
- Git of MorpheusChair Code: https://bitbucket.org/theconstructcore/morpheus_chair/src/master/
- How to publish Image Stream in ROS Raspberry Pi:
https://www.theconstruct.ai/publish-image-stream-ros-kinetic-raspberry-pi/
More resources if you want to use the real robot:
- UbuntuMate DownloadPage: https://ubuntu-mate.org/raspberry-pi/
- RPi Motor Driver Board: https://www.waveshare.com/wiki/RPi_Motor_Driver_Board
- RapsBerryPi Kit ( RaspBerry, PowerBrick, microSD16GB, Case, HDMI ) : https://www.amazon.es/Raspberry-Pi-Official-Desktop-Starter/dp/B01CI58722
- H Bridge Motor Driver Hats : https://www.amazon.es/gp/product/B071FWNBXG
- Battery: https://www.amazon.es/Kuman-expansión-alimentación-Interruptor-Raspberry/dp/B06W9FWDSP
- Jumper Wires: https://www.amazon.es/Akozon-Conectores-Macho-Hembra-Macho-Macho-Hembra-Hembra/dp/B07GJLCGG8
- Jack Connectors: https://www.amazon.es/gp/product/B06XPVJT1Z
- AA Bateries: https://www.amazon.es/Energizer-Set-pilas-alcalinas-unidades/dp/B000IWXV4C
- Bluetooth KeyBoard: https://www.amazon.es/Rii-Bluetooth-disposición-Smartphone-PlayStation/dp/B0195Y4V5G
- If you want to learn more about how to Rosify a robot:
https://www.robotigniteacademy.com/en/course/building-and-rosifying-robot-scratch/details/ - More resources at the end of the page.
Launching the simulation (later the real robot)
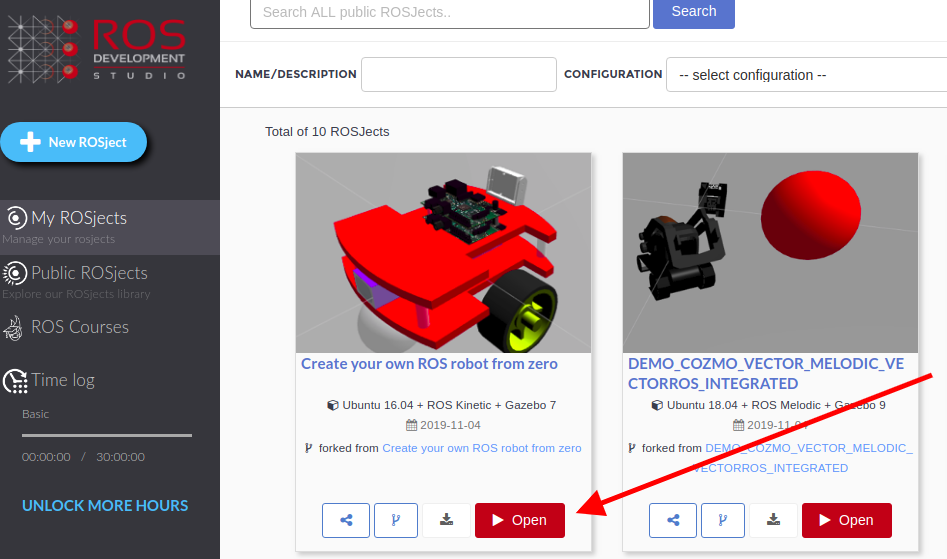
The code used in this post will be used to launch the real robot, but if you want to know how things would “before putting in production”, we can use the simulation for that. To launch the simulation, you first click in the ROSject link provided above (http://www.rosject.io/l/8292943/) to get a copy of it. Once you have it, you then you click on the Open button:
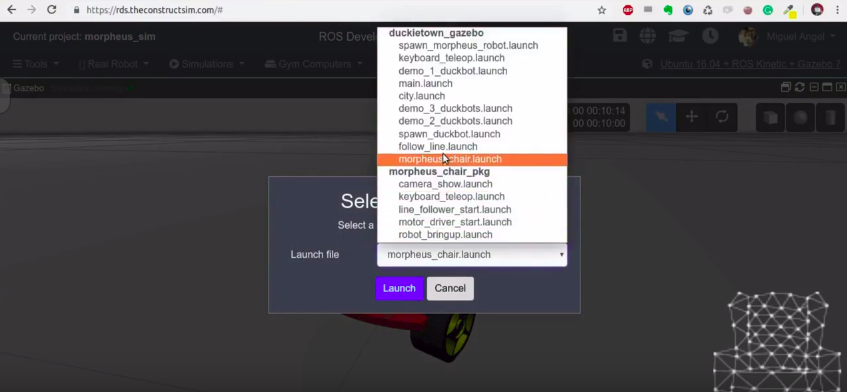
Now that the ROSject is open, you can run the simulation clicking on Simulations -> Select a Launch file and select under the duckietown_gazebo the file morpheus_chair.launch :
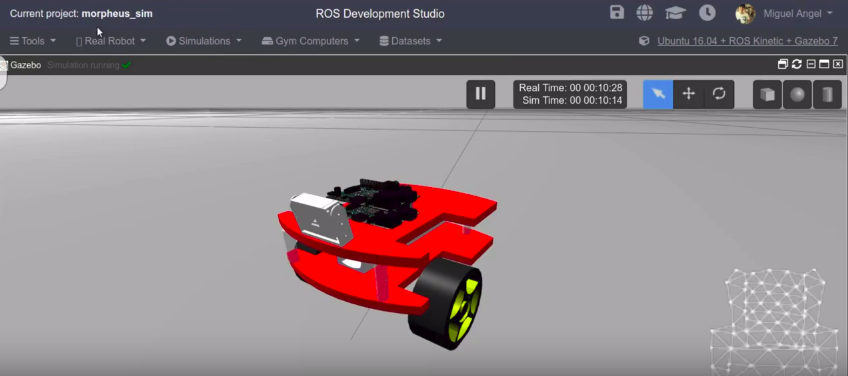
We should now have the simulation up and running, more or less like in the image below:
Analyzing the code using the IDE (Code Editor)
To see the code, you just click Tools -> IDE. With the IDE open, you then open ~/simulation_ws/src/morpheus_chair/morpheus_chair_pkg/scripts/move_with_cmd_vel.py to see the RobotMover class used to move the robot around:
#!/usr/bin/env python
import rospy
import sys
from geometry_msgs.msg import Twist
from motor_driver import MotorDriver

class RobotMover(object):

    def __init__(self, value_BASE_PWM, value_MULTIPLIER_STANDARD, value_MULTIPLIER_PIVOT, value_simple_mode):
        rospy.Subscriber("/morpheus_bot/cmd_vel", Twist, self.cmd_vel_callback)
        self.motor_driver = MotorDriver( i_BASE_PWM=value_BASE_PWM,
                                         i_MULTIPLIER_STANDARD=value_MULTIPLIER_STANDARD,
                                         i_MULTIPLIER_PIVOT=value_MULTIPLIER_PIVOT,
                                         simple_mode=value_simple_mode)
        rospy.wait_for_service('/raspicam_node/start_capture')

        rospy.loginfo("RobotMover Started...")


    def cmd_vel_callback(self, msg):
        linear_speed = msg.linear.x
        angular_speed = msg.angular.z

        # Decide Speed
        self.motor_driver.set_cmd_vel(linear_speed, angular_speed)


    def listener(self):
        rospy.spin()

if __name__ == '__main__':
    rospy.init_node('morpheuschair_cmd_vel_listener', anonymous=True)

    if len(sys.argv) > 5:
        value_BASE_PWM = int(float(sys.argv[1]))
        value_MULTIPLIER_STANDARD = float(sys.argv[2])
        value_MULTIPLIER_PIVOT = float(sys.argv[3])
        value_simple_mode = sys.argv[4] == "true"

        robot_mover = RobotMover(value_BASE_PWM,
                                 value_MULTIPLIER_STANDARD,
                                 value_MULTIPLIER_PIVOT,
                                 value_simple_mode)
        robot_mover.listener()
You can also open the file morpheus_chair/morpheus_chair_pkg/scripts/motor_driver.py to see the class that we use to control the motors:
#!/usr/bin/env python
import rospy
import RPi.GPIO as GPIO
import time

class MotorDriver(object):

    def __init__(self, wheel_distance=0.098, wheel_diameter=0.066, i_BASE_PWM=50, i_MULTIPLIER_STANDARD=0.1, i_MULTIPLIER_PIVOT=1.0, simple_mode = True):
        """
        M1 = Right Wheel
        M2 = Left Wheel
        :param wheel_distance: Distance Between wheels in meters
        :param wheel_diameter: Diameter of the wheels in meters
        """
        self.PIN = 18
        self.PWMA1 = 6
        self.PWMA2 = 13
        self.PWMB1 = 20
        self.PWMB2 = 21
        self.D1 = 12
        self.D2 = 26

        self.PWM1 = 0
        self.PWM2 = 0
        self.BASE_PWM = i_BASE_PWM
        self.MAX_PWM = 100

        self.simple_mode = simple_mode

        # Wheel and chasis dimensions
        self._wheel_distance = wheel_distance
        self._wheel_radius = wheel_diameter / 2.0
        self.MULTIPLIER_STANDARD = i_MULTIPLIER_STANDARD
        self.MULTIPLIER_PIVOT = i_MULTIPLIER_PIVOT

        GPIO.setmode(GPIO.BCM)
        GPIO.setwarnings(False)
        GPIO.setup(self.PIN, GPIO.IN, GPIO.PUD_UP)
        GPIO.setup(self.PWMA1, GPIO.OUT)
        GPIO.setup(self.PWMA2, GPIO.OUT)
        GPIO.setup(self.PWMB1, GPIO.OUT)
        GPIO.setup(self.PWMB2, GPIO.OUT)
        GPIO.setup(self.D1, GPIO.OUT)
        GPIO.setup(self.D2, GPIO.OUT)
        self.p1 = GPIO.PWM(self.D1, 500)
        self.p2 = GPIO.PWM(self.D2, 500)
        self.p1.start(self.PWM1)
        self.p2.start(self.PWM2)

    def __del__(self):
        GPIO.cleanup()

    def set_motor(self, A1, A2, B1, B2):
        GPIO.output(self.PWMA1, A1)
        GPIO.output(self.PWMA2, A2)
        GPIO.output(self.PWMB1, B1)
        GPIO.output(self.PWMB2, B2)

    def forward(self):
        self.set_motor(0, 1, 0, 1)

    def stop(self):
        self.set_motor(0, 0, 0, 0)


    def reverse(self):
        self.set_motor(1, 0, 1, 0)


    def left(self):
        self.set_motor(0, 1, 0, 0)

    def left_reverse(self):
        self.set_motor(1, 0, 0, 0)

    def pivot_left(self):
        self.set_motor(1, 0, 0, 1)


    def right(self):
        self.set_motor(0, 0, 0, 1)

    def right_reverse(self):
        self.set_motor(0, 0, 1, 0)

    def pivot_right(self):
        self.set_motor(0, 1, 1, 0)

    def set_M1M2_speed(self, rpm_speedM1, rpm_speedM2, multiplier):

        self.set_M1_speed(rpm_speedM1, multiplier)
        self.set_M2_speed(rpm_speedM2, multiplier)

    def set_M1_speed(self, rpm_speed, multiplier):

        self.PWM1 = min(int((rpm_speed * multiplier) * self.BASE_PWM), self.MAX_PWM)
        self.p1.ChangeDutyCycle(self.PWM1)
        print("M1="+str(self.PWM1))

    def set_M2_speed(self, rpm_speed, multiplier):

        self.PWM2 = min(int(rpm_speed * multiplier * self.BASE_PWM), self.MAX_PWM)
        self.p2.ChangeDutyCycle(self.PWM2)
        print("M2="+str(self.PWM2))

    def calculate_body_turn_radius(self, linear_speed, angular_speed):
        if angular_speed != 0.0:
            body_turn_radius = linear_speed / angular_speed
        else:
            # Not turning, infinite turn radius
            body_turn_radius = None
        return body_turn_radius

    def calculate_wheel_turn_radius(self, body_turn_radius, angular_speed, wheel):

        if body_turn_radius is not None:
            """
            if angular_speed > 0.0:
                angular_speed_sign = 1
            elif angular_speed < 0.0:
                angular_speed_sign = -1
            else:
                angular_speed_sign = 0.0
            """
            if wheel == "right":
                wheel_sign = 1
            elif wheel == "left":
                wheel_sign = -1
            else:
                assert False, "Wheel Name not supported, left or right only."

            wheel_turn_radius = body_turn_radius + ( wheel_sign * (self._wheel_distance / 2.0))
        else:
            wheel_turn_radius = None

        return wheel_turn_radius

    def calculate_wheel_rpm(self, linear_speed, angular_speed, wheel_turn_radius):
        """
        Omega_wheel = Linear_Speed_Wheel / Wheel_Radius
        Linear_Speed_Wheel = Omega_Turn_Body * Radius_Turn_Wheel
        --> If there is NO Omega_Turn_Body, Linear_Speed_Wheel = Linear_Speed_Body
        :param angular_speed:
        :param wheel_turn_radius:
        :return:
        """
        if wheel_turn_radius is not None:
            # The robot is turning
            wheel_rpm = (angular_speed * wheel_turn_radius) / self._wheel_radius
        else:
            # Its not turning therefore the wheel speed is the same as the body
            wheel_rpm = linear_speed / self._wheel_radius

        return wheel_rpm

    def set_wheel_movement(self, right_wheel_rpm, left_wheel_rpm):

        #print("W1,W2=["+str(right_wheel_rpm)+","+str(left_wheel_rpm)+"]")

        if right_wheel_rpm > 0.0 and left_wheel_rpm > 0.0:
            #print("All forwards")
            self.set_M1M2_speed(abs(right_wheel_rpm), abs(left_wheel_rpm), self.MULTIPLIER_STANDARD)

            if self.simple_mode:
                # We make it turn only on one wheel
                if right_wheel_rpm > left_wheel_rpm:
                    #print("GO FORWARDS RIGHT")
                    self.right()
                if right_wheel_rpm < left_wheel_rpm:
                    #print("GO FORWARDS LEFT")
                    self.left()
                if right_wheel_rpm == left_wheel_rpm:
                    #print("GO FORWARDS")
                    self.forward()
            else:
                #print("GO FORWARDS")
                self.forward()


        elif right_wheel_rpm > 0.0 and left_wheel_rpm == 0.0:
            #print("Right Wheel forwards, left stop")
            self.set_M1M2_speed(abs(right_wheel_rpm), abs(left_wheel_rpm), self.MULTIPLIER_STANDARD)
            self.left()

        elif right_wheel_rpm > 0.0 and left_wheel_rpm < 0.0:
            #print("Right Wheel forwards, left backwards --> Pivot left")
            self.set_M1M2_speed(abs(right_wheel_rpm), abs(left_wheel_rpm), self.MULTIPLIER_PIVOT)
            self.pivot_left()
        elif right_wheel_rpm == 0.0 and left_wheel_rpm > 0.0:
            #print("Right stop, left forwards")
            self.set_M1M2_speed(abs(right_wheel_rpm), abs(left_wheel_rpm), self.MULTIPLIER_STANDARD)
            self.right()

        elif right_wheel_rpm < 0.0 and left_wheel_rpm > 0.0:
            #print("Right backwards, left forwards --> Pivot right")
            self.set_M1M2_speed(abs(right_wheel_rpm), abs(left_wheel_rpm), self.MULTIPLIER_PIVOT)
            self.pivot_right()
        elif right_wheel_rpm < 0.0 and left_wheel_rpm < 0.0:
            #print("All backwards")
            self.set_M1M2_speed(abs(right_wheel_rpm), abs(left_wheel_rpm), self.MULTIPLIER_STANDARD)

            if self.simple_mode:
                # We make it turn only on one wheel
                if abs(right_wheel_rpm) > abs(left_wheel_rpm):
                    #print("GO BACKWARDS RIGHT")
                    self.right_reverse()
                if abs(right_wheel_rpm) < abs(left_wheel_rpm):
                    #print("GO BACKWARDS LEFT")
                    self.left_reverse()
                if right_wheel_rpm == left_wheel_rpm:
                    #print("GO BACKWARDS")
                    self.reverse()
            else:
                self.reverse()


        elif right_wheel_rpm == 0.0 and left_wheel_rpm == 0.0:
            #print("Right stop, left stop")
            self.set_M1M2_speed(abs(right_wheel_rpm), abs(left_wheel_rpm), self.MULTIPLIER_STANDARD)
            self.stop()
        else:
            assert False, "A case wasn't considered==>"+str(right_wheel_rpm)+","+str(left_wheel_rpm)
            pass

    def set_cmd_vel(self, linear_speed, angular_speed):

        body_turn_radius = self.calculate_body_turn_radius(linear_speed, angular_speed)

        wheel = "right"
        right_wheel_turn_radius = self.calculate_wheel_turn_radius(body_turn_radius,
                                                                   angular_speed,
                                                                   wheel)

        wheel = "left"
        left_wheel_turn_radius = self.calculate_wheel_turn_radius(body_turn_radius,
                                                                  angular_speed,
                                                                  wheel)

        right_wheel_rpm = self.calculate_wheel_rpm(linear_speed, angular_speed, right_wheel_turn_radius)
        left_wheel_rpm = self.calculate_wheel_rpm(linear_speed, angular_speed, left_wheel_turn_radius)


        self.set_wheel_movement(right_wheel_rpm, left_wheel_rpm)
Explaining all the details of the code above in this post can be time-consuming. Then, we recommend watching the live version of this post in youtube, following the link at the end of this post if you want to know the tiny details of the file.
Moving the robot around
In order to move the robot, we first have to launch the motor drivers using the command below in the shell. If you don’t know to open the shell, click Tools -> Shell. Then run the command:
roslaunch morpheus_chair_pkg motor_driver_start.launch
Now that the drivers are up and running, we can control it through the command below:
roslaunch morpheus_chair_pkg keyboard_teleop.launch
Then follow the instructions that will be presented in the shell to move the robot (like pressing keys k,j,o, etc)
Making the real robot move
Now that we can move the robot using simulation, we want to move the real robot.
You first need to access your robot with SSH with something like:
ssh USERNAME@IP_ADDRESS
where USERNAME is your username in the robot, and IP_ADDRESS is the IP Address of the real robot.
There you clone the repository in your catkin_ws:
mkdir -p ~/catkin_ws/src
git clone https://bitbucket.org/theconstructcore/morpheus_chair ~/catkin_ws/src/
Then you launch the motor drivers just like we did in the simulation:
source ~/catkin_ws/devel/setup.bash
roslaunch morpheus_chair_pkg motor_driver_start.launch
Now in a different shell of the real robot, you launch the script used to move the robot:
source ~/catkin_ws/devel/setup.bash
roslaunch morpheus_chair_pkg keyboard_teleop.launch
Your real robot now should be moving.
Youtube Video
We hope you liked the post. If you prefer, we also have a live version of it in YouTube with all the details. Please have a look following the link below:
More Resources
New Retro Wave + Bachelor of Hearts Aurora Borealis
Smooth vibes for you retro soul. Listen and enjoy.
OUT NOW on NRW Records:
https://newretrowave.bandcamp.com/album/a-cosmic-funk-odyssey-ep
iTunes: http://apple.co/2r6N1T7
Support:
https://www.facebook.com/BachelorOfHeartsmusic/
Artwork provided by Murryous, who is our featured artist for May. Please support him:
https://www.instagram.com/murryous/
Hang Ups (Want You) 4:04 Otis McDonald Hip hop y rap | Dramática
Puedes usar esta canción en cualquiera de tus vídeos.
———————–
No Copyright Motion Graphics
Motion Graphics provided by https://www.youtubestock.com
YouTube Channel: https://goo.gl/aayJRf
———————–
Explosion Sounds from:
https://www.youtube.com/channel/UCr9ibM1ESxixN5egOyh94mQ
———————–
Explosion Video from:
———————–
3D Models:
Orange Robot:
https://www.blendswap.com/blends/view/77718
Sphere Robot:
https://www.blendswap.com/blends/view/80818
Robot Parts:
https://www.blendswap.com/blends/view/78357
Mars Lander:
https://www.blendswap.com/blends/view/81264
#ROS #RaspberryPi #Robot #rostutorials #Ubuntu #camera #ssh #ROS in RaspberryPi #kinetic #differential drive

![[Morpheus-Chair]-Differential-drive-with-RaspBerryPi-Episode-4](https://www.theconstruct.ai/wp-content/uploads/2019/02/Morpheus-Chair-Differential-drive-with-RaspBerryPi-Episode-4.jpg)


This is good but I would have liked to see a more top down description, starting with what you want the robot to do, and the “commands” that you will use to drive it. – then the implementation of the commands – instead of diving into the implementation and then letting us discover what the commands are.