What will you learn in this post
- How to create Python classes in ROS
- When & why do you need these classes in the first place.
- How to spawn a custom simulation in ROS Development Studio (ROSDS) and move it using our python classes.
List of materials with all the content of this post
- ROSject containing all the code shown here
- The ROSject contains the code of the following git: WhyDoINeedThis
Start the provided ROSject
The first thing you need to do is to copy the ROSject aforementioned. Click on the link to get an automatic copy.
Launch the ROSject
To launch the copied ROSject, go to your ROSDS account and click on the Open button of the copied rosject (see image below). Remember that the rosject you have to open is called WhyINeedIt.
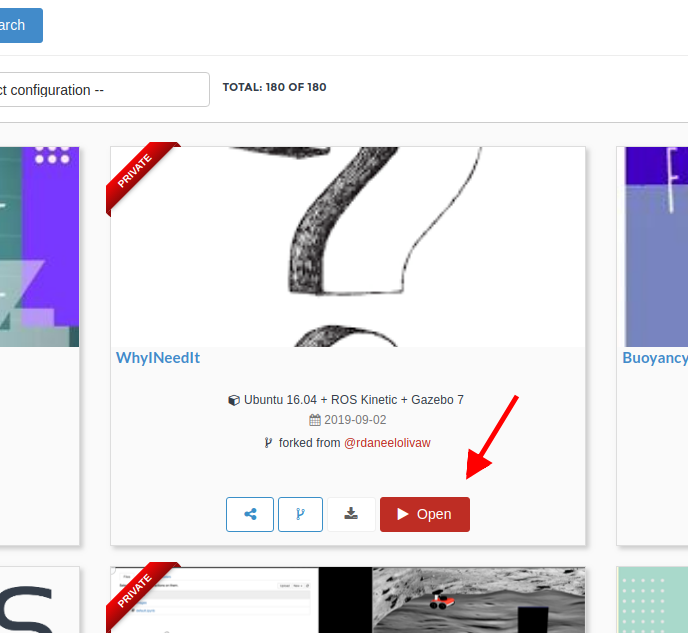
why_python_Classes_rosject
Once the rosject is open, you must see a screen like this:
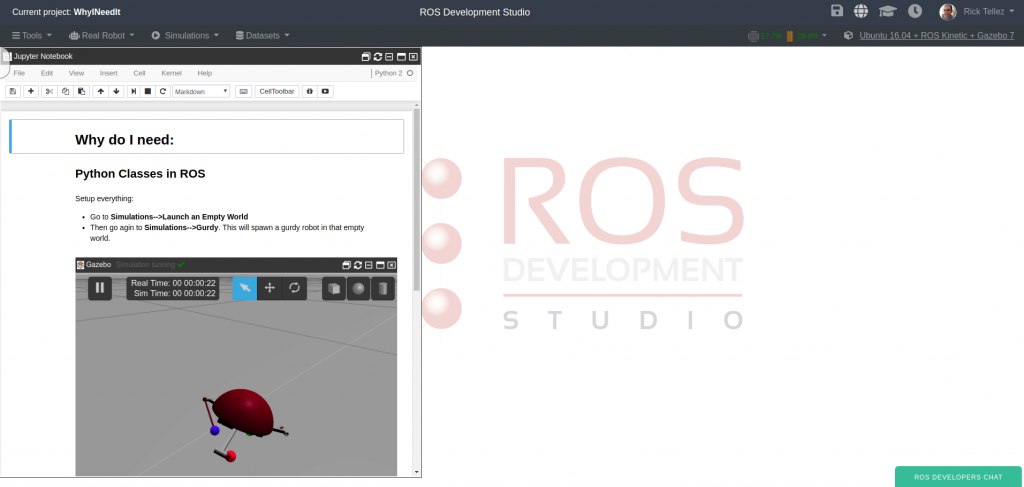
python_rosject_open
At this point, you have succeeded in launching the ROSject.
Launch the simulation
Let’s launch a simulation because we want a python class that detects when the robot is upside down. For that, let’s do the following:
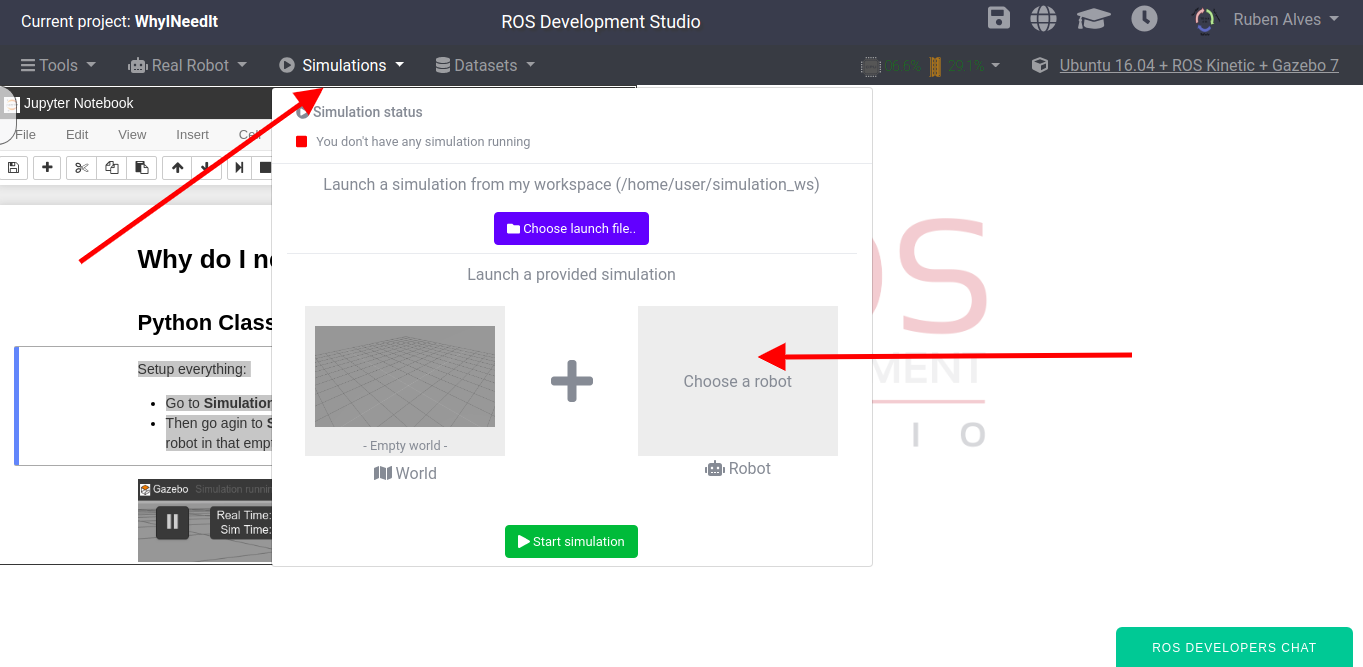
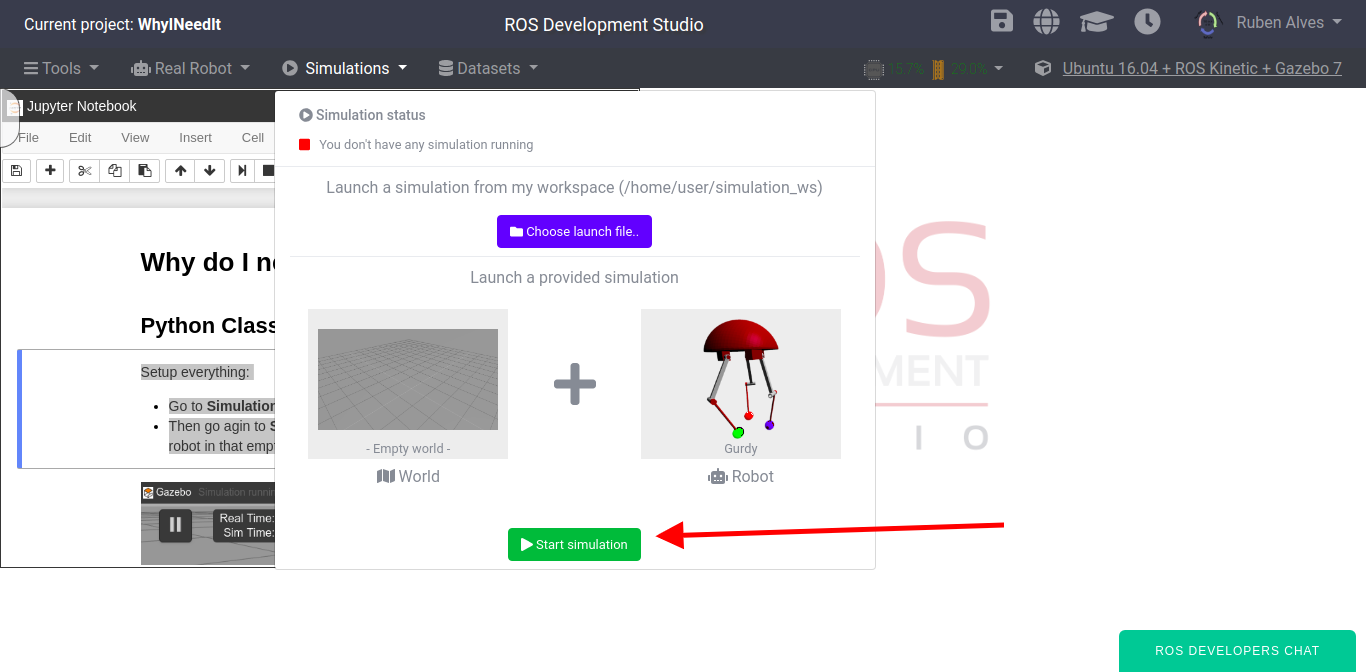
- Go to Simulations, then with the default empty world on the left, let’s click Choose a robot on the right side, as shown in the image below:
After that, you can type “gurdy” or try to find the Gurdy robot by using the scroll bar. Once the robot is selected, you just click Start Simulation.
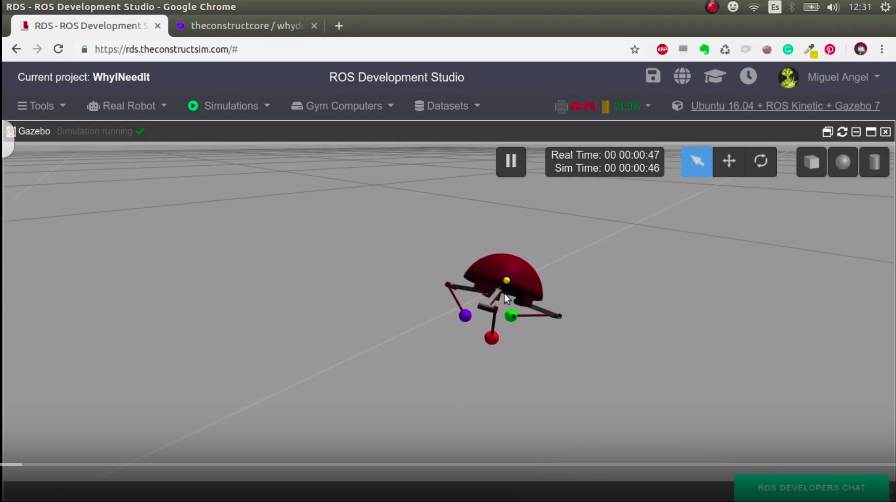
You now should see the simulation of the Gurdy robot as in the image below:
Finding the python code
The code used in this post can be found at ~/catkin_ws/src/. You can see the content with:
cd ~/catkin_ws/src/

ls
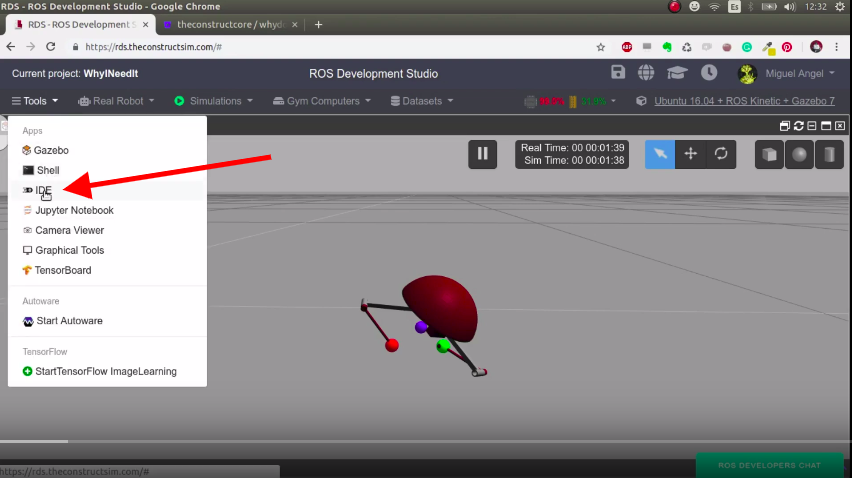
You can also find the code through the Code Editor. For that, let’s click Tools -> IDE as can be seen on the image below:
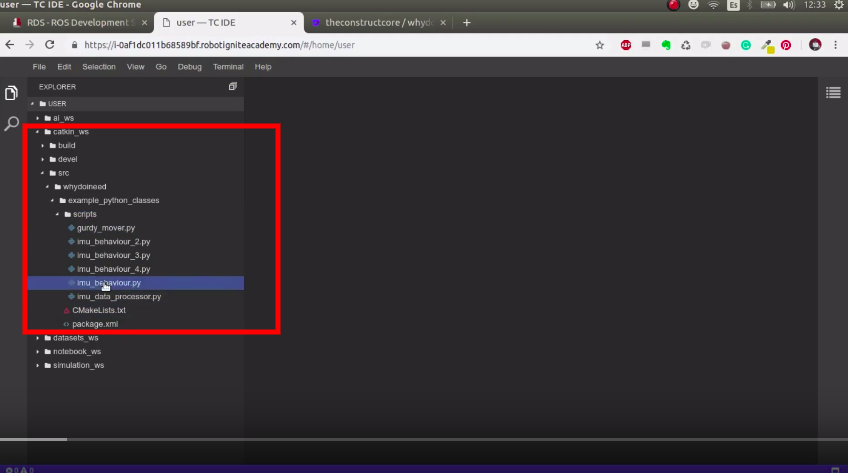
Once the IDE is open, we can find all the code that will be used to control the robot inside the catkin_ws folder (catkin workspace).
Detecting when the robot is upside down
In order to detect when the robot is upside down, we have to use the imu topic, which publishes the robot orientation. We can find the topic with the command rostopic list | grep imu :
user:~$ rostopic list | grep imu
/gurdy/imu/data
We see that the topic is named /gurdy/imu/data. We can see what is being published in this topic with rostopic echo -n1 /gurdy/imu/data , as exemplified below:
user:~$ rostopic echo -n1 /gurdy/imu/data
header:
  seq: 0
  stamp:
    secs: 277
    nsecs:  80000000
  frame_id: "base_link"
orientation:
  x: 0.0
  y: 0.0
  z: 0.0
  w: 1.0
orientation_covariance: [0.0, 0.0, 0.0, 0.0, 0.0, 0.0, 0.0, 0.0, 0.0]
angular_velocity:
  x: nan
  y: nan
  z: nan
angular_velocity_covariance: [0.0, 0.0, 0.0, 0.0, 0.0, 0.0, 0.0, 0.0,0.0]
linear_acceleration:
  x: nan
  y: nan
  z: nan
linear_acceleration_covariance: [0.0, 0.0, 0.0, 0.0, 0.0, 0.0, 0.0, 0.0, 0.0]
---
user:~$
In the output above, we are more interested in the orientation, because is what tells us whether the robot is upside down or not.
In order to detect when the robot is upside down, we execute the imu_behaviour.py found on the catkin_ws with the command below:
rosrun example_python_classes imu_behaviour.py
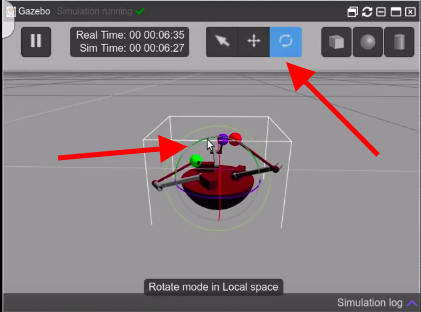
By manually turning the robot upside down, we can see in the output of this script that it correctly detects when that happens. In order to move the robot upside down, on gzweb (the simulation interface), you click on the “Rotate Mode“, then you rotate one of the arcs. In the example below, we rotate the green arc.
Moving the robot to the right orientation automatically
When we detect that the robot is upside down, we have to move its legs, so that the robot can move back to the right position. The ROS topics we have to write to are 6 and can be found with rostopic list | grep command .
user:~$ rostopic list | grep command
/gurdy/head_upperlegM1_joint_position_controller/command
/gurdy/head_upperlegM2_joint_position_controller/command
/gurdy/head_upperlegM3_joint_position_controller/command
/gurdy/upperlegM1_lowerlegM1_joint_position_controller/command
/gurdy/upperlegM2_lowerlegM2_joint_position_controller/command
/gurdy/upperlegM3_lowerlegM3_joint_position_controller/command
user:~$
We have the script called imu_behaviour_2.py which automatically detects when the robot is upside down and publish on the topics listed above to have the robot back to normal position. The content of the file is the following:
#!/usr/bin/env python

import rospy
from sensor_msgs.msg import Imu
from tf.transformations import euler_from_quaternion
from std_msgs.msg import Float64

def extract_rpy_imu_data (imu_msg):

    orientation_quaternion = imu_msg.orientation
    orientation_list = [orientation_quaternion.x,
                        orientation_quaternion.y,
                        orientation_quaternion.z,
                        orientation_quaternion.w]
    roll, pitch, yaw = euler_from_quaternion (orientation_list)
    return roll, pitch, yaw


def detect_upsidedown(roll, pitch, yaw):

    detected_upsidedown = False

    rospy.loginfo("[roll, pitch, yaw]=["+str(roll)+","+str(pitch)+","+str(yaw)+"]")

    # UpRight: 0.011138009176,0.467822324143,2.45108157992

    # UpSideDown: [-3.1415891735,-2.12226602154e-05,2.38423951221]
    # UpSideDown: [3.14141489641,-0.000114323270767,2.38379058991]

    roll_trigger = 3.0

    if abs(roll) > roll_trigger:
        rospy.logwarn("UPASIDEDOWN-ROLL!")
        detected_upsidedown = True

    return detected_upsidedown


def execute_movement_gurdy(movement):

    pub_upperlegM1_joint_position = rospy.Publisher(
            '/gurdy/head_upperlegM1_joint_position_controller/command',
            Float64,
            queue_size=1)
    pub_upperlegM2_joint_position = rospy.Publisher(
        '/gurdy/head_upperlegM2_joint_position_controller/command',
        Float64,
        queue_size=1)
    pub_upperlegM3_joint_position = rospy.Publisher(
        '/gurdy/head_upperlegM3_joint_position_controller/command',
        Float64,
        queue_size=1)
    pub_lowerlegM1_joint_position = rospy.Publisher(
        '/gurdy/upperlegM1_lowerlegM1_joint_position_controller/command',
        Float64,
        queue_size=1)
    pub_lowerlegM2_joint_position = rospy.Publisher(
        '/gurdy/upperlegM2_lowerlegM2_joint_position_controller/command',
        Float64,
        queue_size=1)
    pub_lowerlegM3_joint_position = rospy.Publisher(
        '/gurdy/upperlegM3_lowerlegM3_joint_position_controller/command',
        Float64,
        queue_size=1)


    if movement == "flip":
        rospy.logwarn("FLIP MOVEMENT")
        upperlegM1_angle = -0.7
        upperlegM2_angle = -0.7
        upperlegM3_angle = 0.7
        lowerlegM1_angle = 0.0
        lowerlegM2_angle = 0.0
        lowerlegM3_angle = 0.0
    else:
        rospy.logwarn("basic_stance MOVEMENT")
        upperlegM1_angle = -1.55
        upperlegM2_angle = -1.55
        upperlegM3_angle = -1.55
        lowerlegM1_angle = -2.55
        lowerlegM2_angle = -2.55
        lowerlegM3_angle = -2.55

    upperlegM1 = Float64()
    upperlegM1.data = upperlegM1_angle
    upperlegM2 = Float64()
    upperlegM2.data = upperlegM2_angle
    upperlegM3 = Float64()
    upperlegM3.data = upperlegM3_angle

    lowerlegM1 = Float64()
    lowerlegM1.data = lowerlegM1_angle
    lowerlegM2 = Float64()
    lowerlegM2.data = lowerlegM2_angle
    lowerlegM3 = Float64()
    lowerlegM3.data = lowerlegM3_angle

    pub_upperlegM1_joint_position.publish(upperlegM1)
    pub_upperlegM2_joint_position.publish(upperlegM2)
    pub_upperlegM3_joint_position.publish(upperlegM3)

    pub_lowerlegM1_joint_position.publish(lowerlegM1)
    pub_lowerlegM2_joint_position.publish(lowerlegM2)
    pub_lowerlegM3_joint_position.publish(lowerlegM3)

def get_imu_data(msg):
    roll, pitch, yaw = extract_rpy_imu_data(msg)
    detected_upsidedown = detect_upsidedown(roll, pitch, yaw)
    # Do something based on detect_upsidedown
    if detected_upsidedown:
        movement = "flip"
    else:
        movement = "basic_stance"
    execute_movement_gurdy(movement)


# We Start Here
rospy.init_node('imu')

sub = rospy.Subscriber ('/gurdy/imu/data', Imu, get_imu_data)

rospy.spin()
The magic happens on the function get_imu_data shown above. Based on the position of the robot it decides which movement is going to be executed. We can execute the script with the command below:
rosrun example_python_classes imu_behaviour_2.py
With the command above running, if we now flip the robot around, it will automatically recover its position.
Optimizing the code
Although the imu_behaviour_2.py does the job it is proposed, everything is in a single file and publishers are created every time the execute_movement_gurdy function is called by the get_imu_data one. In addition to that, if we are working on a big project, it is better to have some people working on detecting when the robot is upside down, other people detecting on flipping the robot, so on and so forth.
To make this possible, it is better to have different python files, each one with its different class. We do that by creating the
GurdyBehaviour class on imu_behaviour_3.py, GurdyImuDataProcessor on imu_data_processor.py and
rosrun example_python_classes imu_behaviour_4.py
So, that is the post of today. We hope you guys liked it. If so, please share this post with your friends.
Video with the explanation of this post
Remember that we also have a live version of this post, which can be found on the video below:
If you liked the video and the post, please leave your thoughts on the comments section of the video. You can also subscribe to our channel on YouTube and press the bell for a new video every day.
Post edited by Miguel, Ricardo, and Ruben.



0 Comments