
In this series of videos we are going to learn how to use MoveIt! package with industrial robots. In this series we are going to use the Sawyer robot by Rethink Robotics.
Remember that you can follow all the steps with us at the same time by using the ROS Development Studio, without having to install anything in your system, and by using any operating system (yes, you can learn ROS with Windows!!!). The instructions and steps provided here can be also made in your local computer with a proper installation of ROS.
[Movelt! Camp] Week 1: Get the Robot up and running.
In the first week of Movelt! Camp, we will learn how to get the Sawyer simulation up and running.
Step 0. Create a project in ROS Development Studio(ROSDS)
ROSDS helps you follow our tutorial in a fast pace without dealing without setting up an environment locally. If you haven’t had an account yet, you can create a free account here. Let’s create a new project and call it sawyer_simulation.
Step 1. Clone and compile the simulation
You can find the Sawyer simulation in this github repo. Inside ROSDS, we put all the packages related to simulation to the simulation_ws. So, let’s clone the repo into it and compile.
cd ~/simulation_ws/src
git clone https://github.com/RethinkRobotics/sawyer_simulator.git
cd ~/simulation_ws/src
ws_tool init .
wstool merge sawyer_simulator/sawter_simulator.rosinstall
wstool updatecd
cd ~/simulation_ws
catkin_make
Step 2. Run the simulation
You can now launch the simulation from Simulations->select launch file->sawyer_pick_and_place_demo.launch. You should see the sawyer robot and a desk in the simulation window now.
RELATED LINKS
▸ You can launch the simulation at ROS Development Studio
▸ A git repo with the Sawyer simulation
▸ Simulation installation instructions
▸ Online course about how to learn to do ROS manipulation in 5 days
[Movelt! Camp] Week 2: Create the Movelt! package for Robot.
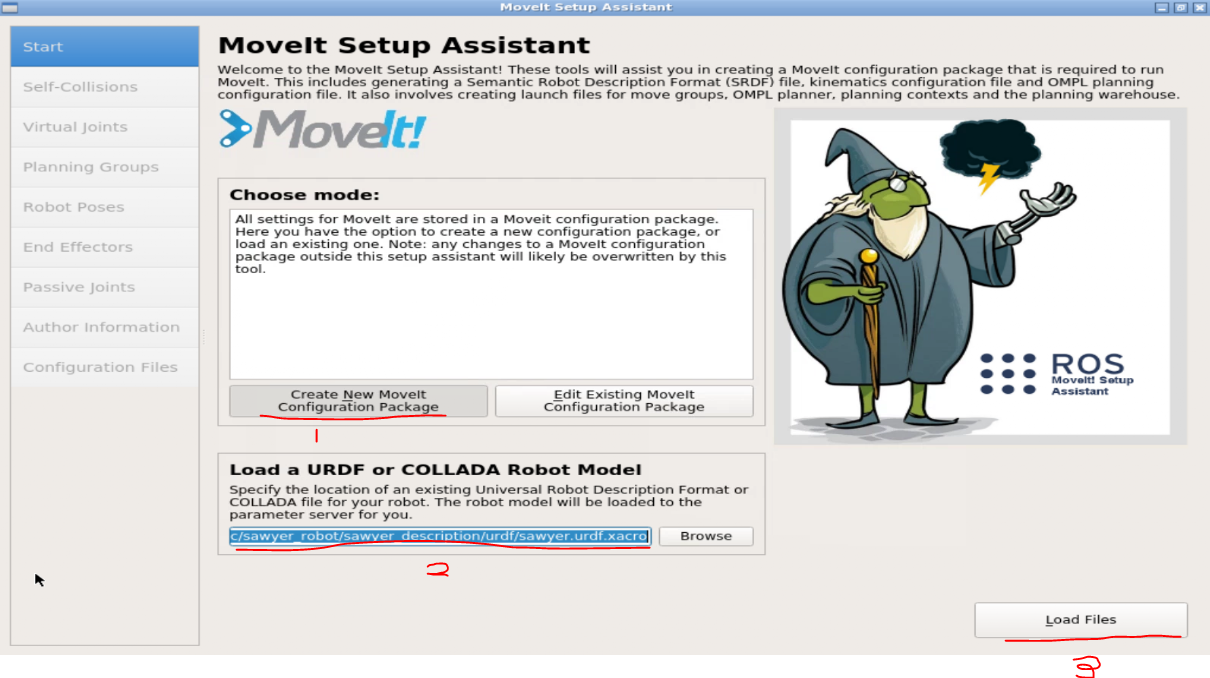
In the second week, you will learn how to create the MoveIt! configuration package for Sawyer the robot, using the moveit_setup_assistant
Step 3. Reconfigure the gripper
To use the gripper in our simulation, we need to modify the sawyer.urdf.xarco file under the ~/simulaiton_ws/src/sawyer_robot/sawyer_description/urdf folder. Please change both the gazebo and electric_gripper tags to true.
In this video, we’ll use another simulation called sawyer_world. We also need to configure it. You can find the launch file sawyer_world.launch under the ~/simulation_ws/src/sawyer_simulator/launch folder. Remember to change the electric_gripper tag to true.
Then we can finally launch the simulation from Simulations->select launch file->sawyer_world.launch.
To check if the simulation works properly, let’s try to move the joint by sending a command to the /robot/right_joint_position_controller/joints/right_j1_controller/command topic with the following command.
rostopic pub -1 /robot/right_joint_position_controller/joints/right_j1_controller/command std_msgs/Float64 "data: 1.0"
You should see the robot moves a little, so the simulation is working properly.
It’s not practical if we need to send command ourselves everytime we want to move the robot. We can use the moveit package to simplify the process for us. To configure it, we can use a graphical tool provided by moveit with the following command.
rosrun moveit_setup_assistant moveit_setup_assistant
Then go tho the Tools->graphical tool and select the urdf file we just defined.
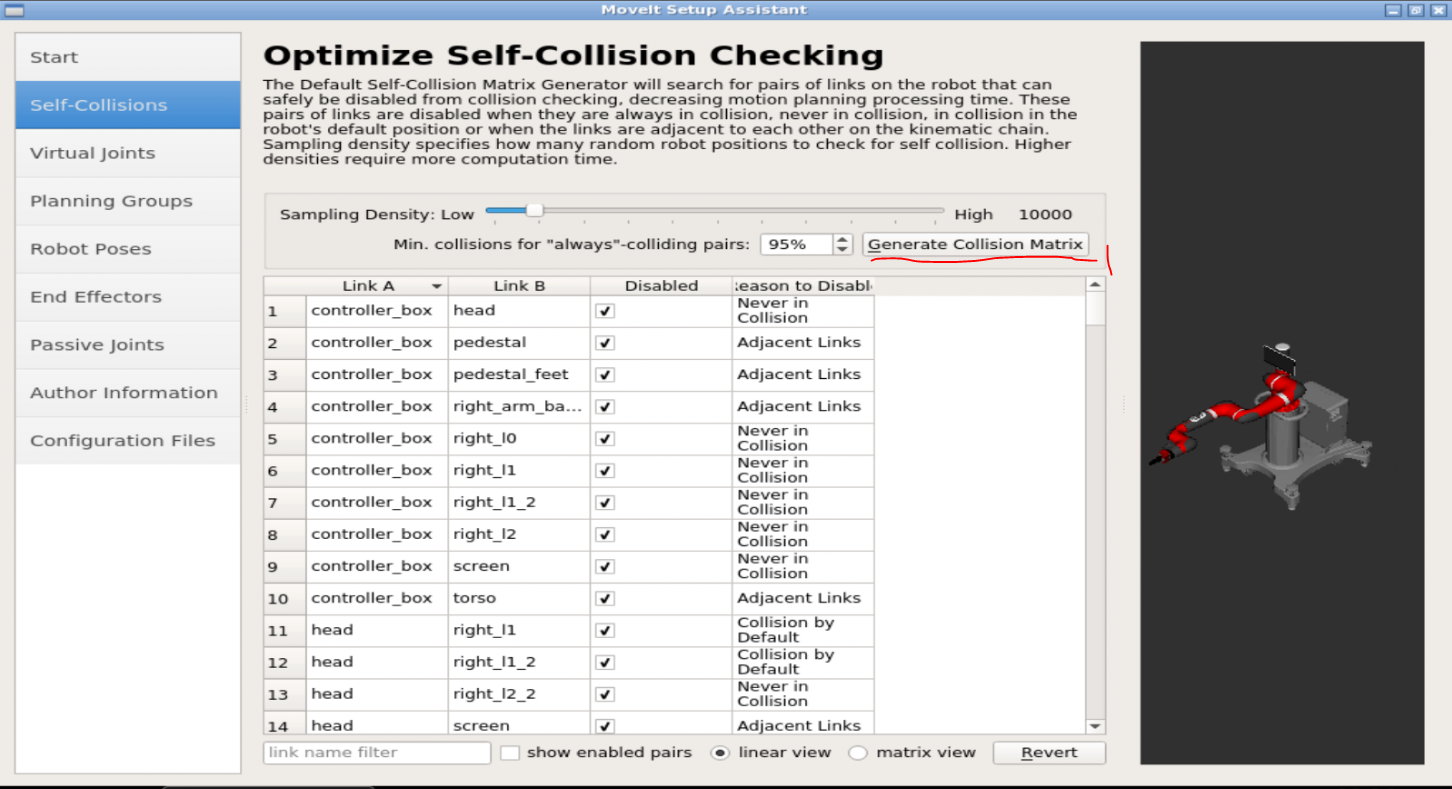
Then, in the next page, we generate the collision matrix using the default value.
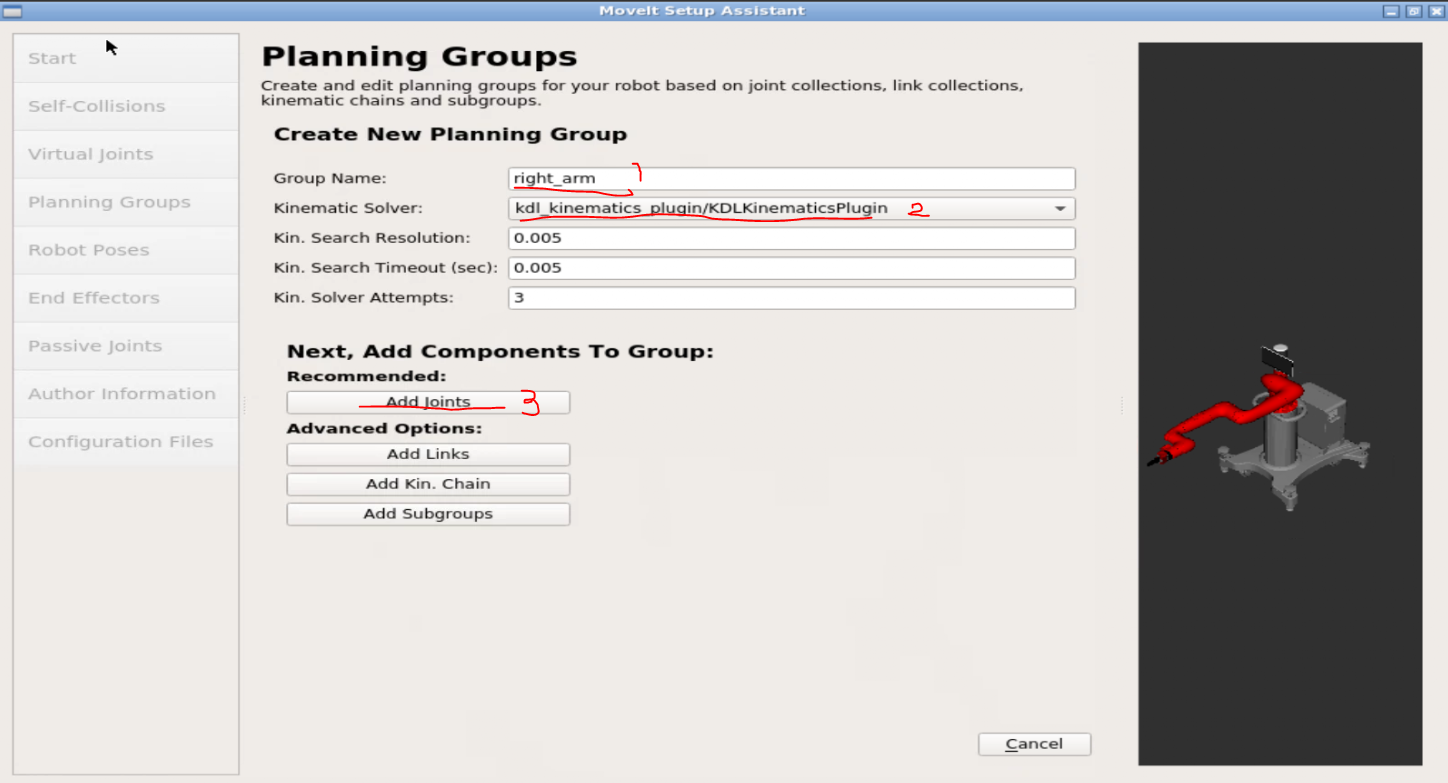
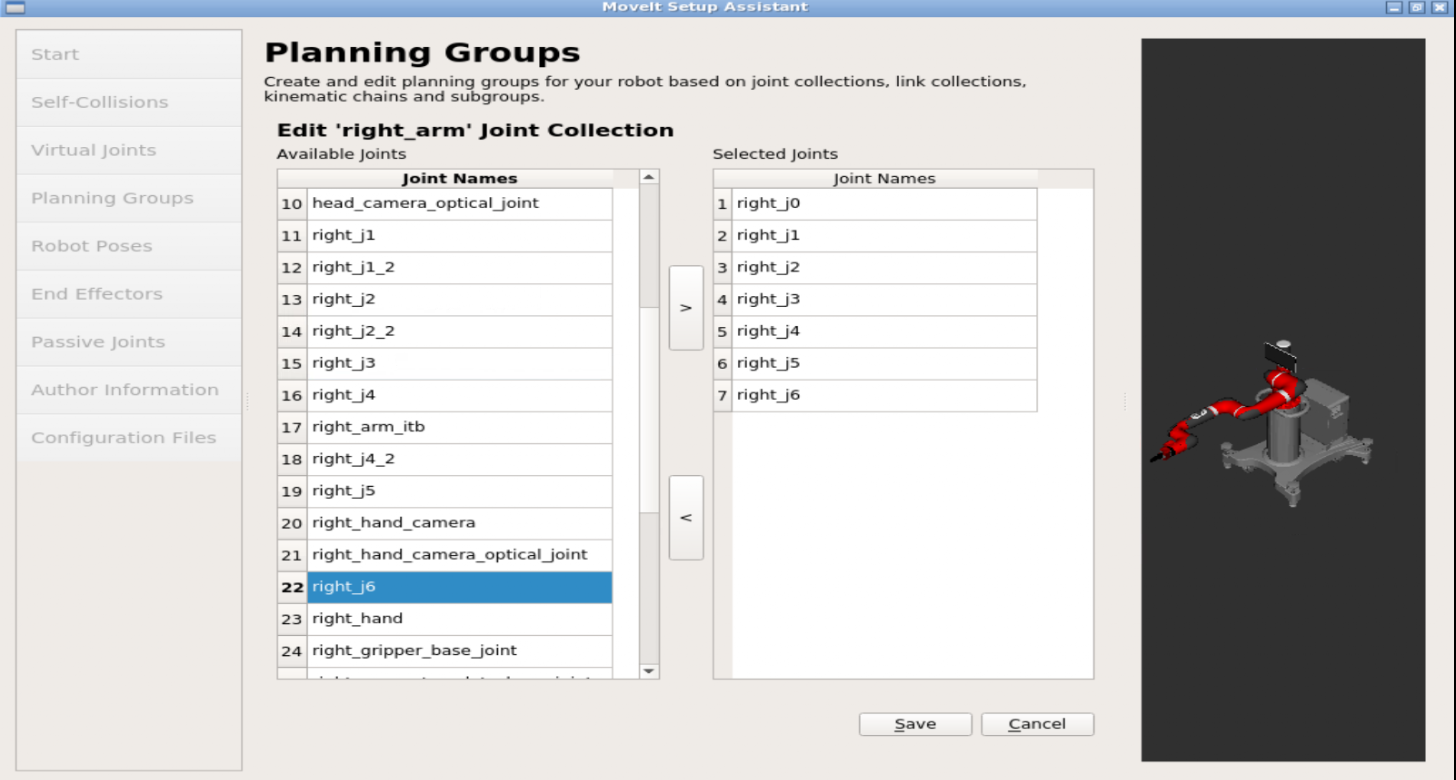
In the planning group page, let’s click add group and fill the group name as right_arm and select kdl solver, then click add joint.
Then select the joints as the following image
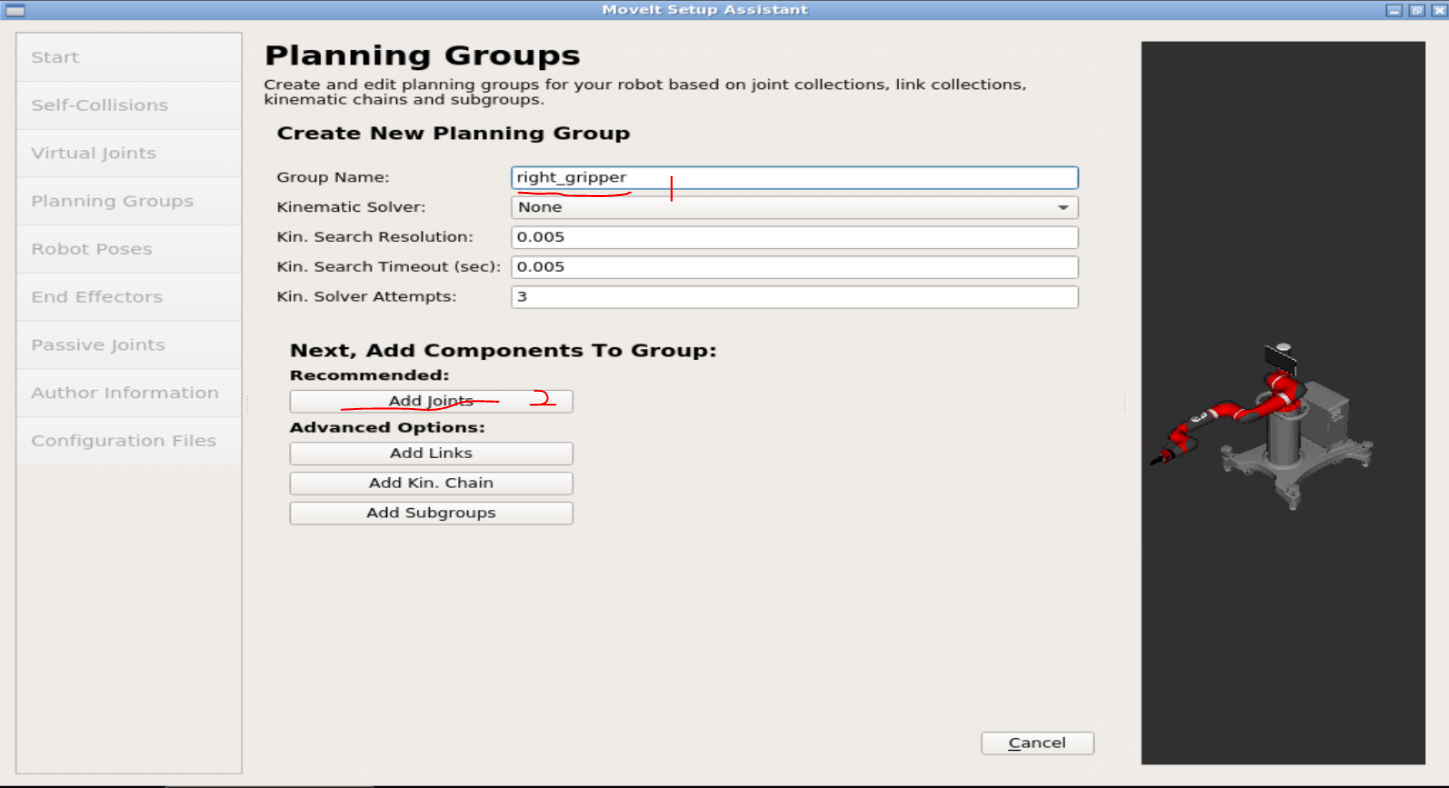
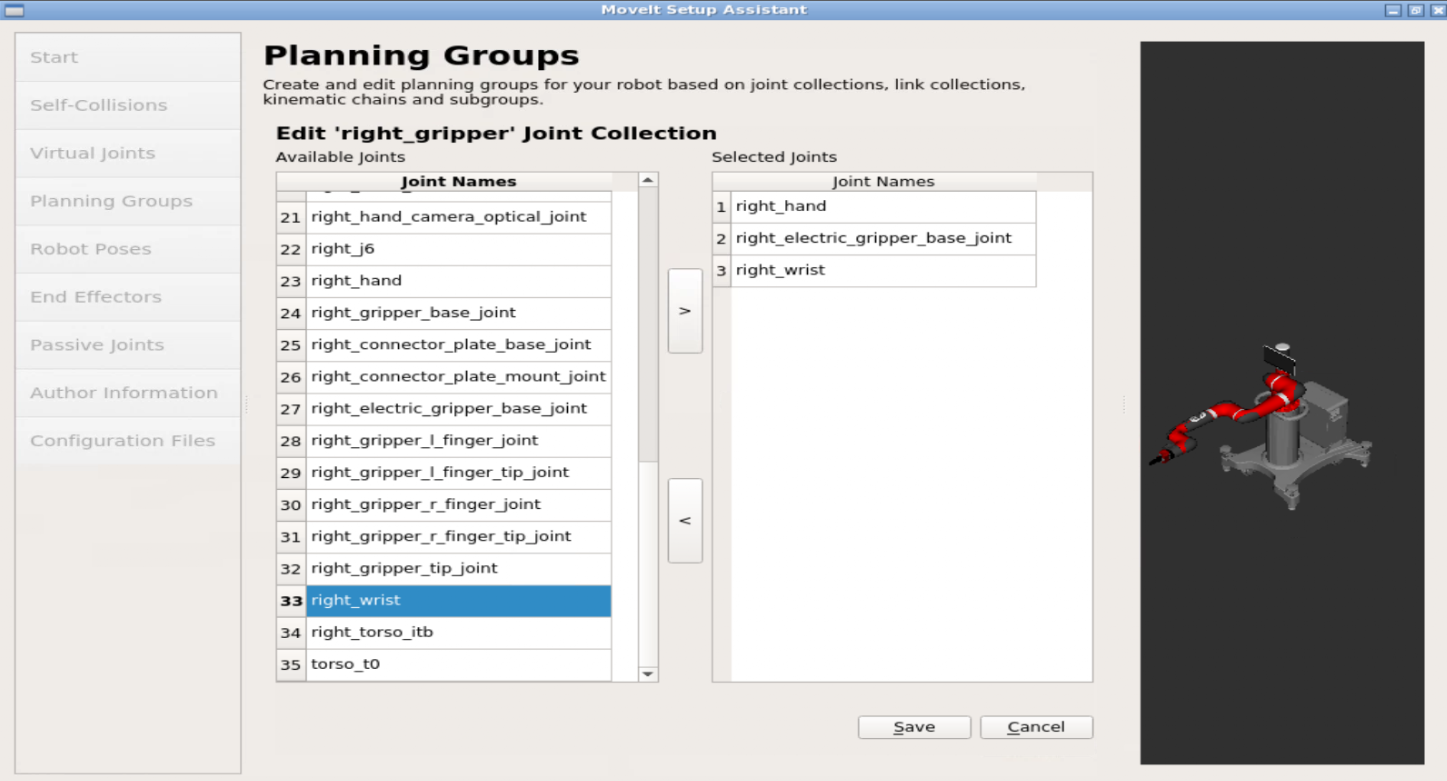
We also need one additional group called right_gripper
In the robot pose page, please set up a pose called tesing_pose for testing. You can choose any value you want.
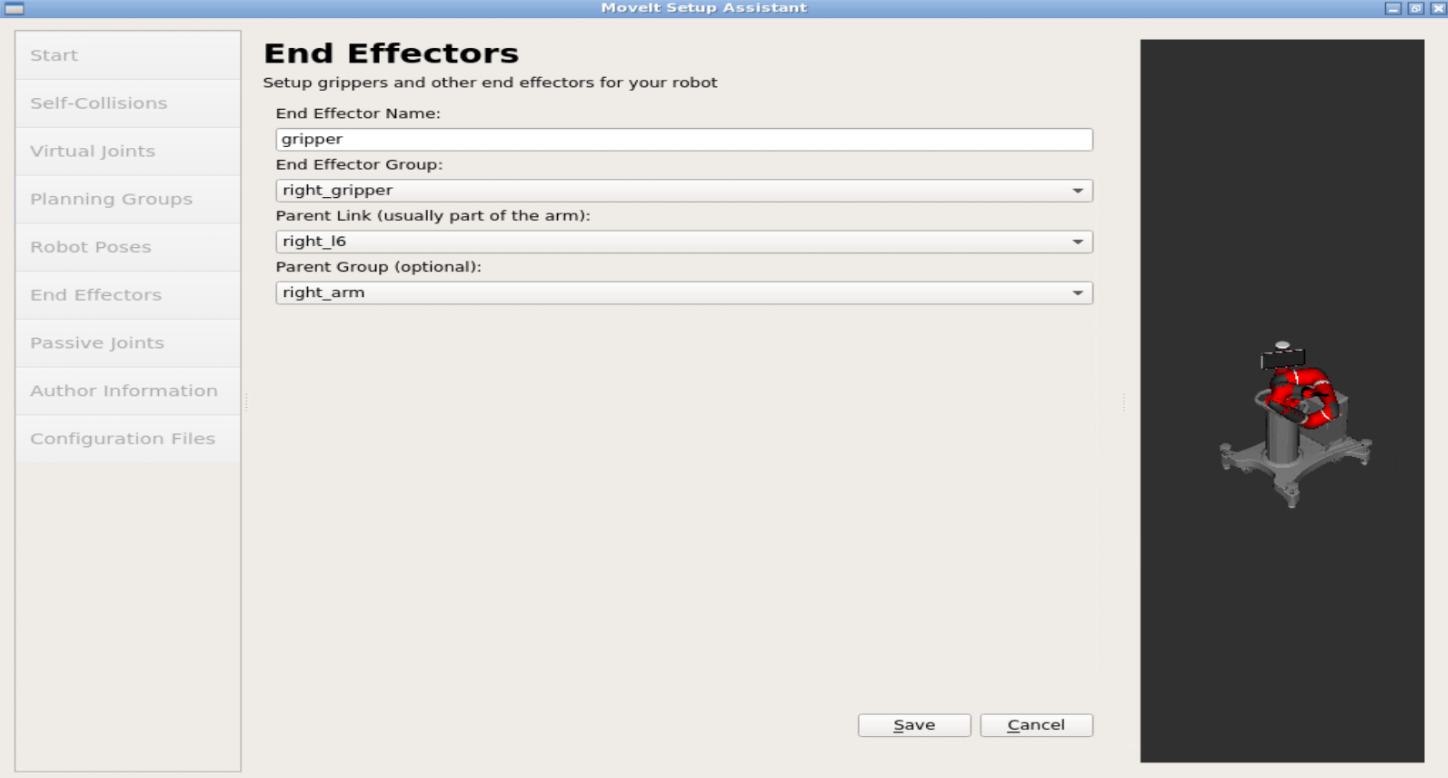
In the end_effector page, please select the links as following image.
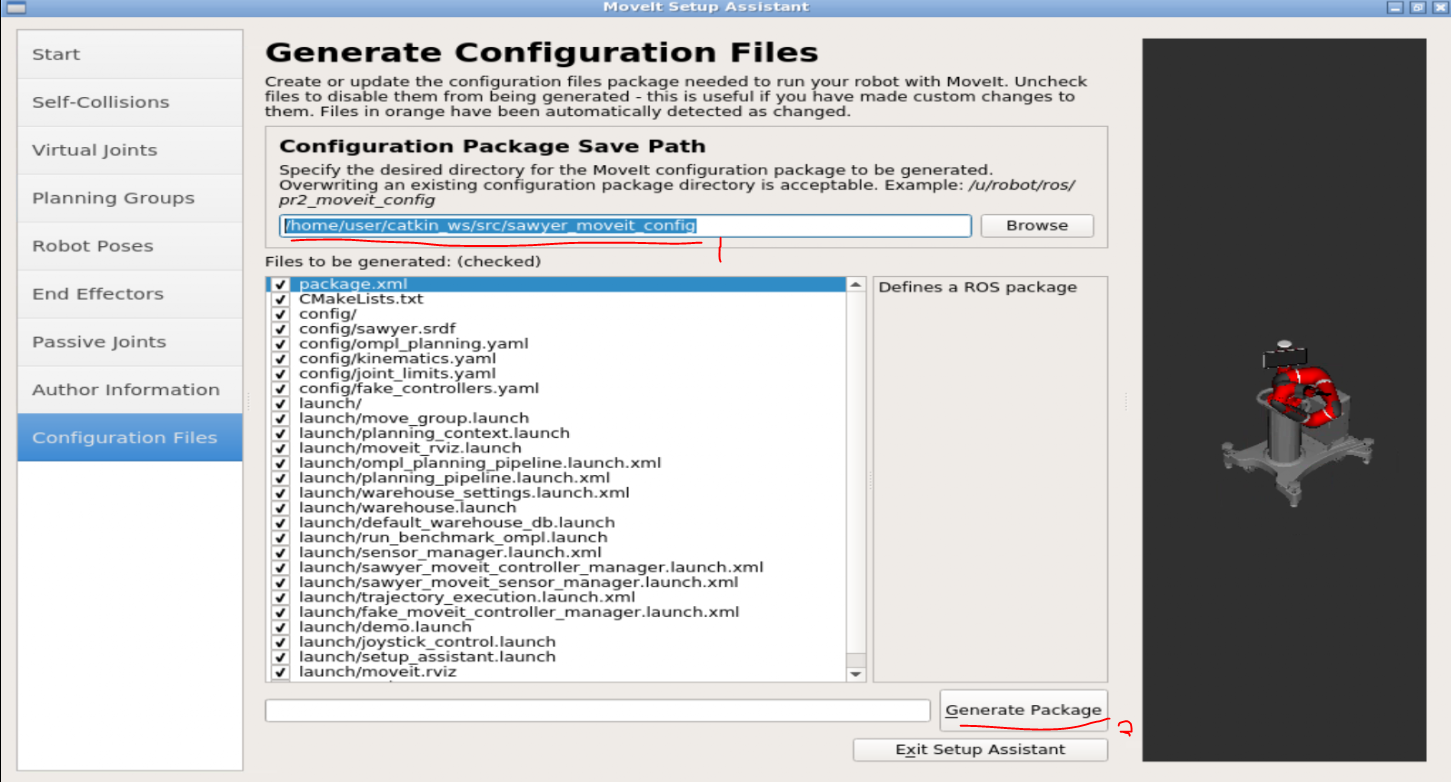
The last step is to generate the moveit package, let’s put it in a new folder called sawyer_moveit_config under the catkin_ws/src
Step 4. Use the moveit package
Now you can launch the package with the following command
roslaunch sawyer_moveit_config demo.launch
In the graphical tool, you should see the moveit, but it’s on a weird position. Please type the following command in a new shell to recenter the window.
wmctrl -r :ACTIVE: -e 0,65,24,1500,550
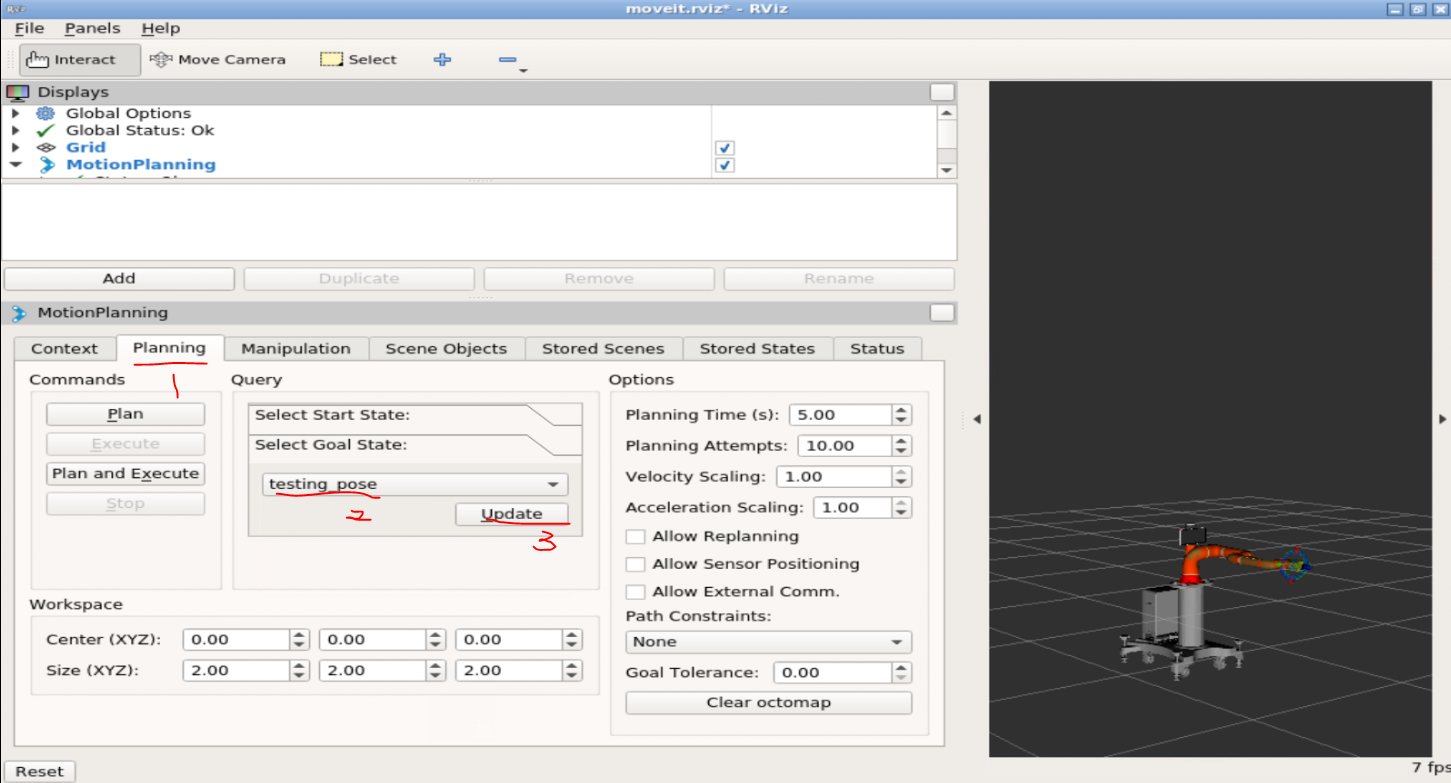
Then we can test the moveit package with our testing_pose
You should see the shadow of the robot move in the rviz tool. Then you can click plan to plan the trajectory move from the current state to the goal state- testing pose. Then you can click execute to execute the planned trajectory. How ever, this won’t move the robot in the gazebo simulation. We’ll talk about this in then next video.
RELATED LINKS
▸ You can launch the simulation at ROS Development Studio
▸ Online course about how to learn to do ROS manipulation in 5 days, including grasping.
ROS Manipulation is the term used to refer to any robot that manipulates something in its environment.
The main goal of this Course is to teach you the basic tools you need to know in order to be able to understand how ROS Manipulation works, and teach you how to implement it for any manipulator robot.
[Movelt! Camp] Week 3: How to connect your MoveIt Setup with a Real/ Simulated Robot.
For this week, we will be looking at how you can connect your MoveIt Setup from “MoveIt Camp: Week 2” to a Real/ Simulated Robot running ROS.
Step 5. Controller configuration
In order to move the robot in the gazebo simulation, we have to configure the controller. We can create a controller config file called controller.yaml file under the catkin_ws/src/sawyer_moveit_config folder with the following content
controller_list:
    - name: /robot/limb/right
      avtion_ns: follow_joint_trajectory
      type: FollowJointTrajectory
      default: true
      joints:
        - right_j0
        - right_j1
        - right_j2
        - right_j3
        - right_j4
        - right_j5
        - right_j6
We also need one launch file to launch the controller and one for the connection. We can use the sawyer_moveit_controller_manager.launch.xml file that moveit prepared for us in the sawyer_moveit_config/launch folder and modify the content as the following.
<launch>
    <!-- Set the param that trajectory_execution_manager needs to find the controller plugin -->
    <arg name="moveit_controller_manager" default="moveit_simple_controller_manager/MoveItSimpleController"
    <param name="moveit_controller_manager" value="$(arg moveit_controller_manager)" />
    <!-- The rest of the params are specific to this plugin -->

    <!-- If a controller manager is running (the generic one, not the MoveIt! one>
    <arg name="controller_manager_name" default="simple_controller_manager" />
    <param name="controller_manager_name value="$(arg controller_manager_name)" />

    <!-- Flag indicating whether the controller manager should be used or not -->
    <arg name="use_controller_manager" default="true" />
    <param name="use_controller_manager" value="$(arg use_controller_manager)" />

    <!-- load controller_list and controller_manager_ns -->
    <rosparam file="$(find sawyer_moveit_config)/config/controllers.yaml"/>
</launch>
Another launch file we need is for the connection. We name it my_connect.launch with the following content
<launch>
    <arg name="config" default="true"/>
    <arg name="rviz_config" default="$(find sawyer_moveit_config)/launch/moveit.rviz" />

    <arg name="electric_gripper" default="true" />
    <arg name="tip_name" if="$(arg electric_gripper)" default="right_gripper_tip"/>
    <arg name="tip_name" unless="$(arg electric_gripper)" default="right_hand"/>

    <!-- Add planning context launch file -->
    <include file="$(find sawyer_moveit_config)/launch/planning_context.launch">
        <arg name="load_robot_description" value="false"/>
        <arg name="electric_gripper" value="true"/>
        <arg name="tip_name" value="$(arg tip_name"/>
    </include>

    <include file="$(find sawyer_moveit_config)/launch/move_group.launch">
        <arg name="allow_trajectory_execution" value="true"/>
        <arg name="fake_execution" value="false"/>
        <arg name="info" value="$(arg electric_gripper)"/>
    </include>

    <include file="$(find sawyer_moveit_config)/config/launch/moveit_rviz.launch">
        <arg name="config" value="$(arg config)" />
        <arg name="rviz_config" value="$(arg rviz_config)" />
    </include>

</launch>
Step 6. Bring up the controller
Let’s start by lanch the trajectory action server of the robot with the following command
source ~/simulation_ws/devel/setup.bash
rosrun rosrun intera_interface joint_trajectory_action_server.py
Then run the moveit package again with the controller.
roslaunch sawyer_moveit_config my_connect.launch
Try to plan the trajectory and execute again, you should see the robot move while executing the trajectory.
Then you should go to the moveit interface from Tools->Graphical tool. Please use the following commend to reconfigure the window.
wmctrl -r :ACTIVE: -e 0,65,24,1500,550
[Movelt! Camp] Week 4: MoveIt Planning Interface: Obstacles in the robot workspace and how to avoid them.
The Robot workspace can get cluttered and it most certainly is 90% of the time. As a result, it is necessary for the Robot to know its workcell in order to allow it to effect and or plan reachable goals. This week, we will focus on the MoveIt Planning Interface and how to send goal(s) and also make and execute a calculated plan(s).
Step 7. Some changes
We’ll start using the demo.launch file to launch the project. Please change the following part.
line 32: <rosparam param=”/source_list”>[/robot/joint_states]</rosparam>
line 41: <arg name=”fake_execution” value=”false”/>
<launch>

  <!-- By default, we do not start a database (it can be large) -->
  <arg name="db" default="false" />
  <!-- Allow user to specify database location -->
  <arg name="db_path" default="$(find sawyer_moveit_config)/default_warehouse_mongo_db" />

  <!-- By default, we are not in debug mode -->
  <arg name="debug" default="false" />

  <!--
  By default, hide joint_state_publisher's GUI

  MoveIt!'s "demo" mode replaces the real robot driver with the joint_state_publisher.
  The latter one maintains and publishes the current joint configuration of the simulated robot.
  It also provides a GUI to move the simulated robot around "manually".
  This corresponds to moving around the real robot without the use of MoveIt.
  -->
  <arg name="use_gui" default="false" />

  <!-- Load the URDF, SRDF and other .yaml configuration files on the param server -->
  <include file="$(find sawyer_moveit_config)/launch/planning_context.launch">
    <arg name="load_robot_description" value="true"/>
  </include>

  <!-- If needed, broadcast static tf for robot root -->


  <!-- We do not have a robot connected, so publish fake joint states -->
  <node name="joint_state_publisher" pkg="joint_state_publisher" type="joint_state_publisher">
    <param name="/use_gui" value="$(arg use_gui)"/>
    <rosparam param="/source_list">[/robot/joint_states]</rosparam>
  </node>

  <!-- Given the published joint states, publish tf for the robot links -->
  <node name="robot_state_publisher" pkg="robot_state_publisher" type="robot_state_publisher" respawn="true" output="screen" />

  <!-- Run the main MoveIt executable without trajectory execution (we do not have controllers configured by default) -->
  <include file="$(find sawyer_moveit_config)/launch/move_group.launch">
    <arg name="allow_trajectory_execution" value="true"/>
    <arg name="fake_execution" value="false"/>
    <arg name="info" value="true"/>
    <arg name="debug" value="$(arg debug)"/>
  </include>

  <!-- Run Rviz and load the default config to see the state of the move_group node -->
  <include file="$(find sawyer_moveit_config)/launch/moveit_rviz.launch">
    <arg name="config" value="true"/>
    <arg name="debug" value="$(arg debug)"/>
  </include>

  <!-- If database loading was enabled, start mongodb as well -->
  <include file="$(find sawyer_moveit_config)/launch/default_warehouse_db.launch" if="$(arg db)">
    <arg name="moveit_warehouse_database_path" value="$(arg db_path)"/>
  </include>

</launch>
The you can source the file and run the following script to enable the robot
source simulation_ws/devel/setup.bash
rosrun intera_interface enable_robot.py -e
rosrun intera_interface joint_trajectory_action_server.py
Then you can finally launch the demo.launch with
roslaunch sawyer_moveit_config_2 demo.launch
At this point, your simulation should working properly as before.
Step 8. Motion planning with code(in C++)
Let’s start by creating a package for the planning code in catkin_ws.
cd ~/catkin_ws/src
catkin_create_pkg planning roscpp
We’ll create a file called planning.h under the include folder with the following content.
#include <moveit/move_group_interface/move_group_interface.h>
#include <moveit/planning_scene_interface/planning_scene_interface.h>
#include <string>
#include <vector>
#include <geometry_msgs/Pose.h>
#include <moveit_msgs/AttachedCollisionObject.h>
#include <moveit_msgs/CollisionObject.h>

namespace my_planning
{
    class MyPlanningClass
    {
        public:
            MyPlanningClass(): move_group(PLANNING_GROUP)
            {
                target_pose1.orientation.w = 1.0;
                target_pose1.position.x = 0.38;
                target_pose1.position.y = -0.2;
                target_pose1.position.z = 0.65;

                move_group.allowReplanning(true);
                move_group.setNumPlanningAttempts(10);
            }

            void goToPoseGoal();
            void goToPoseGoal(geometry_msgs::Pose &pose);
            void goToJointState();
            void cartesianPath();
            void resetValues();
            void addObjects();
            void makeBox(std::string blk_name, double *pose);
            void removeObjects();

        private:
            const std::string PLANNING_GROUP = "right_arm";

            moveit::planning_interface::MoveGroupInterface move_group;
            moveit::planning_interface::PlanningSceneInterface virtual_world;
            const robot_state::JointModelGroup* joint_model_group;
            moveit::planning_interface::MoveGroupInterface::Plan my_plan;

            geometry_msgs::Pose target_pose1;
    };
}
This file includes the packages that we need for planning and create several objects. Then we create a planning.cpp file under the src folder with the following content.
#include <planning.h>

namespace my_planning
{
        void MyPlanningClass::goToPoseGoal()
        {
            move_group.setPoseTarget(target_pose1);
            bool success = (move_group.plan(my_plan) == moveit::planning_interface::MoveItErrorCode::SUCCESS);
            if(!success) //execute
                throw std::runtime_error("No plan found");

            move_group.move(); //blocking
        }

        void MyPlanningClass::goToPoseGoal(geometry_msgs::Pose &pose)
        {
            move_group.setPoseTarget(pose);
            ros::Duration(0.5).sleep();
            bool success = (move_group.plan(my_plan) == moveit::planning_interface::MoveItErrorCode::SUCCESS);
            /*while (!success) //keep trying until a plan is found
            {

                success = (move_group.plan(my_plan) == moveit::planning_interface::MoveItErrorCode::SUCCESS);
            }*/

            if(!success) //execute
                throw std::runtime_error("No plan found");

            move_group.move(); //blocking
        }

        void MyPlanningClass::goToJointState()
        {
            robot_state::RobotState current_state = *move_group.getCurrentState();
            //moveit::core::RobotStatePtr current_state = move_group.getCurrentState();
            std::vector<double> joint_positions;
            joint_model_group = current_state.getJointModelGroup(PLANNING_GROUP);
            current_state.copyJointGroupPositions(joint_model_group, joint_positions);
            //joint_positions = move_group.getCurrentJointValues();

            joint_positions[0] = -1.0;
            joint_positions[3] = 0.7;

            move_group.setJointValueTarget(joint_positions);
            bool success = (move_group.plan(my_plan) == moveit::planning_interface::MoveItErrorCode::SUCCESS);
            if(!success)
                throw std::runtime_error("No plan found");

            move_group.move(); //blocking
        }

        void MyPlanningClass::cartesianPath()
        {
            std::vector<geometry_msgs::Pose> waypoints;
            waypoints.push_back(target_pose1);

            geometry_msgs::Pose target_pose2 = target_pose1;

            target_pose2.position.z -= 0.2;
            waypoints.push_back(target_pose2);

            target_pose2.position.y -= 0.2;
            waypoints.push_back(target_pose2);

            target_pose2.position.z += 0.2;
            target_pose2.position.y += 0.2;
            target_pose2.position.x -= 0.2;
            waypoints.push_back(target_pose2);

            move_group.setMaxVelocityScalingFactor(0.1);

            // We want the Cartesian path to be interpolated at a resolution of 1 cm
            // which is why we will specify 0.01 as the max step in Cartesian
            // translation.  We will specify the jump threshold as 0.0, effectively disabling it.
            // Warning - disabling the jump threshold while operating real hardware can cause
            // large unpredictable motions of redundant joints and could be a safety issue
            moveit_msgs::RobotTrajectory trajectory;
            const double jump_threshold = 0.0;
            const double eef_step = 0.01;
            double fraction = move_group.computeCartesianPath(waypoints, eef_step, jump_threshold, trajectory);

            move_group.move();
            ROS_INFO_STREAM("Percentage of path followed: " << fraction);
        }

        void MyPlanningClass::resetValues()
        {
            //set the start state and operational speed
            move_group.setStartStateToCurrentState();
            move_group.setMaxVelocityScalingFactor(1.0);
        }

         void MyPlanningClass::makeBox(std::string blk_name, double *pose)
         {
             moveit_msgs::CollisionObject box;
            //set the relative frame
            box.header.frame_id = move_group.getPlanningFrame();
            box.id = blk_name;

            shape_msgs::SolidPrimitive primitive;
            primitive.type = primitive.BOX;
            primitive.dimensions.resize(3);
            primitive.dimensions[0] = 0.2;
            primitive.dimensions[1] = 0.2;
            primitive.dimensions[2] = 1.0;

            geometry_msgs::Pose box_pose;
            box_pose.orientation.w = 1.0;
            box_pose.position.x = pose[0];
            box_pose.position.y = pose[1];
            box_pose.position.z = pose[2];

            box.primitives.push_back(primitive);
            box.primitive_poses.push_back(box_pose);
            box.operation = box.ADD;

            std::vector<moveit_msgs::CollisionObject> collisionObjects;
            collisionObjects.push_back(box);
            ros::Duration(2).sleep();
            virtual_world.addCollisionObjects(collisionObjects);
            ROS_INFO_STREAM("Added: " << blk_name);
         }

        void MyPlanningClass::addObjects()
        {
            double box_pose1[3] = {0.60, -0.67, 0.0,};
            makeBox("block_1", box_pose1);

            double box_pose2[3] = {0.0, 0.77, 0.0,};
            makeBox("block_2", box_pose2);
        }

        void MyPlanningClass::removeObjects()
        {
            std::vector<std::string> object_ids;
            object_ids.push_back("block_1");
            object_ids.push_back("block_2");
            virtual_world.removeCollisionObjects(object_ids);
        }
}
Let’s create another file called run.cpp under the src folder with the following content
#include <planning.h>

int main(int argc, char **argv)
{
    ros::init(argc, argv, "custom_interfacing");
    ros::NodeHandle node_handle;
    ros::AsyncSpinner spinner(2);
    spinner.start();

    if(argc != 2)
    {
        ROS_INFO(" ");
        ROS_INFO("\tUsage:");
        ROS_INFO(" ");
        ROS_INFO("\trosrun planning run  n");
        return 1;
    }

    my_planning::MyPlanningClass my_planning_;

    int selection = atoi(argv[1]);
    switch(selection)
    {
        my_planning_.resetValues();

        case 1:
            my_planning_.goToPoseGoal();
            break;
        case 2:
            my_planning_.goToJointState();
            break;
        case 3:
            my_planning_.cartesianPath();
            break;
        case 4:
            my_planning_.addObjects();
            break;
        case 5:
            my_planning_.removeObjects();
    }


    spinner.stop();
    return 0;
}
In order to compile the code, we have to change some parts in the CMakeLists.txt
...
add_definitions(-std=c++11)
...
find_package(catkin REQUIRED COMPONENTS
  roscpp moveit_ros_planning_interface
)
...
catkin_package(
  INCLUDE_DIRS include
  CATKIN_DEPENDS roscpp
)
...
add_executable(run src/run.cpp src/planning.cpp include/planning.h)
target_link_libraries(run ${catkin_LIBRARIES})
...
include_directories(
  include
  ${catkin_INCLUDE_DIRS}
)
Then you can run compile with
cd ~/catkin_ws
catkin_make
source devel/setup.bash
rospack profile
Then we can run the executable with
rosrun planning run 3
[Movelt! Camp] Week 5: 3D Perception with MoveIt.
So you might have read about or thought of incorporating Point Cloud data into MoveIt. With this being the fifth and final week on MoveIt Camp, let’s do just that. We are going to integrate 3D Perception into MoveIt and also look at some related applications.
Tutorial by: Epshon Guakro
Video’s Cover by: Yuhong Lim
Edit by: Tony Huang




The following error pops up when “`roslaunch sawyer_moveit_config my_connect.launch“` as mentioned in Week 3 Step 6.
mmahdi42@tntech.edu@PRSC102-D02:~/ros_ws$ roslaunch sawyer_moveit_config my_connect.launch
… logging to /home/mmahdi42@tntech.edu/.ros/log/055fbaf6-00b7-11ef-aa79-4dc89fc74e20/roslaunch-PRSC102-D02-182227.log
Checking log directory for disk usage. This may take a while.
Press Ctrl-C to interrupt
Done checking log file disk usage. Usage is <1GB.
RLException: unused args [electric_gripper, tip_name] for include of [/home/mmahdi42@tntech.edu/ros_ws/src/sawyer_moveit_config/launch/planning_context.launch]
The traceback for the exception was written to the log file