

Learn how to know if the robot has moved one-meter using Odometry. You’ll learn how to:
- create a Python program for calculating the distance moved by the robot using the Odometry topic and publish it into a topic.
- create a Python program for testing that we can move the robot depending on the Odometry data.
Let’s go!
Related Resources
Step 1: Get your development environment ready and grab a copy of the code
- Click here to grab a copy of the ROSject already containing the project. This requires an account on the ROS Development Studio (ROSDS), an online platform for developing for ROS within a PC browser. If you don’t have an account, you will be asked to create one.
- To open a “terminal” on ROSDS, pick the
Shellapp from the Tools menu. - You can find the
IDEapp on the Tools menu.
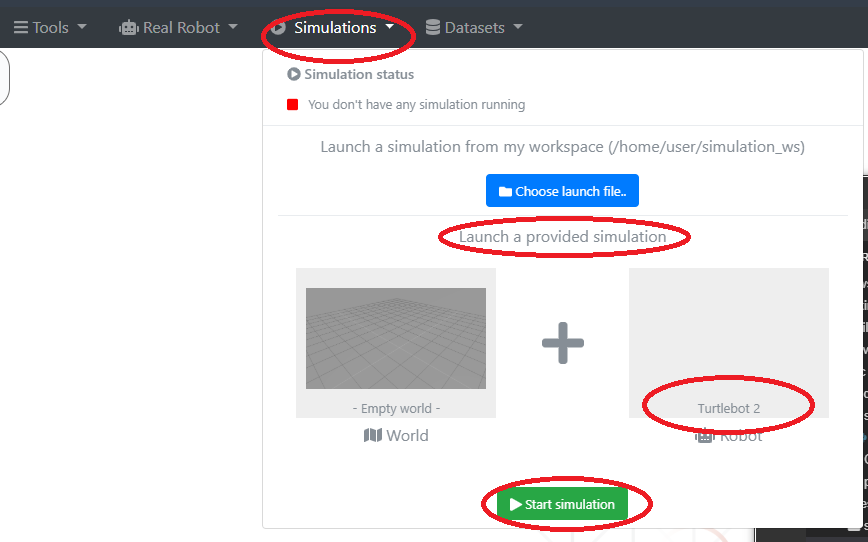
Step 2: Start a Simulation
We are going to use the TurtleBot 2 simulation.
- Click on Simulations from the main menu.
- Under Launch a provided simulation, leave “Empty world” selected and click on Choose a robot.
- Type “turtle” into the search box and select TurtleBot 2.
- Click Start Simulation.
- A window showing the TurtleBot 2 in an empty world should show up.
Step 3: Examine the structure of Odometry messages
Let’s see the structure of an Odom message. Open a terminal and run:
user:~$ rostopic echo /odom -n1
header:
  seq: 14929
  stamp:
    secs: 748
    nsecs: 215000000
  frame_id: "odom"
child_frame_id: "base_footprint"
pose:
  pose:
    position:
      x: 0.00668370211388
      y: 0.00010960687178
      z: -0.000246865753431
    orientation:
      x: 0.000389068511716
      y: -0.00720626927928
      z: 0.000354481463316
      w: 0.999973895985
  covariance: [1e-05, 0.0, 0.0, 0.0, 0.0, 0.0, 0.0, 1e-05, 0.0, 0.0, 0.0, 0.0, 0.0, 0.0, 1000000000000.0, 0.0, 0.0, 0.0, 0.0,0.0, 0.0, 1000000000000.0, 0.0, 0.0, 0.0, 0.0, 0.0, 0.0, 1000000000000.0, 0.0, 0.0, 0.0, 0.0, 0.0, 0.0, 0.001]
twist:
  twist:
    linear:
      x: 2.30945682841e-05
      y: 0.000390977104083
      z: 0.0
    angular:
      x: 0.0
      y: 0.0
      z: -0.000507764995516
  covariance: [0.0, 0.0, 0.0, 0.0, 0.0, 0.0, 0.0, 0.0, 0.0, 0.0, 0.0, 0.0, 0.0, 0.0, 0.0, 0.0, 0.0, 0.0, 0.0, 0.0, 0.0, 0.0, 0.0, 0.0, 0.0, 0.0, 0.0, 0.0, 0.0, 0.0, 0.0, 0.0, 0.0, 0.0, 0.0, 0.0]
---
The part of the message that stores the current position of the robot is the pose.pose.position:
user:~$ rostopic echo /odom -n1
# ...
pose:
  pose:
    position:
      x: 0.00668370211388
      y: 0.00010960687178
      z: -0.000246865753431
# ...
This part is what is used in the Python script that calculates the distance moved.
Step 4: Understand the Python scripts
1. Open the IDE and browse to the src folder. You will find two packages odom_movement_detector and test_movement. Each of these projects contains a Python script, each explained with comments in the code
odom_movement_detector/src/odom_movement_detector.py
#!/usr/bin/env python

import rospy
import math
from nav_msgs.msg import Odometry
from geometry_msgs.msg import Point
from std_msgs.msg import Float64

class MovementDetector(object):
    def __init__(self):
        """Initialize an object of the MovementDetector class."""
        # _mved_distance is for stored distance moved
        # create and initialize it here. Initial value is 0.0
        self._mved_distance = Float64()
        self._mved_distance.data = 0.0

        # Get the inital position. This will be a reference point for calculating
        # the distance moved
        self.get_init_position()

        # Create a publisher for publishing the distance moved into the topic '/moved_distance'
        self.distance_moved_pub = rospy.Publisher('/moved_distance', Float64, queue_size=1)

        # create a subscriber for getting new Odometry messages
        rospy.Subscriber("/odom", Odometry, self.odom_callback)

    def get_init_position(self):
        """Get the initial position of the robot."""
        """
        Structure of the odom position message:
        user:~$ rostopic echo /odom -n1
        header:
        seq: 14929
        stamp:
            secs: 748
            nsecs: 215000000
        frame_id: "odom"
        child_frame_id: "base_footprint"
        pose:
        pose:
            position:
            x: 0.00668370211388
            y: 0.00010960687178
            z: -0.000246865753431
        """
        data_odom = None
        # wait for a message from the odometry topic and store it in data_odom when available
        while data_odom is None:
            try:
                data_odom = rospy.wait_for_message("/odom", Odometry, timeout=1)
            except:
                rospy.loginfo("Current odom not ready yet, retrying for setting up init pose")

        # Store the received odometry "position" variable in a Point instance
        self._current_position = Point()
        self._current_position.x = data_odom.pose.pose.position.x
        self._current_position.y = data_odom.pose.pose.position.y
        self._current_position.z = data_odom.pose.pose.position.z

    def odom_callback(self, msg):
        """Process odometry data sent by the subscriber."""
        # Get the position information from the odom message
        # See the structure of an /odom message in the `get_init_position` function
        NewPosition = msg.pose.pose.position

        # Calculate the new distance moved, and add it to _mved_distance and
        self._mved_distance.data += self.calculate_distance(NewPosition, self._current_position)

        # Update the current position of the robot so we have a new reference point
        # (The robot has moved and so we need a new reference for calculations)
        self.updatecurrent_positin(NewPosition)

        # If distance moved is big enough, publish it to the designated topic
        # Otherwise publish zero
        if self._mved_distance.data < 0.000001:
            aux = Float64()
            aux.data = 0.0
            self.distance_moved_pub.publish(aux)
        else:
            self.distance_moved_pub.publish(self._mved_distance)

    def updatecurrent_positin(self, new_position):
        """Update the current position of the robot."""
        self._current_position.x = new_position.x
        self._current_position.y = new_position.y
        self._current_position.z = new_position.z

    def calculate_distance(self, new_position, old_position):
        """Calculate the distance between two Points (positions)."""
        x2 = new_position.x
        x1 = old_position.x
        y2 = new_position.y
        y1 = old_position.y
        dist = math.hypot(x2 - x1, y2 - y1)
        return dist

    def publish_moved_distance(self):
        # spin() simply keeps python from exiting until this node is stopped
        rospy.spin()

if __name__ == '__main__':
    # create a node for running the program
    rospy.init_node('movement_detector_node', anonymous=True)

    # create an instance of the MovementDetector class and set the code
    # in motion
    movement_obj = MovementDetector()
    movement_obj.publish_moved_distance()
test_movement/src/test_movement.py
#!/usr/bin/env python

import rospy
from geometry_msgs.msg import Twist
from std_msgs.msg import Float64

def my_callback(msg):
    """Callback function that processes messages from the subscriber."""

    # get the distance moved from the message
    distance_moved = msg.data

    # If distance is less than 2, continue moving the robot
    # Otherwise, stop it (by pubishing `0`)
    if msg.data < 2:
        move.linear.x = 0.1

    if msg.data > 2:
        move.linear.x = 0

    pub.publish(move)

# create a node for running the program
rospy.init_node('test_movement')

# create a subscriber that gets the distance moved
sub = rospy.Subscriber('/moved_distance', Float64, my_callback)

# Create a publisher that moves the robot
pub = rospy.Publisher('/cmd_vel', Twist, queue_size="1")

# Create a global variable for publising a Twist ("cmd_vel") message
move = Twist()

# Keep the program running
rospy.spin()
Step 5: See the Python scripts in action
Open a terminal and run the movement detector:
user:~$ rosrun odom_movement_detector odom_movement_detector.py
Open another terminal and check the distance being published to the /moved_distance:
user:~$ rostopic echo /moved_distance
data: 0.00280330822873
---
data: 0.00280530307334
You can see from above that the distance is not changing (more or less) because the robot is stationary. Now let’s move the robot:
user:~$ rosrun test_movement test_movement.py
Now you should see the robot moving and moved_distance increasing. It should stop when moved_instance > 2.0.
user:~$ rostopic echo /moved_distance
data: 0.00280330822873
---
data: 0.00280330822873
---
data: 0.00280330822873
---
data: 0.00280330822873
---
data: 0.00280330822873
---
# ...
data: 1.00280330822873
---
# ...
data: 2.00280330822873
---
And that’s it. I hope you had some fun!
Extra: Video of the post
Here below you have a “sights and sounds” version of this post, just in case you prefer it that way. Enjoy!
Feedback
Did you like this post? Do you have any questions about the explanations? Whatever the case, please leave a comment on the comments section below, so we can interact and learn from each other.
If you want to learn about other ROS or ROS2 topics, please let us know in the comments area and we will do a video or post about it.
Edited by Bayode Aderinola


0 Comments