Hello ROS enthusiasts!
In this post, we’ll see what a ROS(2) node is, and the similarities and differences between ROS1 and ROS2 nodes. We’ll do this using both practicals and theory, practicals first!
Let’s go!
Setup for the practicals
I believe passionate engineers like to get their hands dirty as much as they like to have solid theoretical foundations. And, since I get to decide here ?, we’ll start with the latter.
Now, the required setup for practicals (installation of ROS and other packages) can take a lot of time but, thankfully, we have an easy way out – ROSDS. With this online tool, you will have access to ROS-ready computers (both ROS1 and ROS2) within your browser in a few seconds. If you don’t have one already, you can create a free account here.
PS:
- When you create a project (ROSject) on ROSDS, be sure to select the
Ubuntu 16.04 + ROS Kinetic + Gazebo 7configuration. - If you have access to local installations of ROS1 and ROS2, and you don’t want to embrace the online revolution yet, then you can also use your local installations.
- When I say ‘terminal’ in this post, that means picking the
Shellapp from the ROSDSToolsmenu or opening a terminal on your local PC.
Practicals – ROS nodes in action
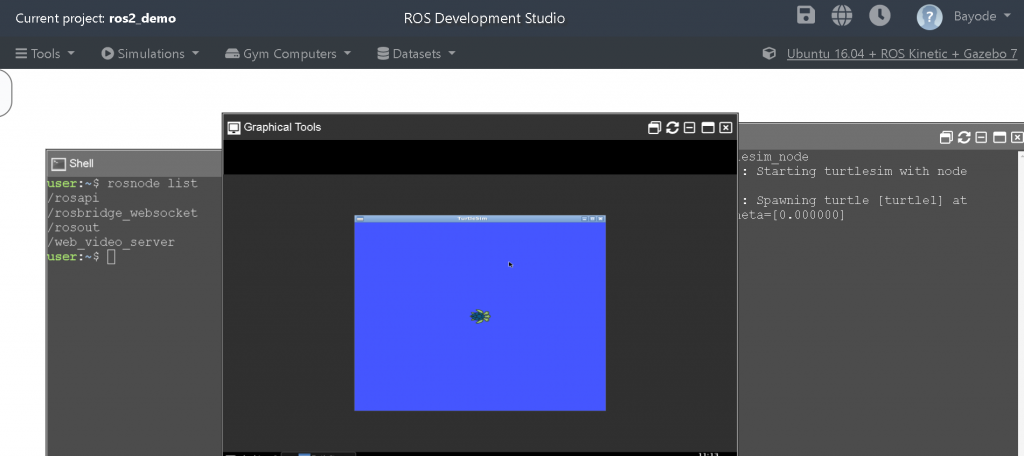
For a practical-oriented topic, we’ve had enough theory already; let’s get down to it and see ROS nodes in action! Fire up a terminal and run the command that displays a list of nodes in ROS1. Your output might be different, but you should have a list of items like this:
user:~$ rosnode list
/rosapi
/rosbridge_websocket
/rosout
/web_video_server
Take note of the items listed above and then run the following command in another terminal:
user:~$ rosrun turtlesim turtlesim_node
[ INFO] [1548414518.301208787]: Starting turtlesim with nodename /turtlesim
[ INFO] [1548414518.309271531]: Spawning turtle [turtle1] atx=[5.544445], y=[5.544445], theta=[0.000000]
To see the turtle on ROSDS, pick the Graphical Tools app from the Tools menu to see your cute turtle:
Well done! Now go back to the previous terminal and re-run the command that displays a list of nodes in ROS1. Now you should see an extra node (“/turtlesim”) in your list.
user:~$ rosnode list
/rosapi
/rosbridge_websocket
/rosout
/turtlesim
/web_video_server
So far so good, but all that is ROS1, so now let’s #goROS2! In another terminal, run the command shown. That should bring up a ROS2-ready docker machine, waiting for your command:
user:~$ docker run -it osrf/ros2:bouncy-desktop
Unable to find image 'osrf/ros2:bouncy-desktop' locally
bouncy-desktop: Pulling from osrf/ros2
...
root@43a5e0d0c74c:/#
As we also need two terminals for the ROS2 “tinkertoons”, spin up a second terminal and run the same command as above. In the first ROS2 terminal run the following commands that display the list of nodes in ROS2. Observe the outputs (the -a switch shows hidden nodes).
root@43a5e0d0c74c:/# ros2 node list
root@43a5e0d0c74c:/# ros2 node list -a
_ros2cli_node_daemon_0
Basically, no user-created node is running now. Let’s change that: in the second ROS2 terminal, run:
root@e12db20394fb:/# ros2 run demo_nodes_cpp talker
[INFO] [talker]: Publishing: 'Hello World: 1'
[INFO] [talker]: Publishing: 'Hello World: 2'
[INFO] [talker]: Publishing: 'Hello World: 3'
[INFO] [talker]: Publishing: 'Hello World: 4'
Now get back to the first ROS2 terminal and rerun the last command. You should see an addition node (talker) displayed, thanks to the talker(tive) program we just ran:
root@43a5e0d0c74c:/# ros2 node list -a
_ros2cli_node_daemon_0
talker
And we are all done for the practicals! But what’s the catch? At this point, we could use some theory. Next!
So, what is a ROS(2) node?
Let’s hear from the horse’s mouth:
A node is a process that performs computation. – http://wiki.ros.org/Nodes
A node really isn’t much more than an executable file within a ROS package. ROS nodes use a ROS client library to communicate with other nodes. – http://wiki.ros.org/ROS/Tutorials/UnderstandingNodes
As we saw from the practicals, the turtlesim_node and talker executables displayed a turtle and some text on-screen, respectively, by performing computations and communicating with other nodes. For one, they both communicated with nodes responsible for displaying output. So, in both ROS1 and ROS2, a node is essentially the same thing.
Done. Now you know what a ROS(2) node is. We’ll examine the similarities and different between ROS1 and ROS2 nodes in the next section.
ROS1 and ROS2 nodes compared
From the previous sections, we’ve already seen that ROS1 and ROS2 nodes are essentially the same. You may also have seen from the practical session that the commands for running and displaying a list of nodes in ROS1 and ROS2 are similar, even if they are not the same.
In this section, we’ll look briefly at some fundamental similarities and differences between ROS1 and ROS2 nodes. The table below summarizes these. Black text represents similarities while red text represents differences.
| ROS2 node | ROS1 node | |
| What is it? | An executable using ROS2 to communicate with other nodes | An executable using ROS1 to communicate with other nodes |
| (De)advertises itself and discovers other nodes using… | A distributed discovery process (which does not depend on a single node) | The ROS1 Master (a single node) |
| After discovery, communicates with other nodes… | Peer to peer | Peer to peer |
| Uses these client libraries (among others) | rclcpp = C++ client library rclpy = Python client library |
roscpp = C++ client library rospy = Python client library |
And that’s it!
Summary
ROS nodes are the executables that make things happen in a ROS system, and they are essentially the same for both ROS1 and ROS2, even if there are some differences. If you’re already familiar with ROS1, you can hit the ground running with ROS2, with just a few differences to master.
Video Version
If you prefer see the audio-visual version of this post, we’ve got you covered. Just click to watch the video below.
Feedback
Did you like this post? Whatever the case, please leave a comment in the comments section below, so we can interact and learn from each other.
If you want to learn about other ROS topics, please let us know on the comments area and we will do a post or video about it.
Keep pushing your ROS(2) learning!

![[ROS2 in 5 mins] 004 – What is a ROS2 node? ROS1 and ROS2 nodes compared [ROS2 in 5 mins] 004 - What is a ROS2 node? ROS1 and ROS2 nodes compared](https://www.theconstruct.ai/wp-content/uploads/2018/11/ROS2-in-5-mins-004-What-is-a-ROS2-node-ROS1-and-ROS2-nodes-compared.png)


can we have more than one nodes in ros1?