What we are going to learn
- How to create a package in ROS2
- How to set up a simple publisher and subscriber in ROS2
- How to write a python launch file
List of resources used in this post
- ROS Development Studio (ROSDS) —▸ http://rosds.online
- Robot Ignite Academy –▸ https://www.robotigniteacademy.com
- ROS2 Cookbook –▸ https://github.com/mikeferguson/ros2_cookbook/blob/main/pages/launch.md
- Question asked on ROS Answers –▸ https://answers.ros.org/question/372416/ros2-python-launch-files/
Creating a rosject
In order to learn how to create launch files, let’s start by creating a publisher and a subscriber in Python. We are going to use The Construct (https://www.theconstruct.ai/) for this tutorial, but if you have ROS2 installed on your own computer, you should be able to do ~everything on your own computer, except this creating a rosject part.
Let’s start by opening The Construct (https://www.theconstruct.ai/) and logging in. You can easily create a free account if you still don’t have one.
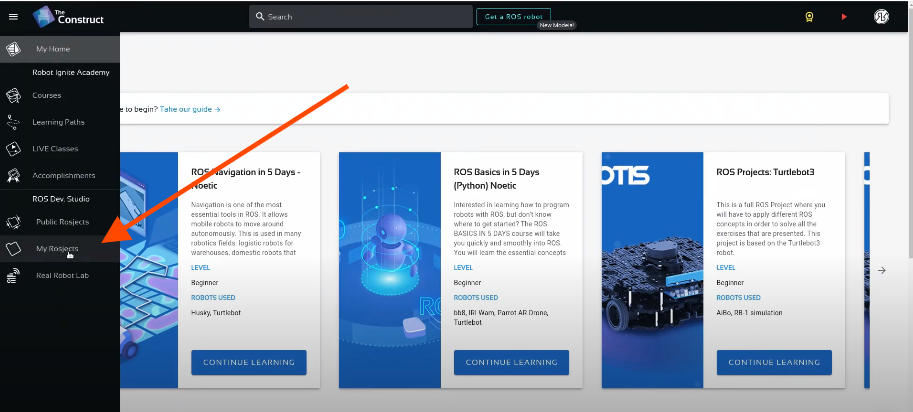
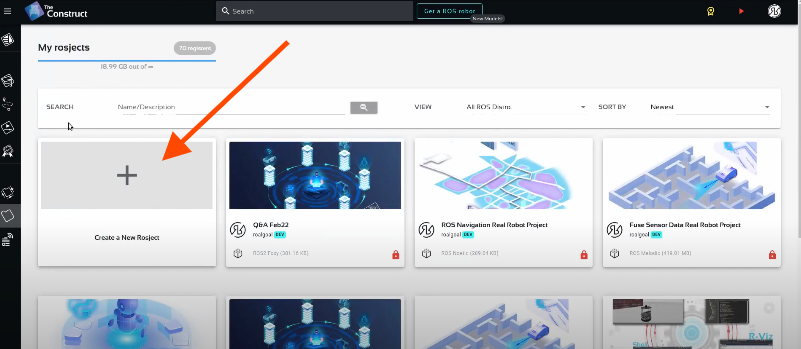
Once inside, let’s create My Rosjects and then, Create a new rosject:
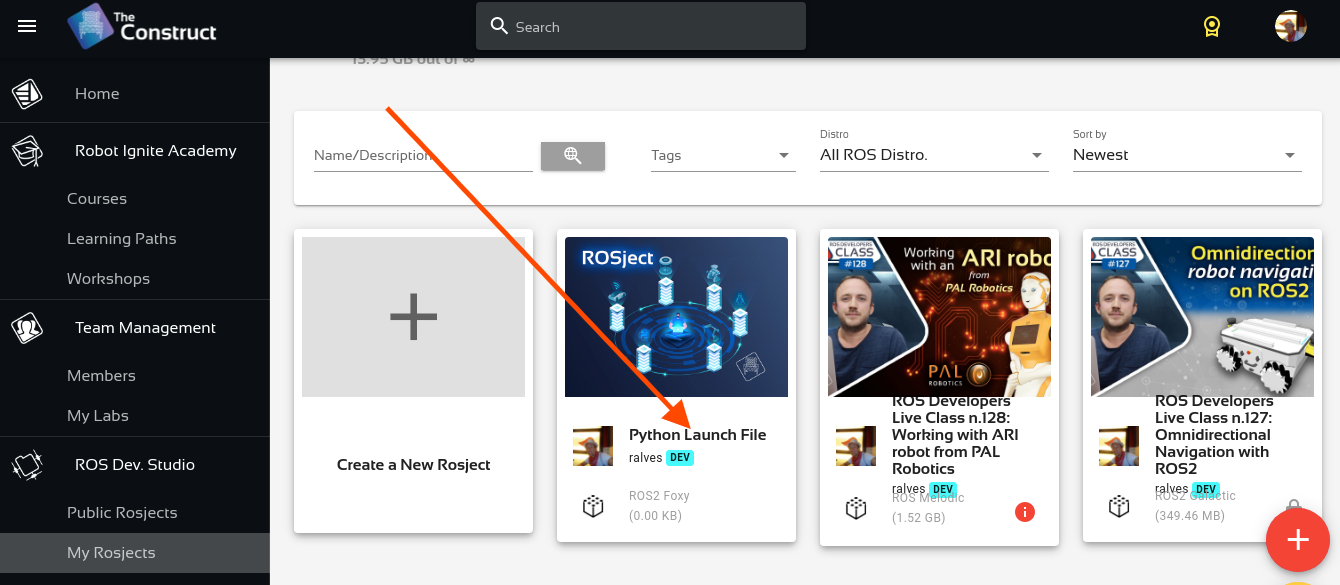
For the rosject, let’s select ROS2 Foxy for the ROS Distro, let’s name the rosject as Python Launch File. You can leave the rosject public.
If you mouse over the recently created rosject, you should see a Run button. Just click that button to launch the rosject.
Writing a simple publisher and subscriber (Python)
Once the rosject is open, we can now create our publisher and subscriber. For that, we are going to use ROS Docs as a reference.
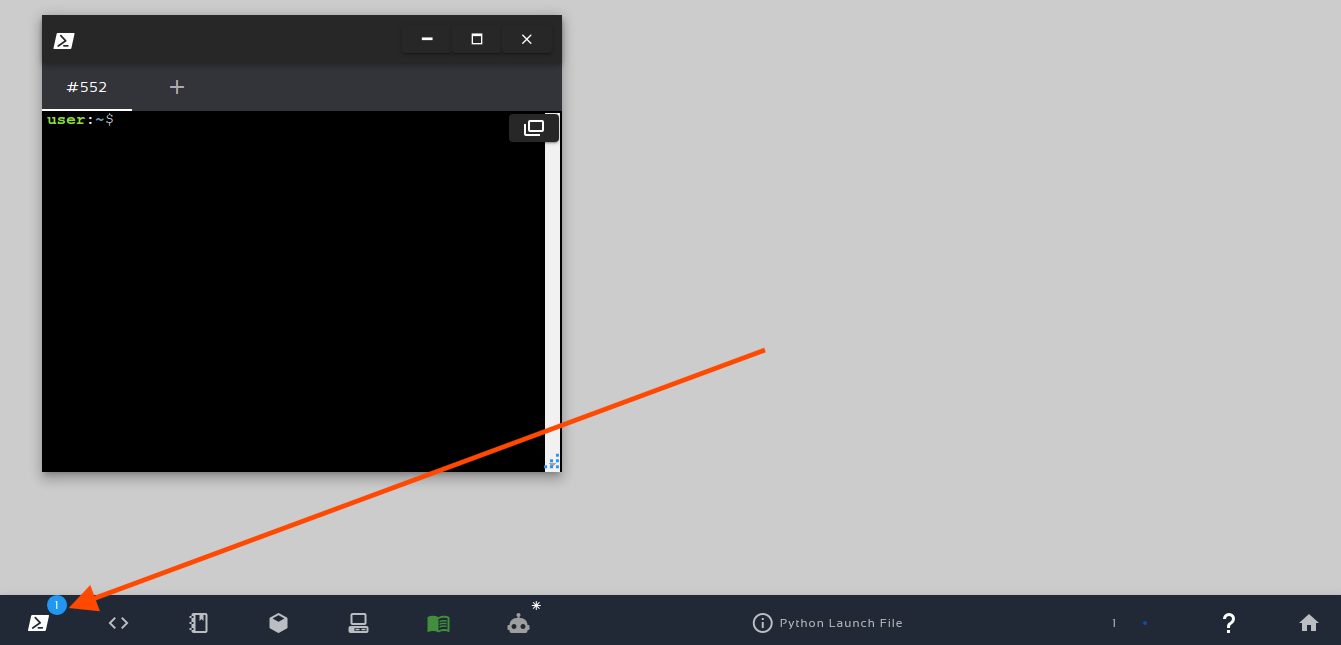
Let’s open a new terminal by clicking on the Open a new shell window button:
Once the terminal is open, we can list the files with the ls command:
user:~$ ls
ai_ws  catkin_ws  notebook_ws  ros2_ws  simulation_ws  webpage_ws
We can see a workspace named ros2_ws. Let’s enter that workspace using cd ros2_ws/:
user:~$ cd ros2_ws/
user:~/ros2_ws$
Let’s now source our workspace with:
source ~/ros2_ws/install/setup.bash
Let’s now enter our src folder:
cd ~/ros2_ws/src/
And create a package named py_pubsub (python publisher and subscriber):
ros2 pkg create --build-type ament_python py_pubsub
The output should be similar to:
user:~/ros2_ws/src$ ros2 pkg create --build-type ament_python py_pubsub
going to create a new package
package name: py_pubsub
destination directory: /home/user/ros2_ws/src
package format: 3
version: 0.0.0
description: TODO: Package description
maintainer: ['user <user@todo.todo>']
licenses: ['TODO: License declaration']
build type: ament_python
dependencies: []
creating folder ./py_pubsub
creating ./py_pubsub/package.xml
creating source folder
creating folder ./py_pubsub/py_pubsub
creating ./py_pubsub/setup.py
creating ./py_pubsub/setup.cfg
creating folder ./py_pubsub/resource
creating ./py_pubsub/resource/py_pubsub
creating ./py_pubsub/py_pubsub/__init__.py
creating folder ./py_pubsub/test
creating ./py_pubsub/test/test_copyright.py
creating ./py_pubsub/test/test_flake8.py
creating ./py_pubsub/test/test_pep257.py
Be aware that in order to create this package, we basically used ROS Docs for reference.
If you now list your src folder using ls, you should be able to see our package:
user:~/ros2_ws/src$ ls
py_pubsub
We can now enter into this py_pubsub package using cd py_pubsub/. We will find a new folder named py_pubsub inside it. Let’s just enter into it. The full command would be as easy as cd ~/ros2_ws/src/py_pubsub/py_pubsub/ . But if you want to go step by step:
user:~/ros2_ws/src$ cd py_pubsub/
user:~/ros2_ws/src/py_pubsub$ ls
package.xml  py_pubsub  resource  setup.cfg  setup.py  test
user:~/ros2_ws/src/py_pubsub$ cd py_pubsub/
user:~/ros2_ws/src/py_pubsub/py_pubsub$ ls
__init__.py
user:~/ros2_ws/src/py_pubsub/py_pubsub$
Now inside that last py_pubsub folder, let’ create a new file and name it publisher_member_function.py, and paste the following content on it, taken from the docs aforementioned:
import rclpy
from rclpy.node import Node

from std_msgs.msg import String


class MinimalPublisher(Node):

    def __init__(self):
        super().__init__('minimal_publisher')
        self.publisher_ = self.create_publisher(String, 'topic', 10)
        timer_period = 0.5  # seconds
        self.timer = self.create_timer(timer_period, self.timer_callback)
        self.i = 0

    def timer_callback(self):
        msg = String()
        msg.data = 'Hello World: %d' % self.i
        self.publisher_.publish(msg)
        self.get_logger().info('Publishing: "%s"' % msg.data)
        self.i += 1


def main(args=None):
    rclpy.init(args=args)

    minimal_publisher = MinimalPublisher()

    rclpy.spin(minimal_publisher)

    # Destroy the node explicitly
    # (optional - otherwise it will be done automatically
    # when the garbage collector destroys the node object)
    minimal_publisher.destroy_node()
    rclpy.shutdown()


if __name__ == '__main__':
    main()
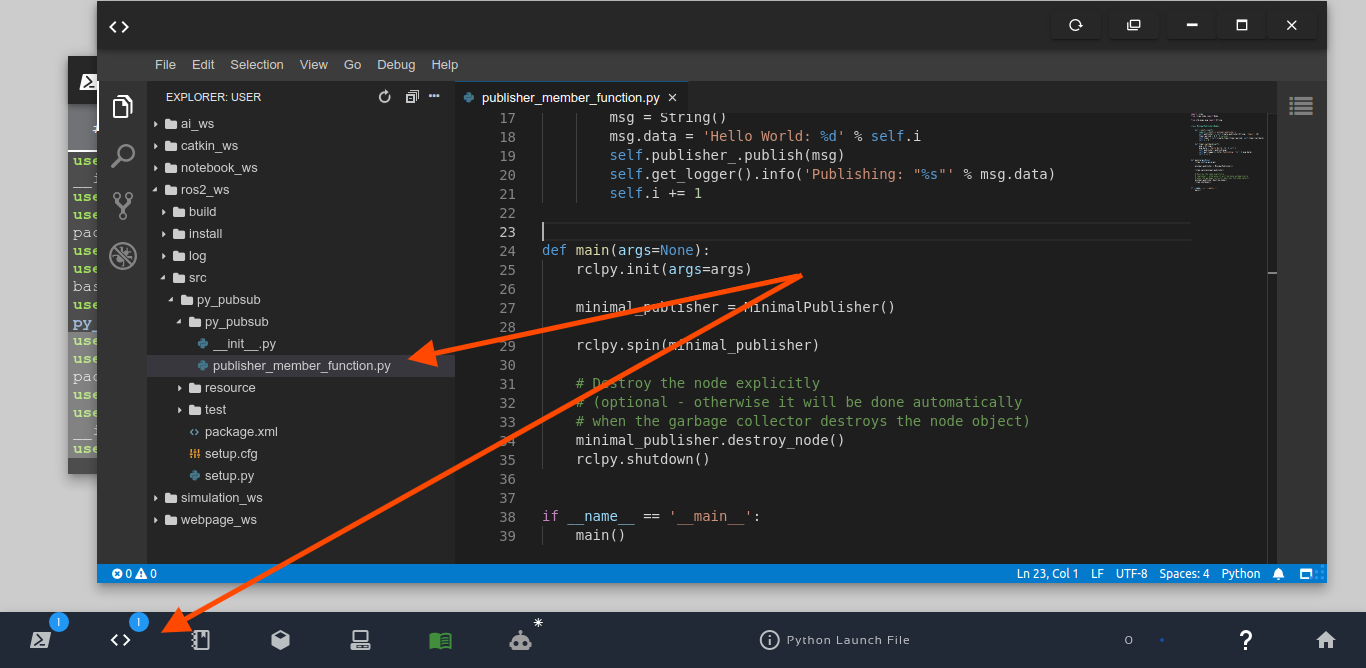
Remember that you can click the file just by typing touch publisher_member_function.py, and If you don’t know how to open the file in the code editor, you can check the image below:
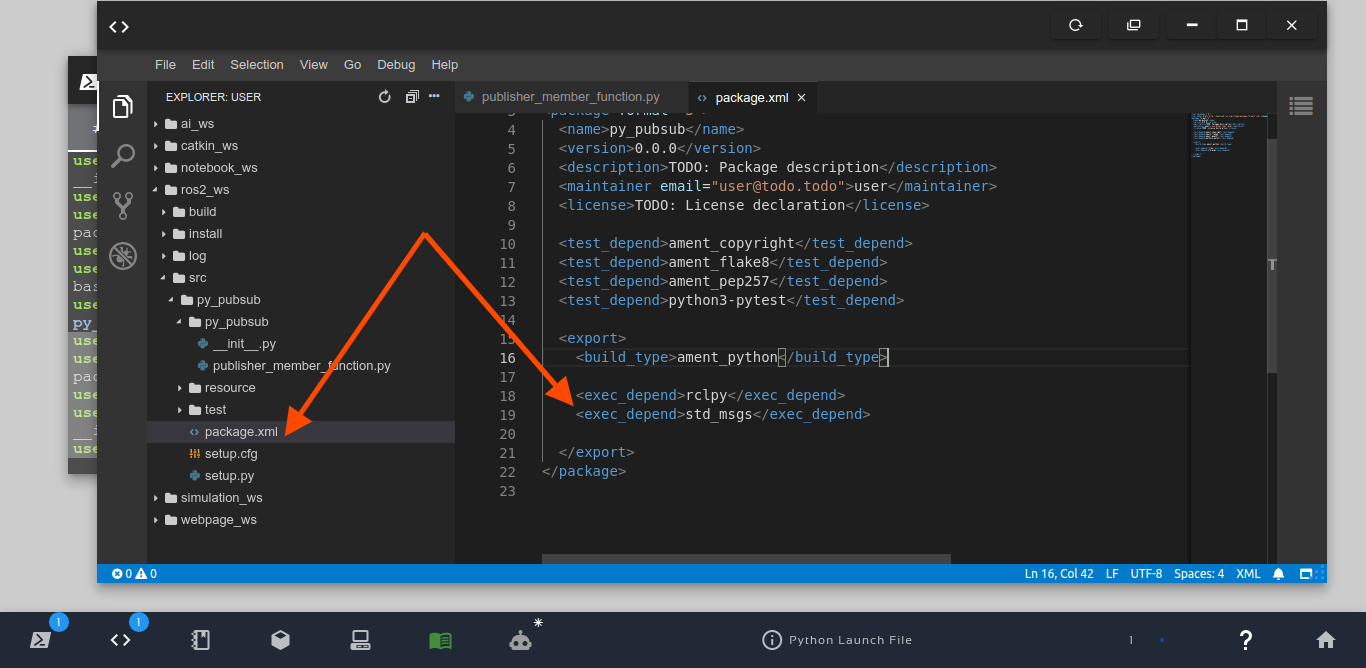
Let’s now open our package.xml file and add rclpy and std_msgs as dependencies, by adding the two lines below after ament_python:
<exec_depend>rclpy</exec_depend>
<exec_depend>std_msgs</exec_depend>
The final result should be similar to the image below:
Let’s now open the setup.py file and add our publisher_member_function.py script to the entry_points list. Since we want out publisher to be started in the main function on the publisher_member_function file inside the py_pubsub package, and we want our publisher to be called talker, what we have to have in our entry_points is:
entry_points={
        'console_scripts': [
                'talker = py_pubsub.publisher_member_function:main',
        ],
},
Congratulations. We have our publisher ready to go. Let’s now create the subscriber.
The process is similar to what we have done for the publisher. Let’s create a file named subscriber_member_function.py:
cd ~/ros2_ws/src/py_pubsub/py_pubsub

touch subscriber_member_function.py
Let’s now paste the following content on it, also taken from the docs.
import rclpy
from rclpy.node import Node

from std_msgs.msg import String


class MinimalSubscriber(Node):

    def __init__(self):
        super().__init__('minimal_subscriber')
        self.subscription = self.create_subscription(
            String,
            'topic',
            self.listener_callback,
            10)
        self.subscription  # prevent unused variable warning

    def listener_callback(self, msg):
        self.get_logger().info('I heard: "%s"' % msg.data)


def main(args=None):
    rclpy.init(args=args)

    minimal_subscriber = MinimalSubscriber()

    rclpy.spin(minimal_subscriber)

    # Destroy the node explicitly
    # (optional - otherwise it will be done automatically
    # when the garbage collector destroys the node object)
    minimal_subscriber.destroy_node()
    rclpy.shutdown()


if __name__ == '__main__':
    main()
Let’s now open the setup.py file again and add our subscriber (let’s call it listener) to the entry_points. Our final entry_points should look like:
entry_points={
        'console_scripts': [
                'talker = py_pubsub.publisher_member_function:main',
                'listener = py_pubsub.subscriber_member_function:main',
        ],
},
If you are wondering whether your final setup.py file is correct, yours should look like this:
from setuptools import setup

package_name = 'py_pubsub'

setup(
    name=package_name,
    version='0.0.0',
    packages=[package_name],
    data_files=[
        ('share/ament_index/resource_index/packages',
            ['resource/' + package_name]),
        ('share/' + package_name, ['package.xml']),
    ],
    install_requires=['setuptools'],
    zip_safe=True,
    maintainer='user',
    maintainer_email='user@todo.todo',
    description='TODO: Package description',
    license='TODO: License declaration',
    tests_require=['pytest'],
    entry_points={
        'console_scripts': [
                'talker = py_pubsub.publisher_member_function:main',
                'listener = py_pubsub.subscriber_member_function:main',
        ],
    },
)
Building our workspace (publisher and subscriber)
Now that our publisher and subscriber are ready, let’s now build our workspace.
To make sure all dependencies are correct, let’s fist run rosdep install:
cd ~/ros2_ws/

rosdep install -i --from-path src --rosdistro foxy -y
If everything went ok, you should see something like this:
#All required rosdeps installed successfully
Now let’s build it with:
cd ~/ros2_ws/

colcon build
The output should be similar to the following:
Starting >>> py_pubsub [2.2s]
[0/1 complete] [py_pubsub - 0.9s]
Finished <<< py_pubsub [1.56s]

Summary: 1 package finished [2.83s]
Running the publisher and subscriber (without launch file)
Now that our ros2_ws (ROS2 Workspace) is built, let’s run our publisher and subscriber to make sure it is working. Let’s start by running our publisher, that we named talker.
source ~/ros2_ws/install/setup.bash

ros2 run py_pubsub talker
If everything went ok, you should see something similar to this:
[INFO] [1636407485.453171555] [minimal_publisher]: Publishing: "Hello World: 0"
[INFO] [1636407485.935194839] [minimal_publisher]: Publishing: "Hello World: 1"
[INFO] [1636407486.435264808] [minimal_publisher]: Publishing: "Hello World: 2"
[INFO] [1636407486.935134692] [minimal_publisher]: Publishing: "Hello World: 3"
But, if you got an error message like this one “No executable found“, then it means you need to make your publisher and subscriber executables. You can make them executable with:
chmod +x ~/ros2_ws/src/py_pubsub/py_pubsub/*
You can now open a different web shell and run the subscriber named listener with:
source ~/ros2_ws/install/setup.bash

ros2 run py_pubsub listener
If everything went ok, you should have the following output:
[INFO] [1636407722.850810657] [minimal_subscriber]: I heard: "Hello World: 0"
[INFO] [1636407723.327879150] [minimal_subscriber]: I heard: "Hello World: 1"
[INFO] [1636407723.828118018] [minimal_subscriber]: I heard: "Hello World: 2"
[INFO] [1636407724.327668937] [minimal_subscriber]: I heard: "Hello World: 3"
[INFO] [1636407724.827548416] [minimal_subscriber]: I heard: "Hello World: 4"
[INFO] [1636407725.327873989] [minimal_subscriber]: I heard: "Hello World: 5"
If that is not the output you have got, please make sure you have the talker (publisher) running when running the listener (subscriber).
Launching nodes with ROS2 Python Launch Files
Awesome. We now know that our publisher and subscriber work if we run them manually. Time has now come to finally learn how to use ROS2 Python Launch Files.
Let’s stop the publisher and subscriber by pressing CTRL+C in the web shells used to launch them.
After having stopped the talker and listener, let’s create a launch.py file inside the first py_pubsub folder:
cd ~/ros2_ws/src/py_pubsub/

mkdir launch

touch launch/launch.py
Let’s now open that file in the Code Editor, and paste the following content on it:
from launch import LaunchDescription
from launch_ros.actions import Node

def generate_launch_description():
    return LaunchDescription([
        Node(
            package="py_pubsub",
            executable="talker",
            output="screen"
        ),
        Node(
            package="py_pubsub",
            executable="listener",
            output="screen"
        ),
    ])
Please take a few minutes to check the code we pasted into the launch.py file. You should be able to easily identify where we are launching the talker and the listener.
Once the launch.py file is ok, let’s now open again our setup.py file again, and add our launch.py file to data_files, so that our launch file will be included in the install folder when we compile our workspace. By doing this we will be able to execute it:
The bit we have to add to data_files is (os.path.join(‘share’, package_name, ‘launch’), glob(‘launch/*.py’)), so that data_files looks like:
data_files=[
        ('share/ament_index/resource_index/packages',
            ['resource/' + package_name]),
        ('share/' + package_name, ['package.xml']),
        (os.path.join('share', package_name, 'launch'), glob('launch/*.py')),
    ],
Just to make sure you have everything correctly imported, the final setup.py file should look like this:
from setuptools import setup
import os
from glob import glob

package_name = 'py_pubsub'

setup(
    name=package_name,
    version='0.0.0',
    packages=[package_name],
    data_files=[
        ('share/ament_index/resource_index/packages',
            ['resource/' + package_name]),
        ('share/' + package_name, ['package.xml']),
        (os.path.join('share', package_name, 'launch'), glob('launch/*.py')),
    ],
    install_requires=['setuptools'],
    zip_safe=True,
    maintainer='user',
    maintainer_email='user@todo.todo',
    description='TODO: Package description',
    license='TODO: License declaration',
    tests_require=['pytest'],
    entry_points={
        'console_scripts': [
                'talker = py_pubsub.publisher_member_function:main',
                'listener = py_pubsub.subscriber_member_function:main',
        ],
    },
)
We can now build our ros2 workspace again with:
cd ~/ros2_ws

colcon build
After that, we can run our launch file with:
ros2 launch py_pubsub launch.py
After launching the launch.py file, the output should be similar to the following:
[INFO] [launch]: All log files can be found below /home/user/.ros/log/2021-11-08-22-19-06-017780-2_xterm-22230
[INFO] [launch]: Default logging verbosity is set to INFO
[INFO] [talker-1]: process started with pid [22232]
[INFO] [listener-2]: process started with pid [22234]
[talker-1] [INFO] [1636409946.863335476] [minimal_publisher]: Publishing: "Hello World: 0"
[listener-2] [INFO] [1636409946.864070340] [minimal_subscriber]: I heard: "Hello World: 0"
[talker-1] [INFO] [1636409947.348533783] [minimal_publisher]: Publishing: "Hello World: 1"
[listener-2] [INFO] [1636409947.348911906] [minimal_subscriber]: I heard: "Hello World: 1"
[talker-1] [INFO] [1636409947.848726734] [minimal_publisher]: Publishing: "Hello World: 2"
[listener-2] [INFO] [1636409947.849143700] [minimal_subscriber]: I heard: "Hello World: 2"
[talker-1] [INFO] [1636409948.348686904] [minimal_publisher]: Publishing: "Hello World: 3"
[listener-2] [INFO] [1636409948.349055815] [minimal_subscriber]: I heard: "Hello World: 3"
[talker-1] [INFO] [1636409948.848715554] [minimal_publisher]: Publishing: "Hello World: 4"
[listener-2] [INFO] [1636409948.849116889] [minimal_subscriber]: I heard: "Hello World: 4"
As we can see in the logs, we have the publisher (talker-1) and the subscriber (listener-2) running.
Congratulations. You made it. You now know not only how to create launch files, but you also learned how to create packages, publishers, and subscribers in ROS2 Python.
Youtube video
So this is the post for today. Remember that we have the live version of this post on YouTube. If you liked the content, please consider subscribing to our youtube channel. We are publishing new content ~every day.
Keep pushing your ROS Learning.

![215-How to Use ROS2 Python Launch Files [ROS2 Q&A] 215 - How to Use ROS2 Python Launch Files](https://www.theconstruct.ai/wp-content/uploads/2021/11/215-How-to-Use-ROS2-Python-Launch-Files.jpg)


0 Comments