ROS2 Tutorials #5: How to create a ROS2 Package for Python
About
In this post, you will learn how to create a simple ROS2 package for Python. You don’t need a ROS2 installation for this as we will use the ROS Development Studio (ROSDS), an online platform that provides access to ROS (1 or 2) computers and other powerful ROS tools within a browser!
PS: If you have ROS2 installed locally on your machine, you can skip Step 1.
Step 1: Create a Project (ROSject) on ROSDS
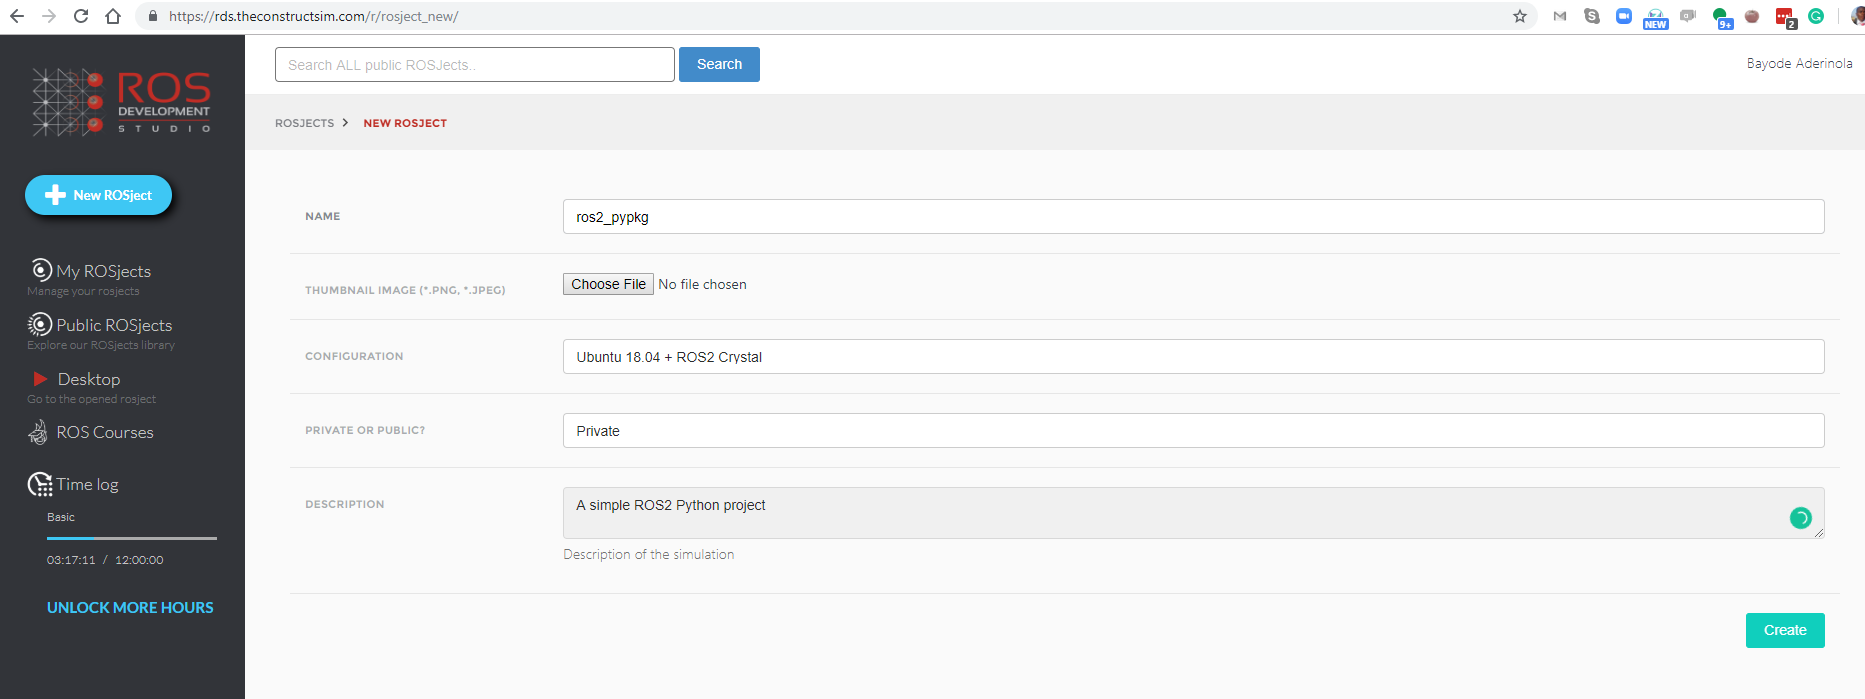
Head to http://rosds.online and create a project with a similar configuration as the one shown below. You can change the details as you like, but please ensure you select “Ubuntu 18.04 + ROS2 Crystal” under “Configuration”.
Once done with that, open your ROSject. This might take a few moments, please be patient.
Step 2: Source the ROS2 workspace
Once the ROSject is open, head to the Tools menu and pick the Shell tool (if on your local PC just fire up a terminal) and run the following command to source the workspace:
user:~$ source /opt/ros/crystal/setup.bash
ROS_DISTRO was set to 'melodic' before. Please make sure that the environment does not mix paths from different distributions.
user:~$
If you get that ROS_DISTRO warning, just ignore it.
Step 3: Create a ROS2 Python package in your ROS2 workspace
The syntax for creating a ROS2 Python package is ros2 pkg create <package_name>.
In the same terminal as in Step 2, change to your ROS2 workspace src directory and create a package there:
user:~$ cd ros2_ws/src
user:~/ros2_ws/src$ ros2 pkg create ros2_demo_py
going to create a new package
package name: ros2_demo_py
destination directory: /home/user/ros2_ws/src
package format: 2
version: 0.0.0
description: TODO: Package description
maintainer: ['user <user@todo.todo>']
licenses: ['TODO: License declaration']
build type: ament_cmake
dependencies: []
creating folder ./ros2_demo_py
creating ./ros2_demo_py/package.xml
creating source and include folder
creating folder ./ros2_demo_py/src
creating folder ./ros2_demo_py/include/ros2_demo_py
creating ./ros2_demo_py/CMakeLists.txt
user:~/ros2_ws/src$
Step 4: Delete CMakeLists.txt , create setup.py and setup.cfg and edit package.xml
Unlike ROS1, ROS2 Python packages don’t use CMakeList.txt, but a new setup.py file. Let’s create one here. In the Shell:
user:~/ros2_ws/src$ cd ros2_demo_py/
user:~/ros2_ws/src/ros2_demo_py$ rm CMakeLists.txt
user:~/ros2_ws/src/ros2_demo_py$ touch setup.py
user:~/ros2_ws/src/ros2_demo_py$ touch setup.cfg
user:~/ros2_ws/src/ros2_demo_py$
Fire up the IDE, locate the setup.py file and paste in the following code:
from setuptools import setup

package_name = 'ros2_demo_py'

setup(
    name=package_name,
    version='0.7.0',
    packages=[package_name],
    install_requires=['setuptools'],
    zip_safe=True,
    author='You',
    author_email='you@youremail.com',
    maintainer='YourFirstname Lastname',
    maintainer_email='your@youremail.com',
    keywords=['ROS'],
    classifiers=[
        'Intended Audience :: Developers',
        'License :: OSI Approved :: Apache Software License',
        'Programming Language :: Python',
        'Topic :: Software Development',
    ],
    description='A simple ROS2 Python package',
    license='Apache License, Version 2.0',
    tests_require=['pytest'],
    entry_points={
        'console_scripts': [
            'demo = ros2_demo_py.demo:main'
        ],
    },
)
Locate the setup.cfg file and paste in the following code:
[develop]
script-dir=$base/lib/ros2_demo_py
[install]
install-scripts=$base/lib/ros2_demo_py
Locate package.xml and replace the contents with this snippet:
<?xml version="1.0"?>
<?xml-model href="http://download.ros.org/schema/package_format2.xsd" schematypens="http://www.w3.org/2001/XMLSchema"?>
<package format="2">
  <name>ros2_demo_py</name>
  <version>0.7.3</version>
  <description>A simple ROS2 Python package</description>

  <maintainer email="sloretz@openrobotics.org">Shane Loretz</maintainer>
  <license>Apache License 2.0</license>

  <exec_depend>rclpy</exec_depend>
  <exec_depend>std_msgs</exec_depend>

  <!-- These test dependencies are optional
  Their purpose is to make sure that the code passes the linters -->
  <test_depend>ament_copyright</test_depend>
  <test_depend>ament_flake8</test_depend>
  <test_depend>ament_pep257</test_depend>
  <test_depend>python3-pytest</test_depend>

  <export>
    <build_type>ament_python</build_type>
  </export>
</package>
Step 5: Create the Python code
In the Shell, run the following commands:
user:~/ros2_ws/src/ros2_demo_py$ mkdir ros2_demo_py && cd ros2_demo_py
user:~/ros2_ws/src/ros2_demo_py/ros2_demo_py$ touch demo.py
user:~/ros2_ws/src/ros2_demo_py/ros2_demo_py$ touch __init__.py
user:~/ros2_ws/src/ros2_demo_py/ros2_demo_py$
We created the __init__.py file so that the ros2_demo_py folder could be recognized as a python module directory.
Locate the demo.py file, open it in the IDE and paste in the following code:
# Copyright 2016 Open Source Robotics Foundation, Inc.
#
# Licensed under the Apache License, Version 2.0 (the "License");
# you may not use this file except in compliance with the License.
# You may obtain a copy of the License at
#
#     http://www.apache.org/licenses/LICENSE-2.0
#
# Unless required by applicable law or agreed to in writing, software
# distributed under the License is distributed on an "AS IS" BASIS,
# WITHOUT WARRANTIES OR CONDITIONS OF ANY KIND, either express or implied.
# See the License for the specific language governing permissions and
# limitations under the License.

import rclpy
from rclpy.node import Node

from std_msgs.msg import String


class MinimalPublisher(Node):

    def __init__(self):
        super().__init__('minimal_publisher')
        self.publisher_ = self.create_publisher(String, 'topic')
        timer_period = 0.5  # seconds
        self.timer = self.create_timer(timer_period, self.timer_callback)
        self.i = 0

    def timer_callback(self):
        msg = String()
        msg.data = 'Hello World: %d' % self.i
        self.publisher_.publish(msg)
        self.get_logger().info('Publishing: "%s"' % msg.data)
        self.i += 1


def main(args=None):
    rclpy.init(args=args)

    minimal_publisher = MinimalPublisher()

    rclpy.spin(minimal_publisher)

    # Destroy the node explicitly
    # (optional - otherwise it will be done automatically
    # when the garbage collector destroys the node object)
    minimal_publisher.destroy_node()
    rclpy.shutdown()


if __name__ == '__main__':
    main()
Step 6: Compile the package and source the workspace
We have created all the files needed. Now let’s compile.
user:~/ros2_ws/src/ros2_demo_py/ros2_demo_py$ cd /home/user/ros2_ws/
user:~/ros2_ws$ colcon build --symlink-install

Starting >>> ros2_demo_py
Finished <<< ros2_demo_py [0.78s]

Summary: 1 package finished [0.90s]
user:~/ros2_ws$ source install/setup.bash # source the workspace
user:~/ros2_ws$
Step 7: Test-run the package
Here comes the moment of truth…will it run?
user:~/ros2_ws$ ros2 run ros2_demo_py demo
[INFO] [minimal_publisher]: Publishing: "Hello World: 0"
[INFO] [minimal_publisher]: Publishing: "Hello World: 1"
[INFO] [minimal_publisher]: Publishing: "Hello World: 2"
[INFO] [minimal_publisher]: Publishing: "Hello World: 3"
[INFO] [minimal_publisher]: Publishing: "Hello World: 4"
...
Great, it ran! We’re done here!!
Extra 1: ROSject link
Get the ROSject containing all code used in the post in the following link: http://www.rosject.io/l/bd0cfbd/
Extra 2: Video
Prefer to watch a video demonstrating the steps above? We have one for you below!
Related Resources
Feedback
Did you like this post? Do you have questions about what is explained? Whatever the case, please leave a comment on the comments section below, so we can interact and learn from each other.
If you want to learn about other ROS topics, please let us know in the comments area and we will do a video or post about it
Code edited by Bayode Aderinola


![[ROS in 5 mins] 037 – What is ROS PACKAGE PATH and how to use it?](https://www.theconstruct.ai/wp-content/uploads/2018/09/ROS-in-5-mins-037-What-is-ROS-PACKAGE-PATH.png)
![[ROS In 5 Minutes] 002 – How to create a ROS Package](https://www.theconstruct.ai/wp-content/uploads/2018/04/ROS-In-5-Minutes-002-How-to-create-a-ROS-Package.png)