About:
In the video of today, we are going to see how you can easily store a value from a subscribed topic into a variable in order to use it later for further purposes. In this case, we will use a global variable to do so.
? Subscribe for more free ROS learning: https://www.youtube.com/channel/UCt6Lag-vv25fTX3e11mVY1Q?sub_confirmation=1
RELATED ROS RESOURCES&LINKS:
ROS Development Studio (ROSDS) —▸ http://rosds.online
Robot Ignite Academy –▸ https://www.robotigniteacademy.com
—
Feedback
—
Did you like this video? Do you have questions about what is explained? Whatever the case, please leave a comment on the comments section below, so we can interact and learn from each other.
If you want to learn about other ROS topics, please let us know on the comments area and we will do a video about it 🙂
About:
In this video, you are going to learn how to connect to the real Vector ROBOT through ROSDS using the real robot connection tools. You will also use a docker created by betaB0t to connect to VECTOR.
Here you can find the list of materials that you will need for this session:
Vector Robot: https://www.amazon.es/Anki-000-0079-Vector/dp/B078T42JCM
Vector Robot Playing Space ( recommended to avoid any problems with flying Vectors :P): https://www.amazon.es/Anki-000-0078-Habitat-Vector-Space/dp/B07G3QSX8G
———————————————————————————
Music:
Original Track:https://youtu.be/FBv6rm1lY0w
Thanks to NewRetroWave for letting us use their music.
Here more info:
New Retro Wave + Bachelor of Hearts Aurora Borealis
Smooth vibes for you retro soul. Listen and enjoy.
OUT NOW on NRW Records:
https://newretrowave.bandcamp.com/album/a-cosmic-funk-odyssey-ep
iTunes: http://apple.co/2r6N1T7
Support:
https://www.facebook.com/BachelorOfHeartsmusic/
Artwork provided by Murryous, who is our featured artist for May. Please support him:
https://www.instagram.com/murryous/
———————————————————————————
3D Models:
Orange Robot:
https://www.blendswap.com/blends/view/77718
About:
In the video of today, we are going to see how you can generate Odometry data from the Drone’s laser readings (using the rf2o_laser_odometry package). Then, we will use this Odometry data in order to perform Navigation.
Get the full code of this video with this ROSject Link –▸ http://www.rosject.io/l/913ce36/
? Subscribe for more free ROS learning: https://www.youtube.com/channel/UCt6Lag-vv25fTX3e11mVY1Q?sub_confirmation=1
RELATED ROS RESOURCES&LINKS:
ROS Development Studio (ROSDS) —▸ http://rosds.online
Robot Ignite Academy –▸ https://www.robotigniteacademy.com
Quadrotor simulation –▸ https://bitbucket.org/theconstructcor…
rf2o_laser_odometry –▸ https://github.com/MAPIRlab/rf2o_laser_odometry
—
Feedback
—
Did you like this video? Do you have questions about what is explained? Whatever the case, please leave a comment on the comments section below, so we can interact and learn from each other.
If you want to learn about other ROS topics, please let us know on the comments area and we will do a video about it 🙂
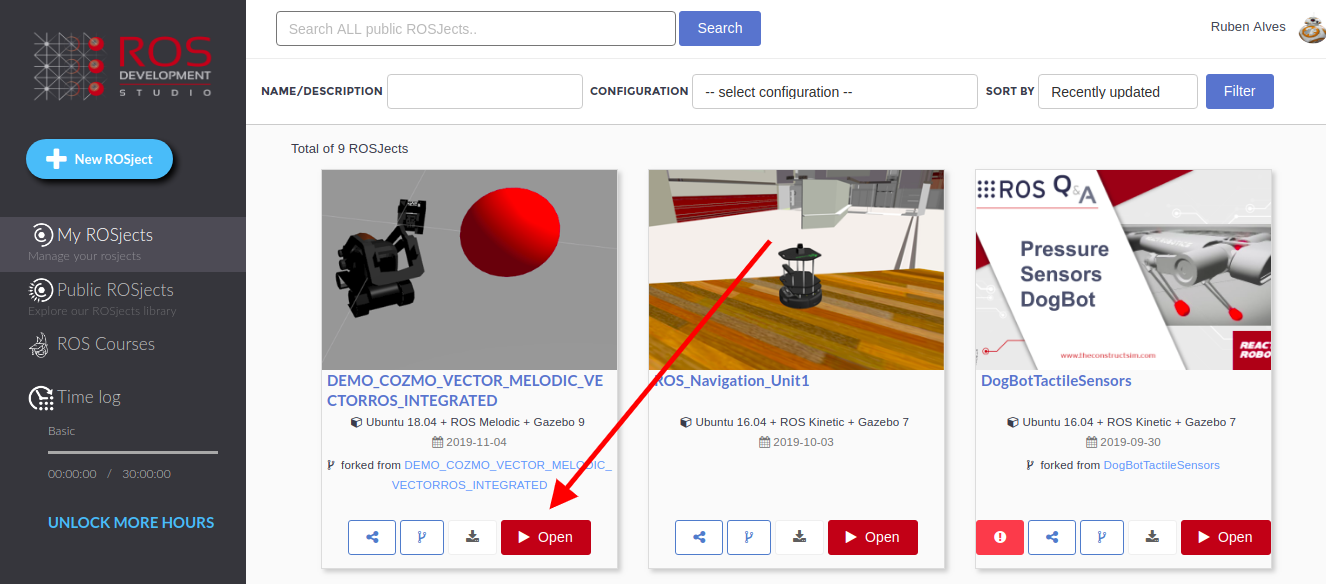
If you click in the ROSject provided above (http://www.rosject.io/l/908ce19/), you will get a copy of it on ROSDS (ROS Development Studio)
To launch it, you first need to open the ROSject clicking on the Open button.
Open Cozmo and Vector robots in ROSDS
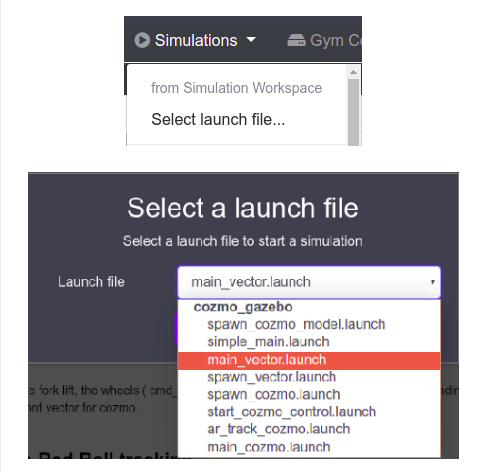
Once the ROSject open, you just launch the simulation by clicking Simulations–>Select Launch File, then you select cozmo_gazebo main_cozmo.launch
Launch cozmo_gazebo main_vector.launch in ROSDS
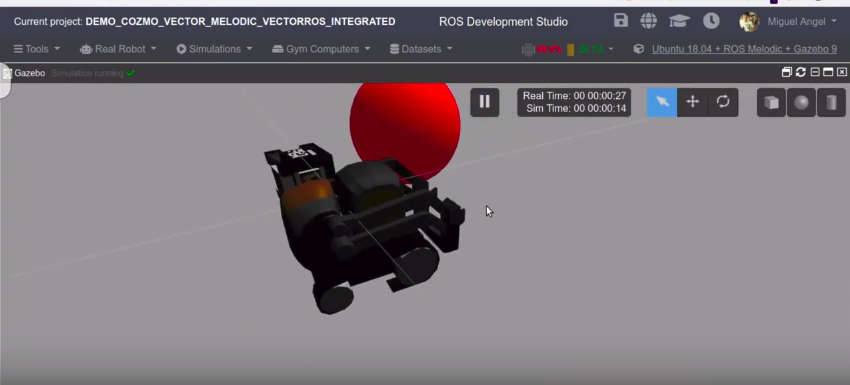
If everything went ok, now you should have the simulation up and running:
cozmo vector running in ROSDS
You can launch cozmo and vector just by choosing between the main_vector.launch and main_cozmo.launch
You can access the camera, the forklift, the wheels (through the /cmd_vel ROS Topic), imu and the Infra-Red sensors form their corresponding topics. All the topics have the exact same name in the two different robots, except that you have to change the word vector for cozmo.
Launching the Simple Red Ball tracking
To do so you have to launch the simulation you want, in this case, we will launch the Vector simulation as described in the previous section.
Then open a Webshell from the Tools Bar (Tools -> Shell), and execute the following commands:
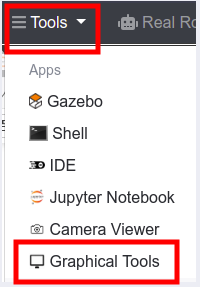
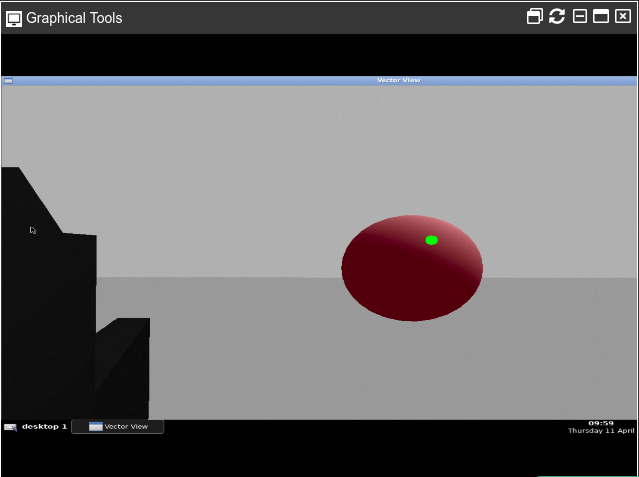
You should then Open the Graphical Tools from the Tools menu to see the RedBall detection Gui:
Launching Graphical Tools in ROSDS
You should then be able to see the robot camera:
redball seen by cozmo and vector in ROSDS
If you now move the ball around with the move object icon of the 3D view, you can see how Vector follows the ball. You can also move the ball with the keyboard, which will send absolute position commands to the ball. You first need to run the launch file below:
roslaunch cozmo_gazebo move_redball.launch
Then use the Keys below:
“i“=+X Axis,
“k“=STOP,
“j“=-Y Axis,
“l“=+Y Axis,
“,“=-X Axis:
Moving the robot around
With the ball tracking enabled, you can move the robot around using the command below in the web shell:
To see the IMU of the robot, you can see the /imu topic using the command below:
rostopicecho/imu
Current known issues
We noticed that there is a drift that occurs when Vector or Cozmo is still.
SPECIAL THANKS:
Our special thanks to beat_b0t for creating the Vector_ROS package.
Also, thanks to TheConstructSim For creating the COZMO and Vector simulation package. and thanks to ANKI for creating COZMO and VECTOR real robots that we can use to play around and learn more about robotics.
Youtube Video
We hope you like the post. If you prefer, we also have a live version of this post in YouTube. You can find it in the link below. If you like it, please consider subscribing to our channel on youTube. We are constantly adding new ROS-related content.
———————————————————————————
Music:
Original Track:https://youtu.be/FBv6rm1lY0w
Thanks to NewRetroWave for letting us use their music.
Here more info:
New Retro Wave + Bachelor of Hearts Aurora Borealis
Smooth vibes for you retro soul. Listen and enjoy.
OUT NOW on NRW Records:
https://newretrowave.bandcamp.com/album/a-cosmic-funk-odyssey-ep
iTunes: http://apple.co/2r6N1T7
Support:
https://www.facebook.com/BachelorOfHeartsmusic/
Artwork provided by Murryous, who is our featured artist for May. Please support him:
https://www.instagram.com/murryous/
———————————————————————————
3D Models:
Orange Robot:
https://www.blendswap.com/blends/view/77718
About:
In the video of today, we are going to see how to easily navigate your robot autonomously, with Path Planning, in an indoor environment using a drone and the ROS move_base node from the Navigation Stack.
Get the full code of this video with this ROSject Link –▸ http://www.rosject.io/l/8797919/
? Subscribe for more free ROS learning: https://www.youtube.com/channel/UCt6Lag-vv25fTX3e11mVY1Q?sub_confirmation=1
RELATED ROS RESOURCES&LINKS:
ROS Development Studio (ROSDS) —▸ http://rosds.online
Robot Ignite Academy –▸ https://www.robotigniteacademy.com
Quadrotor simulation –▸ https://bitbucket.org/theconstructcor…
depthimage_to_laserscan –▸ http://wiki.ros.org/depthimage_to_las…
Turtlebot Navigation –▸ http://wiki.ros.org/turtlebot_navigation
—
Feedback
—
Did you like this video? Do you have questions about what is explained? Whatever the case, please leave a comment on the comments section below, so we can interact and learn from each other.
If you want to learn about other ROS topics, please let us know on the comments area and we will do a video about it 🙂
![[ROS Q&A] 186 – How to store value from a subscribed topic in ROS in Python](https://www.theconstruct.ai/wp-content/uploads/2019/04/how-to-store-value-from-suscribed-topic-ROS-python.jpg)
![[Morpheus Chair] Vector ROSDS CloudConnection | T2.Ep.4](https://www.theconstruct.ai/wp-content/uploads/2019/04/Connect-to-real-vector.jpg)
![[Morpheus Chair] Vector ROS Simulation | T2.Ep.3](https://www.theconstruct.ai/wp-content/uploads/2019/04/vector-and-ball.jpg)
![[ROS Q&A] 183 – 2D Drone Navigation with ROS (Part 3 Path Planning)](https://www.theconstruct.ai/wp-content/uploads/2019/03/2D-drone-navigation-planning.jpg)