How to Publish and Subscribe to a topic from a launch file
In this post, you will learn how to publish and subscribe to a topic from a launch file. This post is a response to this question posted on Gazebo Answers.
Step 1: Fire up a system with ROS installation
“Hey, do you mean I have to install ROS first?” Absolutely not! Just log in to The Construct to get access to virtual machines pre-installed with ROS.
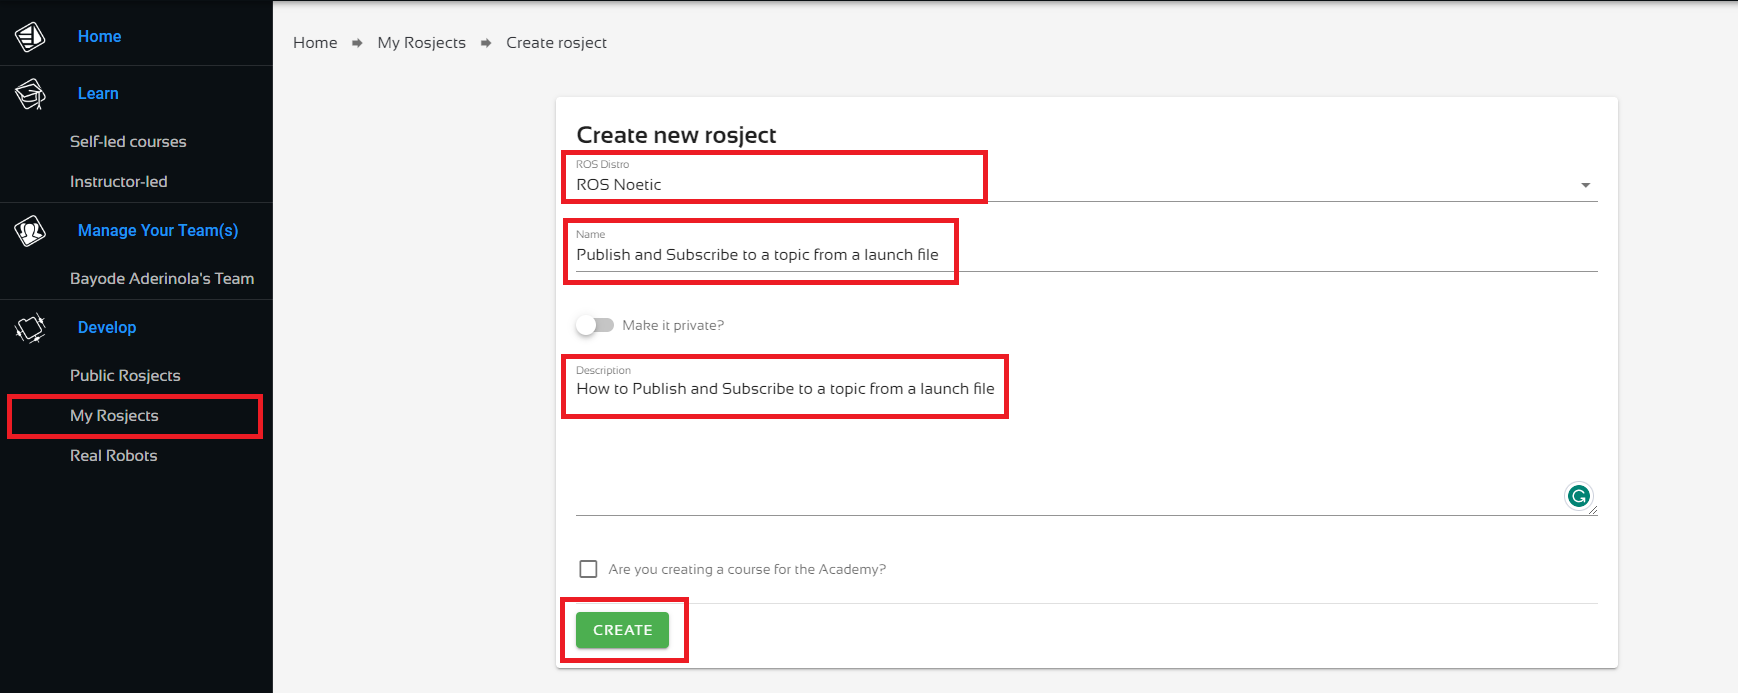
Once logged in, click on My Rosjects, then Create a New Rosject, supply the information as shown in the image below, and click Create. Then RUN the rosject.

You might also want to try this on a local PC if you have ROS installed. However, please note that we don’t support local PCs and you will have to fix any errors you run into on your own. The rest of the instruction assumes that you are working on The Construct; please adapt them to your local PC and ROS installation.
PS: we are using ROS Noetic. You should be able to replicate the same on any ROS 1 distro.
Step 2: Create a package to demonstrate how to publish and subscribe to a topic from a launch file

Open a web shell and run the following commands to create the package.
cd catkin_ws/src
source /opt/ros/noetic/setup.bash
catkin_create_pkg test_rostopic
Next, we create the launch directory and the launch files.
cd test_rostopic
mkdir launch
cd launch
touch test_pub.launch
touch test_echo.launch
Nice done! Now head over to the Code Editor to make changes to the launch files. Check the image below for how to open the Code Editor.

Locate the launch folder in the code editor: catkin_ws > src > test_rostopic > launch and open the two launch files.
Paste the following lines into the test_pub.launch file. This is equivalent to rostopic pub /test_topic std_msgs/String "data: 'Hello there!'"
<launch>
    <arg name="topic_name" default="/test_topic" />
    <arg name="message" default="Hello there!" />
    <node pkg="rostopic" type="rostopic" name="rostopic_pub_node" output="screen" args="pub $(arg topic_name) std_msgs/String 'data: $(arg message)'" />
</launch>
Next, your test_echo.launch should be made up of the following lines. This is equivalent to rostopic echo /test_topic.
<launch>
    <arg name="topic_name" default="/test_topic" />
    <node pkg="rostopic" type="rostopic" name="rostopic_echo_node" output="screen" args="echo $(arg topic_name)" />
</launch>
Fantastic! Now, let’s compile the package.
cd ~/catkin_ws
catkin_make
source devel/setup.bash
Success! We’ll test it in the next step.
PS: if your code did not compile correctly, please go over the instructions and ensure you have created the files in the exact locations specified.
Step 3: Test the package to demonstrate how to publish and subscribe to a topic from a launch file
Start the test_pub.launch file in the current terminal.
roslaunch test_rostopic test_pub.launch
When done, open another terminal and run the test_echo.launch file.
roslaunch test_rostopic test_echo.launch
Now you should see something similar to the following on the terminal where test_echo.launch is running:
process[rostopic_echo_node-1]: started with pid [xxxx]
data: "Hello there!"
---
Sweet! So we are able to publish with one launch file and echo what we publish in another launch file. And…we are done here, congrats!
Take home: try combining both into a single launch file. After trying, check the solution in this gist.
Step 4: Check your learning
Do you understand how to publish and subscribe to a topic from a launch file? If you don’t know it yet, please go over the post again, more carefully this time.
(Extra) Step 5: Watch the video to understand how to publish and subscribe to a topic from a launch file
Here you go:
Feedback
Did you like this post? Do you have any questions about how to publish and subscribe to a topic from a launch file? Please leave a comment in the comments section below, so we can interact and learn from each other.
If you want to learn about other ROS topics, please let us know in the comments area and we will do a video or post about it.
