Wall Follower Algorithm
Hello ROS Developers! In this post number #7, as we continue on the track of the video series, we are going to go line-by-line in order to achieve the Wall Follower Algorithm.
In order to start, you can use the ROSject we generate in the previous post, by copying it here.
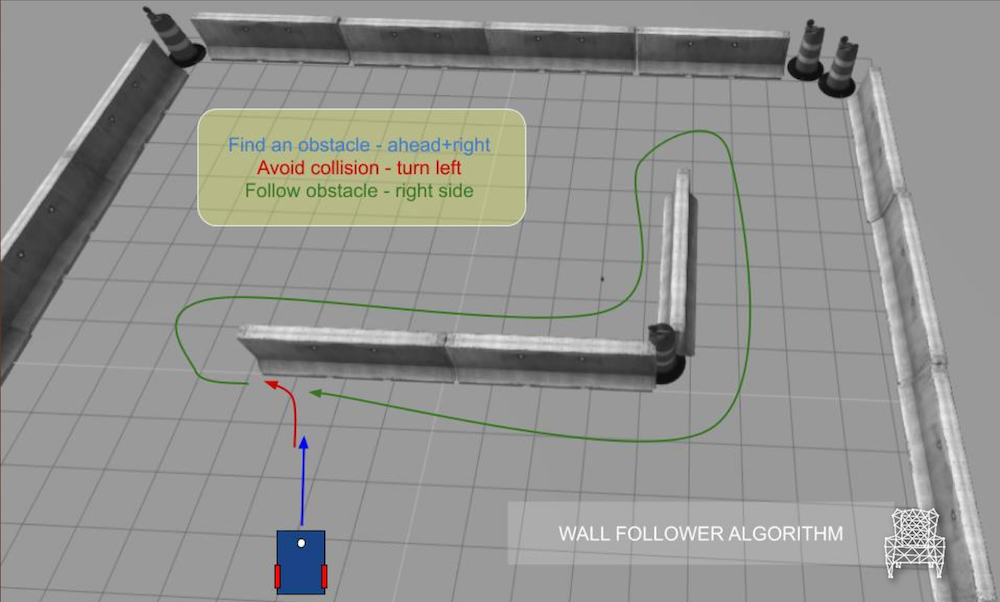
Our goal is to achieve the following behavior:
- Find the wall – Go straight+right until it reaches an obstacle
- Turn left, if there is no obstacle in front of the robot
- Go straight ahead, if there is an obstacle in the right side
Which is described in the image below:

Let’s start!
STEP 1
First things first, creating a new script file for the algorithm. I’m calling it follow_wall.py, and it goes into the folder ~/catkin_ws/src/motion_plan/scripts/.
Some necessary libraries for our script:
#! /usr/bin/env python

# import ros stuff
import rospy
from sensor_msgs.msg import LaserScan
from geometry_msgs.msg import Twist
from nav_msgs.msg import Odometry
from tf import transformations

import math
And just below, our global variables:
pub_ = None
regions_ = {
    'right': 0,
    'fright': 0,
    'front': 0,
    'fleft': 0,
    'left': 0,
}
state_ = 0
state_dict_ = {
    0: 'find the wall',
    1: 'turn left',
    2: 'follow the wall',
}
We are again separating the laser regions (right, front-right, front, front-left and left)
And our state_dict, which defines 3 main states: find the wall, turn left and follow the wall
STEP 2
Further, two necessary functions, but no magic or business logic here:
def clbk_laser(msg):
    global regions_
    regions_ = {
        'right':  min(min(msg.ranges[0:143]), 10),
        'fright': min(min(msg.ranges[144:287]), 10),
        'front':  min(min(msg.ranges[288:431]), 10),
        'fleft':  min(min(msg.ranges[432:575]), 10),
        'left':   min(min(msg.ranges[576:713]), 10),
    }

    take_action()


def change_state(state):
    global state_, state_dict_
    if state is not state_:
        print 'Wall follower - [%s] - %s' % (state, state_dict_[state])
        state_ = state
In the callback, we assign the means of the laser reading to the regions we defined
And the change_state is just a formal way to change the state, log and change the value of the variable state_
STEP 3
And now, we define the main function, the one that contains the logic of the wall following algorithm. It’s called here take_action:
def take_action():
    global regions_
    regions = regions_
    msg = Twist()
    linear_x = 0
    angular_z = 0

    state_description = ''

    d = 1.5

    if regions['front'] > d and regions['fleft'] > d and regions['fright'] > d:
        state_description = 'case 1 - nothing'
        change_state(0)
    elif regions['front'] < d and regions['fleft'] > d and regions['fright'] > d:
        state_description = 'case 2 - front'
        change_state(1)
    elif regions['front'] > d and regions['fleft'] > d and regions['fright'] < d:
        state_description = 'case 3 - fright'
        change_state(2)
    elif regions['front'] > d and regions['fleft'] < d and regions['fright'] > d:
        state_description = 'case 4 - fleft'
        change_state(0)
    elif regions['front'] < d and regions['fleft'] > d and regions['fright'] < d:
        state_description = 'case 5 - front and fright'
        change_state(1)
    elif regions['front'] < d and regions['fleft'] < d and regions['fright'] > d:
        state_description = 'case 6 - front and fleft'
        change_state(1)
    elif regions['front'] < d and regions['fleft'] < d and regions['fright'] < d:
        state_description = 'case 7 - front and fleft and fright'
        change_state(1)
    elif regions['front'] > d and regions['fleft'] < d and regions['fright'] < d:
        state_description = 'case 8 - fleft and fright'
        change_state(0)
    else:
        state_description = 'unknown case'
        rospy.loginfo(regions)
We are treating 8 possibilities of the three region readings of the laser (Like in the previous post, but now for a different behavior)
Switch to state Find the wall when:
- No obstacles detected
- Obstacle on the left side
- Obstacles on the left and right sides
For the state Turn left:
- Obstacles in front of the robot
- Obstacles in front and left of the robot
- Obstacles in front and right of the robot
- Obstacles in front, left and right of the robot
And finally, we change to the state Follow the wall when:
- Obstacle detected only on the right side of the robot
STEP 4
The next thing is to define the behavior of each state:
def find_wall():
    msg = Twist()
    msg.linear.x = 0.2
    msg.angular.z = -0.3
    return msg

def turn_left():
    msg = Twist()
    msg.angular.z = 0.3
    return msg

def follow_the_wall():
    global regions_

    msg = Twist()
    msg.linear.x = 0.5
    return msg
This is quite basic, but pay attention to the conventions!! Here we defined to keep the wall on the right side, so if you want to change this convention, you need to play with the signal of the variables. It’s also important it can change depending on the gazebo version and gazebo plugins you are using!! (E.g: During the development of this series, the gazebo version was changed from 4 to 7 and the Z-axis of the driver was changed!)
STEP 5
Finally, we just define our main function, where the main node, publishers, subscribers, and a loop, are defined:
def main():
    global pub_

    rospy.init_node('reading_laser')

    pub_ = rospy.Publisher('/cmd_vel', Twist, queue_size=1)

    sub = rospy.Subscriber('/m2wr/laser/scan', LaserScan, clbk_laser)

    rate = rospy.Rate(20)
    while not rospy.is_shutdown():
        msg = Twist()
        if state_ == 0:
            msg = find_wall()
        elif state_ == 1:
            msg = turn_left()
        elif state_ == 2:
            msg = follow_the_wall()
            pass
        else:
            rospy.logerr('Unknown state!')

        pub_.publish(msg)

        rate.sleep()

if __name__ == '__main__':
    main()
After having it running, you may have the robot going around one of the walls. Don’t forget to spawn the robot near to a wall, or just spawn it anywhere and change its position manually, using Gazebo interface.
You must have something like the below:
I hope you liked this post!
If something went wrong in the process of following this tutorial, you can clone the ROSject generated here.
In the next post, we are gonna work with the Bug 0 algorithm using the previous scripts we have created: Wall following + Go to point!
Keep following our channels!
Cheers
[irp posts=”13235″ name=”Exploring ROS with a 2 wheeled Robot #6 – Robot Motion Planning”]


0 Comments